Ford Escape: Multifunction Electronic Modules / Diagnosis and Testing - Body Control Module (BCM)
Diagnostic Trouble Code (DTC) Chart
Diagnostics in this manual assume a certain skill level and knowledge of Ford-specific diagnostic practices.
REFER to: Diagnostic Methods (100-00 General Information, Description and Operation).
| Module | DTC | Description | Action |
|---|---|---|---|
| BCM | B11D8:01 | Restraint Event Notification: General Electrical Failure | GO to Pinpoint Test A |
| BCM | B153F:01 | Power Distribution Box: General Electrical Failure | GO to Pinpoint Test B |
| BCM | B153F:08 | Power Distribution Box: Bus Signal/Message Failures | GO to Pinpoint Test B |
| BCM | B153F:49 | Power Distribution Box: Internal Electronic Failure | GO to Pinpoint Test B |
| BCM | B153F:9A | Power Distribution Box: Component or System Operating Conditions | GO to Pinpoint Test B |
| BCM | U0100:87 | Lost Communication With ECM/PCM 'A': Missing Message | GO to Pinpoint Test C |
| BCM | U0101:87 | Lost Communication with TCM: Missing Message | GO to Pinpoint Test D |
| BCM | U0121:87 | Lost Communication With Anti-Lock Brake System (ABS) Control Module 'A': Missing Message | GO to Pinpoint Test E |
| BCM | U0131:87 | Lost Communication With Power Steering Control Module 'A': Missing Message | GO to Pinpoint Test F |
| BCM | U0151:87 | Lost Communication With Restraints Control Module: Missing Message | GO to Pinpoint Test G |
| BCM | U0155:87 | Lost Communication With Instrument Panel Cluster (IPC) Control Module: Missing Message | GO to Pinpoint Test H |
| BCM | U0184:87 | Lost Communication With Radio: Missing Message | GO to Pinpoint Test I |
| BCM | U0198:87 | Lost Communication With Telematic Control Module 'A': Missing Message | GO to Pinpoint Test J |
| BCM | U0199:87 | Lost Communication With 'Door Control Module A': Missing Message | GO to Pinpoint Test K |
| BCM | U0200:87 | Lost Communication With 'Door Control Module B': Missing Message | GO to Pinpoint Test L |
| BCM | U0208:87 | Lost Communication With 'Seat Control Module A': Missing Message | GO to Pinpoint Test M |
| BCM | U0212:87 | Lost Communication With Steering Column Control Module: Missing Message | GO to Pinpoint Test N |
| BCM | U0230:87 | Lost Communication With Rear Gate Module: Missing Message | GO to Pinpoint Test O |
| BCM | U023A:87 | Lost Communication With Image Processing Module A: Missing Message | GO to Pinpoint Test P |
| BCM | U0252:87 | Lost Communication With Lighting Control Module- Rear 'B': Missing Message | GO to Pinpoint Test Q |
| BCM | U0253:87 | Lost Communication With Accessory Protocol Interface Module: Missing Message | GO to Pinpoint Test R |
| BCM | U0293:87 | Lost Communication With Hybrid/EV Powertrain Control Module 'A': Missing Message | GO to Pinpoint Test S |
| BCM | U1000:00 | Solid State Driver Protection Active -Driver Disabled: No Sub Type Information | GO to Pinpoint Test T |
| BCM | U2005:85 | Vehicle Speed: Signal Above Allowable Range | GO to Pinpoint Test U |
| BCM | U2100:00 | Initial Configuration Not Complete: No Sub Type Information | GO to Pinpoint Test V |
| BCM | U2101:00 | Control Module Configuration Incompatible: No Sub Type Information | GO to Pinpoint Test V |
| BCM | U2200:00 | Control Module Configuration Memory Corrupt: No Sub Type Information | GO to Pinpoint Test V |
| BCM | U3000:49 | Control Module: Internal Electronic Failure | GO to Pinpoint Test W |
| BCM | U3006:16 | Control Module Input Power 'A' Circuit/Open: Circuit Voltage Below Threshold | GO to Pinpoint Test X |
| BCM | U3006:17 | Control Module Input Power 'A' Circuit/Open: Circuit Voltage Above Threshold | GO to Pinpoint Test Z |
| BCM | U3006:1C | Control Module Input Power 'A' Circuit/Open: Circuit Voltage Out Of Range | GO to Pinpoint Test Y |
Symptom Chart
Symptom Chart: Multifunction Electronic Modules
Diagnostics in this manual assume a certain skill level and knowledge of Ford-specific diagnostic practices.
REFER to: Diagnostic Methods (100-00 General Information, Description and Operation).
| Condition | Possible Sources | Action |
| A module does not respond to the diagnostic scan tool | Refer to the Pinpoint Test |
REFER to: Communications Network (418-00 Module Communications Network, Diagnosis and Testing). |
Pinpoint Tests
|
Refer to Wiring Diagrams Cell 13 for schematic and connector information. Normal Operation and Fault Conditions The BCM monitors the RCM event status and verifies the voltage state is normal on the event notification circuit input. DTC Fault Trigger Conditions
Possible Sources
|
||||||||||
| A1 CONFIRM THE DTC (DIAGNOSTIC TROUBLE CODE) RESETS | ||||||||||
Is DTC B11D8:01 still present?
|
||||||||||
| A2 CHECK THE CIRCUIT FOR A SHORT TO VOLTAGE | ||||||||||
Is any voltage present?
|
||||||||||
| A3 CHECK THE CIRCUIT FOR SHORT TO GROUND | ||||||||||
Is the resistance greater than 10,000 ohms?
|
||||||||||
| A4 CHECK THE CIRCUIT FOR AN OPEN | ||||||||||
Is the resistance less than 1 ohm?
|
||||||||||
| A5 CHECK FOR CORRECT RCM (RESTRAINTS CONTROL MODULE) OPERATION | ||||||||||
Is the concern still present?
|
||||||||||
| A6 CHECK FOR CORRECT BCM (BODY CONTROL MODULE) OPERATION | ||||||||||
Is the concern still present?
|
.jpg)
.jpg)
|
Refer to Wiring Diagrams Cell 13 for schematic and connector information. Normal Operation and Fault Conditions The BCM monitors the BJB ignition status and verifies the battery voltage state is normal on the LIN communication circuit. DTC Fault Trigger Conditions
Possible Sources
|
||||||||||||||||
| B1 CONFIRM THE DTC (DIAGNOSTIC TROUBLE CODE) RESETS | ||||||||||||||||
Are DTCs still present?
|
||||||||||||||||
| B2 CHECK THE LIN (LOCAL INTERCONNECT NETWORK) CIRCUIT FOR A SHORT TO VOLTAGE | ||||||||||||||||
Is any voltage present?
|
||||||||||||||||
| B3 CHECK THE LIN (LOCAL INTERCONNECT NETWORK) CIRCUIT FOR SHORT TO GROUND | ||||||||||||||||
Is the resistance greater than 10,000 ohms?
|
||||||||||||||||
| B4 CHECK THE LIN (LOCAL INTERCONNECT NETWORK) CIRCUIT FOR AN OPEN | ||||||||||||||||
Is the resistance less than 3 ohms?
|
||||||||||||||||
| B5 CHECK FOR CORRECT BJB (BATTERY JUNCTION BOX) OPERATION | ||||||||||||||||
Is the concern still present?
|
||||||||||||||||
| B6 CHECK FOR CORRECT BCM (BODY CONTROL MODULE) OPERATION | ||||||||||||||||
Is the concern still present?
|
|
Refer to Wiring Diagrams Cell 14 for schematic and connector information. Normal Operation and Fault Conditions
REFER to: Communications Network - System Operation and Component
Description (418-00 Module Communications Network, Description and
Operation). DTC Fault Trigger Conditions
Possible Sources
NOTE: If new modules were installed prior to the DTC being set, the module configuration may be incorrectly set during the PMI or the PMI may not have been carried out. |
||||||
| C1 VERIFY THE DIAGNOSTIC SCAN TOOL COMMUNICATES WITH THE PCM (POWERTRAIN CONTROL MODULE) | ||||||
Can a vehicle session be established?
|
||||||
| C2 RECHECK THE BCM (BODY CONTROL MODULE) CONTINUOUS MEMORY DIAGNOSTIC TROUBLE CODES (CMDTCS) | ||||||
Is DTC U0100:87 retrieved again?
|
||||||
| C3 RETRIEVE THE PCM (POWERTRAIN CONTROL MODULE) DTCS FROM THE SELF-TEST | ||||||
Are any PCM system related DTCs present?
|
||||||
| C4 RETRIEVE THE BCM (BODY CONTROL MODULE) DTCS FROM THE SELF-TEST | ||||||
Are any BCM system related DTCs present?
|
||||||
| C5 CHECK FOR DTC (DIAGNOSTIC TROUBLE CODE) U0100:87 SET IN OTHER MODULES | ||||||
Is DTC U0100:87 set in other modules?
|
||||||
| C6 CHECK FOR CORRECT PCM (POWERTRAIN CONTROL MODULE) OPERATION | ||||||
Is the concern still present?
|
||||||
| C7 CHECK FOR CORRECT BCM (BODY CONTROL MODULE) OPERATION | ||||||
Is the concern still present?
|
.GIF)
 VIN required to access Guided Routine (PCM)
|
Refer to Wiring Diagrams Cell 14 for schematic and connector information. Normal Operation and Fault Conditions
REFER to: Communications Network - System Operation and Component
Description (418-00 Module Communications Network, Description and
Operation). DTC Fault Trigger Conditions
Possible Sources
NOTE: If new modules were installed prior to the DTC being set, the module configuration may be incorrectly set during the PMI or the PMI may not have been carried out. |
||||||
| D1 VERIFY THE DIAGNOSTIC SCAN TOOL COMMUNICATES WITH THE TCM (TRANSMISSION CONTROL MODULE) | ||||||
Can a vehicle session be established?
|
||||||
| D2 RECHECK THE BCM (BODY CONTROL MODULE) CONTINUOUS MEMORY DIAGNOSTIC TROUBLE CODES (CMDTCS) | ||||||
Is DTC U0101:87 retrieved again?
|
||||||
| D3 RETRIEVE THE TCM (TRANSMISSION CONTROL MODULE) DTCS FROM THE SELF-TEST | ||||||
Are any TCM system related DTCs present?
|
||||||
| D4 RETRIEVE THE BCM (BODY CONTROL MODULE) DTCS FROM THE SELF-TEST | ||||||
Are any BCM system related DTCs present?
|
||||||
| D5 CHECK FOR DTC (DIAGNOSTIC TROUBLE CODE) U0101:87 SET IN OTHER MODULES | ||||||
Is DTC U0101:87 set in other modules?
|
||||||
| D6 CHECK FOR CORRECT TCM (TRANSMISSION CONTROL MODULE) OPERATION | ||||||
Is the concern still present?
|
||||||
| D7 CHECK FOR CORRECT BCM (BODY CONTROL MODULE) OPERATION | ||||||
Is the concern still present?
|
|
Refer to Wiring Diagrams Cell 14 for schematic and connector information. Normal Operation and Fault Conditions
REFER to: Communications Network - System Operation and Component
Description (418-00 Module Communications Network, Description and
Operation). DTC Fault Trigger Conditions
Possible Sources
NOTE: If new modules were installed prior to the DTC being set, the module configuration may be incorrectly set during the PMI or the PMI may not have been carried out. |
||||||
| E1 CHECK THE COMMUNICATION NETWORK | ||||||
Does the ABS module pass the network test?
|
||||||
| E2 CHECK THE BCM (BODY CONTROL MODULE) CONTINUOUS MEMORY DIAGNOSTIC TROUBLE CODES (CMDTCS) | ||||||
Is DTC U3006:16 or U3006:17 recorded?
|
||||||
| E3 RETRIEVE THE ABS (ANTI-LOCK BRAKE SYSTEM) MODULE DTCS FROM THE SELF-TEST | ||||||
Are any ABS related DTCs present?
|
||||||
| E4 RECHECK THE BCM (BODY CONTROL MODULE) CMDTCS | ||||||
Is DTC U0121:87 still present?
|
||||||
| E5 CHECK FOR DTC (DIAGNOSTIC TROUBLE CODE) U0121:87 SET IN OTHER MODULES | ||||||
Is DTC U0121:87 set in other modules?
|
||||||
| E6 CHECK FOR CORRECT ABS (ANTI-LOCK BRAKE SYSTEM) MODULE OPERATION | ||||||
Is the concern still present?
|
||||||
| E7 CHECK FOR CORRECT BCM (BODY CONTROL MODULE) OPERATION | ||||||
Is the concern still present?
|
|
Refer to Wiring Diagrams Cell 14 for schematic and connector information. Normal Operation and Fault Conditions
REFER to: Communications Network - System Operation and Component
Description (418-00 Module Communications Network, Description and
Operation). DTC Fault Trigger Conditions
Possible Sources
NOTE: If new modules were installed prior to the DTC being set, the module configuration may be incorrectly set during the PMI or the PMI may not have been carried out. |
||||||
| F1 CHECK THE COMMUNICATION NETWORK | ||||||
Does the PSCM pass the network test?
|
||||||
| F2 CHECK THE BCM (BODY CONTROL MODULE) CONTINUOUS MEMORY DIAGNOSTIC TROUBLE CODES (CMDTCS) | ||||||
Is DTC U3006:16 or U3006:17 recorded?
|
||||||
| F3 RETRIEVE THE PSCM (POWER STEERING CONTROL MODULE) DTCS FROM THE SELF-TEST | ||||||
Are any PSCM system related DTCs present?
|
||||||
| F4 RECHECK THE BCM (BODY CONTROL MODULE) CMDTCS | ||||||
Is DTC U0131:87 still present?
|
||||||
| F5 CHECK FOR DTC (DIAGNOSTIC TROUBLE CODE) U0131:87 SET IN OTHER MODULES | ||||||
Is DTC U0131:87 set in other modules?
|
||||||
| F6 CHECK FOR CORRECT PSCM (POWER STEERING CONTROL MODULE) OPERATION | ||||||
Is the concern still present?
|
||||||
| F7 CHECK FOR CORRECT BCM (BODY CONTROL MODULE) OPERATION | ||||||
Is the concern still present?
|
|
Refer to Wiring Diagrams Cell 14 for schematic and connector information. Normal Operation and Fault Conditions
REFER to: Communications Network - System Operation and Component
Description (418-00 Module Communications Network, Description and
Operation). DTC Fault Trigger Conditions
Possible Sources
NOTE: If new modules were installed prior to the DTC being set, the module configuration may be incorrectly set during the PMI or the PMI may not have been carried out. |
||||||
| G1 CHECK THE COMMUNICATION NETWORK | ||||||
Does the RCM pass the network test?
|
||||||
| G2 CHECK THE BCM (BODY CONTROL MODULE) CONTINUOUS MEMORY DIAGNOSTIC TROUBLE CODES (CMDTCS) | ||||||
Is DTC U3006:16 or U3006:17 recorded?
|
||||||
| G3 RETRIEVE THE RCM (RESTRAINTS CONTROL MODULE) DTCS | ||||||
Are any RCM system related DTCs present?
|
||||||
| G4 RECHECK THE BCM (BODY CONTROL MODULE) CMDTCS | ||||||
Is DTC U0151:87 still present?
|
||||||
| G5 CHECK FOR DTC (DIAGNOSTIC TROUBLE CODE) U0151:87 SET IN OTHER MODULES | ||||||
Is DTC U0151:87 set in other modules?
|
||||||
| G6 CHECK FOR CORRECT RCM (RESTRAINTS CONTROL MODULE) OPERATION | ||||||
Is the concern still present?
|
||||||
| G7 CHECK FOR CORRECT BCM (BODY CONTROL MODULE) OPERATION | ||||||
Is the concern still present?
|
|
Refer to Wiring Diagrams Cell 14 for schematic and connector information. Normal Operation and Fault Conditions
REFER to: Communications Network - System Operation and Component
Description (418-00 Module Communications Network, Description and
Operation). DTC Fault Trigger Conditions
Possible Sources
NOTE: If new modules were installed prior to the DTC being set, the module configuration may be incorrectly set during the PMI or the PMI may not have been carried out. |
||||||
| H1 CHECK THE COMMUNICATION NETWORK | ||||||
Does the IPC pass the network test?
|
||||||
| H2 CHECK THE BCM (BODY CONTROL MODULE) CONTINUOUS MEMORY DIAGNOSTIC TROUBLE CODES (CMDTCS) | ||||||
Is DTC U3006:16 or U3006:17 recorded?
|
||||||
| H3 RETRIEVE THE IPC (INSTRUMENT PANEL CLUSTER) MODULE DTCS | ||||||
Are any IPC system related DTCs present?
|
||||||
| H4 RECHECK THE BCM (BODY CONTROL MODULE) CMDTCS | ||||||
Is DTC U0155:87 still present?
|
||||||
| H5 CHECK FOR DTC (DIAGNOSTIC TROUBLE CODE) U0155:87 SET IN OTHER MODULES | ||||||
Is DTC U0155:87 set in other modules?
|
||||||
| H6 CHECK FOR CORRECT IPC (INSTRUMENT PANEL CLUSTER) OPERATION | ||||||
Is the concern still present?
|
||||||
| H7 CHECK FOR CORRECT BCM (BODY CONTROL MODULE) OPERATION | ||||||
Is the concern still present?
|
|
Refer to Wiring Diagrams Cell 14 for schematic and connector information. Normal Operation and Fault Conditions
REFER to: Communications Network - System Operation and Component
Description (418-00 Module Communications Network, Description and
Operation). DTC Fault Trigger Conditions
Possible Sources
NOTE: If new modules were installed prior to the DTC being set, the module configuration may be incorrectly set during the PMI or the PMI may not have been carried out. |
||||||
| I1 CHECK THE COMMUNICATION NETWORK | ||||||
Does the ACM pass the network test?
|
||||||
| I2 CHECK THE BCM (BODY CONTROL MODULE) CONTINUOUS MEMORY DIAGNOSTIC TROUBLE CODES (CMDTCS) | ||||||
Is DTC U3006:16 or U3006:17 recorded?
|
||||||
| I3 RETRIEVE THE ACM (AUDIO FRONT CONTROL MODULE) DTCS | ||||||
Are any ACM system related DTCs present?
|
||||||
| I4 RECHECK THE BCM (BODY CONTROL MODULE) CMDTCS | ||||||
Is DTC U0184:87 still present?
|
||||||
| I5 CHECK FOR DTC (DIAGNOSTIC TROUBLE CODE) U0184:87 SET IN OTHER MODULES | ||||||
Is DTC U0184:87 set in other modules?
|
||||||
| I6 CHECK FOR CORRECT ACM (AUDIO FRONT CONTROL MODULE) OPERATION | ||||||
Is the concern still present?
|
||||||
| I7 CHECK FOR CORRECT BCM (BODY CONTROL MODULE) OPERATION | ||||||
Is the concern still present?
|
|
Refer to Wiring Diagrams Cell 14 for schematic and connector information. Normal Operation and Fault Conditions
REFER to: Communications Network - System Operation and Component
Description (418-00 Module Communications Network, Description and
Operation). DTC Fault Trigger Conditions
Possible Sources
NOTE: If new modules were installed prior to the DTC being set, the module configuration may be incorrectly set during the PMI or the PMI may not have been carried out. |
||||||
| J1 CHECK THE COMMUNICATION NETWORK | ||||||
Does the TCU pass the network test?
|
||||||
| J2 CHECK THE BCM (BODY CONTROL MODULE) CONTINUOUS MEMORY DIAGNOSTIC TROUBLE CODES (CMDTCS) | ||||||
Is DTC U3006:16 or U3006:17 recorded?
|
||||||
| J3 RETRIEVE THE TCU (TELEMATIC CONTROL UNIT MODULE) DTCS | ||||||
Are any TCU system related DTCs present?
|
||||||
| J4 RECHECK THE BCM (BODY CONTROL MODULE) CMDTCS | ||||||
Is DTC U0198:87 still present?
|
||||||
| J5 CHECK FOR DTC (DIAGNOSTIC TROUBLE CODE) U0198:87 SET IN OTHER MODULES | ||||||
Is DTC U0198:87 set in other modules?
|
||||||
| J6 CHECK FOR CORRECT TCU (TELEMATIC CONTROL UNIT MODULE) OPERATION | ||||||
Is the concern still present?
|
||||||
| J7 CHECK FOR CORRECT BCM (BODY CONTROL MODULE) OPERATION | ||||||
Is the concern still present?
|
|
Refer to Wiring Diagrams Cell 14 for schematic and connector information. Normal Operation and Fault Conditions
REFER to: Communications Network - System Operation and Component
Description (418-00 Module Communications Network, Description and
Operation). DTC Fault Trigger Conditions
Possible Sources
NOTE: If new modules were installed prior to the DTC being set, the module configuration may be incorrectly set during the PMI or the PMI may not have been carried out. |
||||||
| K1 CHECK THE COMMUNICATION NETWORK | ||||||
Does the DDM pass the network test?
|
||||||
| K2 CHECK THE BCM (BODY CONTROL MODULE) CMDTCS | ||||||
Is DTC U3006:16 or U3006:17 recorded?
|
||||||
| K3 RETRIEVE THE DDM (DRIVER DOOR MODULE) DTCS | ||||||
Are any DDM system related DTCs present?
|
||||||
| K4 RECHECK THE BCM (BODY CONTROL MODULE) CMDTCS | ||||||
Is DTC U0199:87 still present?
|
||||||
| K5 CHECK FOR DTC (DIAGNOSTIC TROUBLE CODE) U0199:87 SET IN OTHER MODULES | ||||||
Is DTC U0199:87 set in other modules?
|
||||||
| K6 CHECK FOR CORRECT DDM (DRIVER DOOR MODULE) OPERATION | ||||||
Is the concern still present?
|
||||||
| K7 CHECK FOR CORRECT BCM (BODY CONTROL MODULE) OPERATION | ||||||
Is the concern still present?
|
|
Refer to Wiring Diagrams Cell 14 for schematic and connector information. Normal Operation and Fault Conditions
REFER to: Communications Network - System Operation and Component
Description (418-00 Module Communications Network, Description and
Operation). DTC Fault Trigger Conditions
Possible Sources
NOTE: If new modules were installed prior to the DTC being set, the module configuration may be incorrectly set during the PMI or the PMI may not have been carried out. |
||||||
| L1 CHECK THE COMMUNICATION NETWORK | ||||||
Does the PDM pass the network test?
|
||||||
| L2 CHECK THE BCM (BODY CONTROL MODULE) CONTINUOUS MEMORY DIAGNOSTIC TROUBLE CODES (CMDTCS) | ||||||
Is DTC U3006:16 or U3006:17 recorded?
|
||||||
| L3 RETRIEVE THE PDM (PASSENGER DOOR MODULE) DTCS | ||||||
Are any PDM system related DTCs present?
|
||||||
| L4 RECHECK THE BCM (BODY CONTROL MODULE) CMDTCS | ||||||
Is DTC U0200:87 still present?
|
||||||
| L5 CHECK FOR DTC (DIAGNOSTIC TROUBLE CODE) U0200:87 SET IN OTHER MODULES | ||||||
Is DTC U0200:87 set in other modules?
|
||||||
| L6 CHECK FOR CORRECT PDM (PASSENGER DOOR MODULE) OPERATION | ||||||
Is the concern still present?
|
||||||
| L7 CHECK FOR CORRECT BCM (BODY CONTROL MODULE) OPERATION | ||||||
Is the concern still present?
|
|
Refer to Wiring Diagrams Cell 14 for schematic and connector information. Normal Operation and Fault Conditions
REFER to: Communications Network - System Operation and Component
Description (418-00 Module Communications Network, Description and
Operation). DTC Fault Trigger Conditions
Possible Sources
NOTE: If new modules were installed prior to the DTC being set, the module configuration may be incorrectly set during the PMI or the PMI may not have been carried out. |
||||||
| M1 CHECK THE COMMUNICATION NETWORK | ||||||
Does the DSM pass the network test?
|
||||||
| M2 CHECK THE BCM (BODY CONTROL MODULE) CONTINUOUS MEMORY DIAGNOSTIC TROUBLE CODES (CMDTCS) | ||||||
Is DTC U3006:16 or U3006:17 recorded?
|
||||||
| M3 RETRIEVE THE DSM (DRIVER FRONT SEAT MODULE) DTCS | ||||||
Are any DSM system related DTCs present?
|
||||||
| M4 RECHECK THE BCM (BODY CONTROL MODULE) CMDTCS | ||||||
Is DTC U0208:87 still present?
|
||||||
| M5 CHECK FOR DTC (DIAGNOSTIC TROUBLE CODE) U0208:87 SET IN OTHER MODULES | ||||||
Is DTC U0208:87 set in other modules?
|
||||||
| M6 CHECK FOR CORRECT DSM (DRIVER FRONT SEAT MODULE) OPERATION | ||||||
Is the concern still present?
|
||||||
| M7 CHECK FOR CORRECT BCM (BODY CONTROL MODULE) OPERATION | ||||||
Is the concern still present?
|
|
Refer to Wiring Diagrams Cell 14 for schematic and connector information. Normal Operation and Fault Conditions
REFER to: Communications Network - System Operation and Component
Description (418-00 Module Communications Network, Description and
Operation). DTC Fault Trigger Conditions
Possible Sources
|
||||||
| N1 CHECK THE COMMUNICATION NETWORK | ||||||
Does the SCCM pass the network test?
|
||||||
| N2 CHECK THE BCM (BODY CONTROL MODULE) CONTINUOUS MEMORY DIAGNOSTIC TROUBLE CODES (CMDTCS) | ||||||
Is DTC U3006:16 or U3006:17 recorded?
|
||||||
| N3 RETRIEVE THE SCCM (STEERING COLUMN CONTROL MODULE) DTCS | ||||||
Are any SCCM system related DTCs present?
|
||||||
| N4 RECHECK THE BCM (BODY CONTROL MODULE) CMDTCS | ||||||
Is DTC U0212:87 still present?
|
||||||
| N5 CHECK FOR DTC (DIAGNOSTIC TROUBLE CODE) U0212:87 SET IN OTHER MODULES | ||||||
Is DTC U0212:87 set in other modules?
|
||||||
| N6 CHECK FOR CORRECT SCCM (STEERING COLUMN CONTROL MODULE) OPERATION | ||||||
Is the concern still present?
|
||||||
| N7 CHECK FOR CORRECT BCM (BODY CONTROL MODULE) OPERATION | ||||||
Is the concern still present?
|
|
Refer to Wiring Diagrams Cell 14 for schematic and connector information. Normal Operation and Fault Conditions
REFER to: Communications Network - System Operation and Component
Description (418-00 Module Communications Network, Description and
Operation). DTC Fault Trigger Conditions
Possible Sources
|
||||||
| O1 CHECK THE COMMUNICATION NETWORK | ||||||
Does the RGTM pass the network test?
|
||||||
| O2 CHECK THE BCM (BODY CONTROL MODULE) CONTINUOUS MEMORY DIAGNOSTIC TROUBLE CODES (CMDTCS) | ||||||
Is DTC U3006:16 or U3006:17 recorded?
|
||||||
| O3 RETRIEVE THE RGTM (REAR GATE TRUNK MODULE) DTCS | ||||||
Are any RGTM module system related DTCs present?
|
||||||
| O4 RECHECK THE BCM (BODY CONTROL MODULE) CMDTCS | ||||||
Is DTC U0230:87 still present?
|
||||||
| O5 CHECK FOR DTC (DIAGNOSTIC TROUBLE CODE) U0230:87 SET IN OTHER MODULES | ||||||
Is DTC U0230:87 set in other modules?
|
||||||
| O6 CHECK FOR CORRECT RGTM (REAR GATE TRUNK MODULE) OPERATION | ||||||
Is the concern still present?
|
||||||
| O7 CHECK FOR CORRECT BCM (BODY CONTROL MODULE) OPERATION | ||||||
Is the concern still present?
|
|
Refer to Wiring Diagrams Cell 14 for schematic and connector information. Normal Operation and Fault Conditions
REFER to: Communications Network - System Operation and Component
Description (418-00 Module Communications Network, Description and
Operation). DTC Fault Trigger Conditions
Possible Sources
|
||||||
| P1 CHECK THE COMMUNICATION NETWORK | ||||||
Does the IPMA pass the network test?
|
||||||
| P2 CHECK THE BCM (BODY CONTROL MODULE) CONTINUOUS MEMORY DIAGNOSTIC TROUBLE CODES (CMDTCS) | ||||||
Is DTC U3006:16 or U3006:17 recorded?
|
||||||
| P3 RETRIEVE THE IPMA (IMAGE PROCESSING MODULE A) DTCS | ||||||
Are any IPMA system related DTCs present?
|
||||||
| P4 RECHECK THE BCM (BODY CONTROL MODULE) CMDTCS | ||||||
Is DTC U023A:87 still present?
|
||||||
| P5 CHECK FOR DTC (DIAGNOSTIC TROUBLE CODE) U023A:87 SET IN OTHER MODULES | ||||||
Is DTC U023A:87 set in other modules?
|
||||||
| P6 CHECK FOR CORRECT IPMA (IMAGE PROCESSING MODULE A) OPERATION | ||||||
Is the concern still present?
|
||||||
| P7 CHECK FOR CORRECT BCM (BODY CONTROL MODULE) OPERATION | ||||||
Is the concern still present?
|
|
Refer to Wiring Diagrams Cell 14 for schematic and connector information. Normal Operation and Fault Conditions
REFER to: Communications Network - System Operation and Component
Description (418-00 Module Communications Network, Description and
Operation). DTC Fault Trigger Conditions
Possible Sources
|
||||||
| Q1 CHECK THE COMMUNICATION NETWORK | ||||||
Does the TRM pass the network test?
|
||||||
| Q2 CHECK THE BCM (BODY CONTROL MODULE) CONTINUOUS MEMORY DIAGNOSTIC TROUBLE CODES (CMDTCS) | ||||||
Is DTC U3006:16 or U3006:17 recorded?
|
||||||
| Q3 RETRIEVE THE TRM (TRAILER MODULE) DTCS | ||||||
Are any TRM system related DTCs present?
|
||||||
| Q4 RECHECK THE BCM (BODY CONTROL MODULE) CMDTCS | ||||||
Is DTC U0252:87 still present?
|
||||||
| Q5 CHECK FOR DTC (DIAGNOSTIC TROUBLE CODE) U0252:87 SET IN OTHER MODULES | ||||||
Is DTC U0252:87 set in other modules?
|
||||||
| Q6 CHECK FOR CORRECT TRM (TRAILER MODULE) OPERATION | ||||||
Is the concern still present?
|
||||||
| Q7 CHECK FOR CORRECT BCM (BODY CONTROL MODULE) OPERATION | ||||||
Is the concern still present?
|
|
Refer to Wiring Diagrams Cell 14 for schematic and connector information. Normal Operation and Fault Conditions
REFER to: Communications Network - System Operation and Component
Description (418-00 Module Communications Network, Description and
Operation). DTC Fault Trigger Conditions
Possible Sources
|
||||||
| R1 CHECK THE COMMUNICATION NETWORK | ||||||
Does the APIM pass the network test?
|
||||||
| R2 CHECK THE BCM (BODY CONTROL MODULE) CONTINUOUS MEMORY DIAGNOSTIC TROUBLE CODES (CMDTCS) | ||||||
Is DTC U3006:16 or U3006:17 recorded?
|
||||||
| R3 RETRIEVE THE APIM (SYNC MODULE) DTCS | ||||||
Are any APIM system related DTCs present?
|
||||||
| R4 RECHECK THE BCM (BODY CONTROL MODULE) CMDTCS | ||||||
Is DTC U0253:87 still present?
|
||||||
| R5 CHECK FOR DTC (DIAGNOSTIC TROUBLE CODE) U0253:87 SET IN OTHER MODULES | ||||||
Is DTC U0253:87 set in other modules?
|
||||||
| R6 CHECK FOR CORRECT APIM (SYNC MODULE) OPERATION | ||||||
Is the concern still present?
|
||||||
| R7 CHECK FOR CORRECT BCM (BODY CONTROL MODULE) OPERATION | ||||||
Is the concern still present?
|
|
Refer to Wiring Diagrams Cell 14 for schematic and connector information. Normal Operation and Fault Conditions
REFER to: Communications Network - System Operation and Component
Description (418-00 Module Communications Network, Description and
Operation). DTC Fault Trigger Conditions
Possible Sources
|
||||||
| S1 CHECK THE COMMUNICATION NETWORK | ||||||
Does the SOBDMC pass the network test?
|
||||||
| S2 CHECK THE BCM (BODY CONTROL MODULE) CONTINUOUS MEMORY DIAGNOSTIC TROUBLE CODES (CMDTCS) | ||||||
Is DTC U3006:16 or U3006:17 recorded?
|
||||||
| S3 RETRIEVE THE SOBDMC (SECONDARY ON-BOARD DIAGNOSTIC CONTROL MODULE C) DTCS | ||||||
Are any SOBDMC system related DTCs present?
|
||||||
| S4 RECHECK THE BCM (BODY CONTROL MODULE) CMDTCS | ||||||
Is DTC U0293:87 still present?
|
||||||
| S5 CHECK FOR DTC (DIAGNOSTIC TROUBLE CODE) U0293:87 SET IN OTHER MODULES | ||||||
Is DTC U0293:87 set in other modules?
|
||||||
| S6 CHECK FOR CORRECT SOBDMC (SECONDARY ON-BOARD DIAGNOSTIC CONTROL MODULE C) OPERATION | ||||||
Is the concern still present?
|
||||||
| S7 CHECK FOR CORRECT BCM (BODY CONTROL MODULE) OPERATION | ||||||
Is the concern still present?
|
|
Normal Operation and Fault Conditions The BCM
uses solid state drivers (Field Effect Transistors (FET)) to control
the output of several vehicle systems. When an overload occurs on any of
these drivers, the BCM
disables the output and tracks the number of repetitive faults on each
of these circuits. The module compares this number of overloads to three
progressive thresholds established for each circuit. At each threshold,
DTC U1000:00 sets along with the DTC associated with the affected
circuit. For additional information, REFER to: Module Controlled
Functions - Overview (419-10 Multifunction Electronic Modules,
Description and Operation). DTC Fault Trigger Conditions
Possible Sources
|
||||||
| T1 REVIEW THE DIAGNOSTIC TROUBLE CODES (DTCS) | ||||||
Are any DTCs present besides U1000:00?
|
||||||
| T2 REPEAT THE BCM (BODY CONTROL MODULE) SELF-TEST | ||||||
Is DTC U1000:00 still present?
|
|
Normal Operation and Fault Conditions The BCM monitores various inputs from all modules that communicate in the CAN . When a vehicle speed signal is detected while the vehicle is stationary, the BCM triggers DTC U2005:85. DTC Fault Trigger Conditions
Possible Sources
|
||||||
| U1 CONFIRM THE DTC (DIAGNOSTIC TROUBLE CODE) RESETS | ||||||
Is DTC U2005:85 still present?
|
||||||
| U2 REPEAT THE BCM (BODY CONTROL MODULE) SELF-TEST | ||||||
Is DTC U2005:85 still present?
|
|
Normal Operation and Fault Conditions The BCM as well as all control modules that are programmable must have the correct As-Built data installed. DTC Fault Trigger Conditions
Possible Sources
|
||||||||||||
| V1 CONFIRM THE DTC (DIAGNOSTIC TROUBLE CODE) RESETS | ||||||||||||
Is DTC U2100:00, U2101:00 and/or U2200:00 still present?
|
||||||||||||
| V2 INSTALL BCM (BODY CONTROL MODULE) PMI (PROGRAMMABLE MODULE INSTALLATION) | ||||||||||||
Is DTC U2100:00, U2101:00 and/or U2200:00 still present?
|
|
Normal Operation and Fault Conditions DTC Fault Trigger Conditions
Possible Sources
|
||||||
| W1 CONFIRM THE DTC (DIAGNOSTIC TROUBLE CODE) RESETS | ||||||
Is DTC U3000:49 still present?
|
||||||
| W2 INSTALL BCM (BODY CONTROL MODULE) PMI (PROGRAMMABLE MODULE INSTALLATION) | ||||||
Is DTC U3000:49 still present?
|
|
Refer to Wiring Diagrams Cell 10 for schematic and connector information. Refer to Wiring Diagrams Cell 13 for schematic and connector information. Normal Operation and Fault Conditions The BCM receives battery voltage at all times from the High Current BJB . DTC Fault Trigger Conditions
Possible Sources
|
||||||||||||||||
| X1 CHECK THE BCM (BODY CONTROL MODULE) DIAGNOSTIC TROUBLE CODES (DTCS) | ||||||||||||||||
Is DTC U3006:16 still present?
|
||||||||||||||||
| X2 CHECK FOR CHARGING SYSTEM DTCS SET IN OTHER MODULES | ||||||||||||||||
Are any charging system DTCs present?
|
||||||||||||||||
| X3 CHECK THE BATTERY CONDITION AND STATE OF CHARGE | ||||||||||||||||
Is the battery OK and fully charged?
|
||||||||||||||||
| X4 COMPARE THE BCM (BODY CONTROL MODULE) BATTERY VOLTAGE PID (PARAMETER IDENTIFICATION) WITH ACTUAL BATTERY VOLTAGE | ||||||||||||||||
Is the recorded battery voltage within 0.2 volt of the Access the BCM and monitor the VPWR_RAW (V) PID ?
|
||||||||||||||||
| X5 CHECK THE BCM (BODY CONTROL MODULE) VOLTAGE SUPPLY CIRCUITS | ||||||||||||||||
Are the voltages within 0.2 volt of the recorded battery voltage?
|
||||||||||||||||
| X6 CHECK THE BCM (BODY CONTROL MODULE) PROCESSOR GROUNDS | ||||||||||||||||
Are the resistances less than 3 ohms?
|
||||||||||||||||
| X7 CHECK FOR CORRECT BCM (BODY CONTROL MODULE) OPERATION | ||||||||||||||||
Is the concern still present?
|
.jpg)
.jpg)
|
Refer to Wiring Diagrams Cell 10 for schematic and connector information. Refer to Wiring Diagrams Cell 13 for schematic and connector information. Normal Operation and Fault Conditions The BCM receives battery voltage at all times from the High Current BJB . DTC Fault Trigger Conditions
Possible Sources
|
||||||||||||||||
| Y1 CHECK THE BCM (BODY CONTROL MODULE) FOR CHARGING SYSTEM DIAGNOSTIC TROUBLE CODES (DTCS) | ||||||||||||||||
Are there any charging system DTCs present?
|
||||||||||||||||
| Y2 CHECK FOR CHARGING SYSTEM DTCS SET IN OTHER MODULES | ||||||||||||||||
Are there any charging system DTCs present in other modules?
|
||||||||||||||||
| Y3 CHECK THE BATTERY VOLTAGE | ||||||||||||||||
Does the battery voltage rise to 16 volts or higher?
|
||||||||||||||||
| Y4 RECHECK THE BCM (BODY CONTROL MODULE) DTCS | ||||||||||||||||
Is DTC U3006:1C present?
|
||||||||||||||||
| Y5 CHECK THE BATTERY CONDITION AND STATE OF CHARGE | ||||||||||||||||
Is the battery OK and fully charged?
|
||||||||||||||||
| Y6 COMPARE THE BCM (BODY CONTROL MODULE) BATTERY VOLTAGE PID (PARAMETER IDENTIFICATION) WITH ACTUAL BATTERY VOLTAGE | ||||||||||||||||
Is the recorded battery voltage within 0.2 volt of the Access the BCM and monitor the VPWR_RAW (V) PID ?
|
||||||||||||||||
| Y7 CHECK THE BCM (BODY CONTROL MODULE) VOLTAGE SUPPLY CIRCUIT | ||||||||||||||||
Is the voltage within 0.2 volt of the recorded battery voltage?
|
||||||||||||||||
| Y8 CHECK THE BCM (BODY CONTROL MODULE) PROCESSOR GROUNDS | ||||||||||||||||
Are the resistances less than 3 ohms?
|
||||||||||||||||
| Y9 CHECK FOR CORRECT BCM (BODY CONTROL MODULE) OPERATION | ||||||||||||||||
Is the concern still present?
|
|
Refer to Wiring Diagrams Cell 10 for schematic and connector information. Refer to Wiring Diagrams Cell 13 for schematic and connector information. Normal Operation and Fault Conditions The BCM receives battery voltage at all times from the High Current BJB . DTC Fault Trigger Conditions
Possible Sources
|
||||||||||
| Z1 CHECK FOR CHARGING SYSTEM DIAGNOSTIC TROUBLE CODES (DTCS) SET IN OTHER MODULES | ||||||||||
Are any charging system DTCs present in other modules?
|
||||||||||
| Z2 CHECK THE BATTERY VOLTAGE | ||||||||||
Does the battery voltage rise to 16 volts or higher?
|
||||||||||
| Z3 RECHECK THE BCM (BODY CONTROL MODULE) CONTINUOUS MEMORY DIAGNOSTIC TROUBLE CODES (CMDTCS) | ||||||||||
Is DTC U3006:17 present?
|
||||||||||
| Z4 CHECK FOR CORRECT BCM (BODY CONTROL MODULE) OPERATION | ||||||||||
Is the concern still present?
|
 Description and Operation - Module Controlled Functions - System Operation and Component Description
System Operation
BCM
The BCM
controls various systems by monitoring inputs from switches, sensors
and network messages from other modules and components on the HS-CAN1 ,
LIN and the GWM ...
 Diagnosis and Testing - Body Control Module C (BCMC)
Diagnostic Trouble Code (DTC) Chart
Diagnostics in this manual assume a certain skill level and knowledge of Ford-specific diagnostic practices. REFER to: Diagnostic Methods (100-00 General Information, Description and Operation)...
Other information:
Ford Escape 2020-2026 Service Manual: Removal and Installation - Rear Door Window Control Switch
Special Tool(s) / General Equipment Interior Trim Remover Removal NOTE: LH (left-hand) side shown, RH (right-hand) side similar. Remove the rear door window control switch bezel assembly. Starting from the front, release the locking tabs from the rear door window control switch bezel assembly...
Ford Escape 2020-2026 Owners Manual: Playing or Pausing the Audio Source. Adjusting the Volume. Switching Shuffle Mode On and Off. Switching Repeat Mode On and Off
Playing or Pausing the Audio Source Press to pause playback. Press again to resume playback. Note: Not all sources can be paused. Adjusting the Volume Turn to adjust the volume. Switching Shuffle Mode On and Off Press the button on the touchscreen to switch shuffle mode on or off...
Categories
- Manuals Home
- 4th Generation Ford Escape Owners Manual
- 4th Generation Ford Escape Service Manual
- Rear View Camera
- Power Outlet - Vehicles With: 12V Power Outlet
- Adjusting the Headlamps
- New on site
- Most important about car
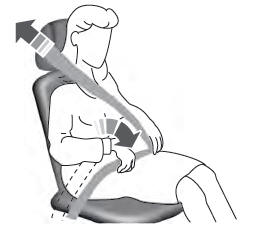
Adjusting the Seatbelts During Pregnancy
WARNING: Always ride and drive with your seatback upright and properly fasten your seatbelt. Fit the lap portion of the seatbelt snugly and low across the hips. Position the shoulder portion of the seatbelt across your chest. Pregnant women must follow this practice. See the following figure.