Ford Escape 2020-2026 Service Manual / Body and Paint / Body and Paint / Bumpers / Disassembly and Assembly - Rear Bumper Cover
Ford Escape: Bumpers / Disassembly and Assembly - Rear Bumper Cover
DISASSEMBLY
-
Remove the rear bumper cover.
Refer to: Rear Bumper Cover (501-19 Bumpers, Removal and Installation).
-
-
Disconnect the hands-free liftgate module electrical connector.
-
Disconnect the rear park aid sensor electrical connectors.
-
Disconnect the rear active park assist sensor electrical connectors.
-
Disconnect the hands-free liftgate module electrical connector.
.jpg) |
-
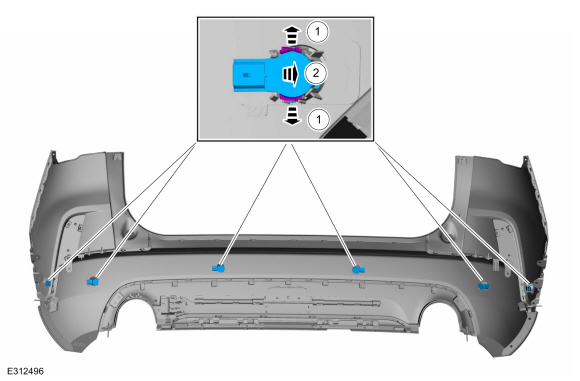
Separate the harness guides, harness retainers and remove the rear bumper cover harness.
.jpg) |
-
NOTE: Make sure that the isolator rings are installed correctly while installing the sensors.
If equipped.
Remove the rear parking aid sensors and rear active park assist sensors.
-
Release the tabs.
-
Remove the rear parking aid sensors and rear active park assist sensors from the bracket.
-
Release the tabs.
 |
-
Drill the rivets, release the tabs and remove the lower rear bumper cover valence.
.jpg) |
-
If equipped.
Disconnect the electrical connectors, remove the screws and remove the hands-free liftgate module.
.jpg) |
-
If equipped.
Remove the push pins, the brackets and the lower hands-free liftgate sensor.
.jpg) |
-
If equipped.
Remove the upper hands-free liftgate sensor.
.jpg) |
-
On both sides.
Release the tabs and remove the rear reflectors.
.jpg) |
-
On both sides.
Drill the rivets, release the tabs, remove the spring clips, remove the bolts and remove the side valance.
.jpg) |
ASSEMBLY
-
To install, reverse the removal procedure.
-
If equipped.
Carry out the azimuth and elevation system checks.
Refer to: Azimuth System Check (413-13A Parking Aid - Vehicles With: Rear Parking Aid, General Procedures).
Refer to: Elevation System Check (413-13A Parking Aid - Vehicles With: Rear Parking Aid, General Procedures).
-
If equipped.
Carry out the azimuth system check.
Refer to: Azimuth System Check (413-13C Parking Aid - Vehicles With: Active Park Assist, General Procedures).
-
If equipped.
If any sensor fails the check, diagnose the sensor fault.
Refer to: Parking Aid (413-13A Parking Aid - Vehicles With: Rear Parking Aid, Diagnosis and Testing).
-
If equipped.
If any sensor fails the check, diagnose the sensor fault.
Refer to: Parking Aid (413-13C Parking Aid - Vehicles With: Active Park Assist, Diagnosis and Testing).
 Disassembly and Assembly - Front Bumper Cover
Special Tool(s) /
General Equipment
Hot Air Gun
DISASSEMBLY
Remove the front bumper cover.
Refer to: Front Bumper Cover (501-19 Bumpers, Removal and Installation)...

Other information:
Ford Escape 2020-2026 Service Manual: Removal and Installation - Ambient Air Temperature Sensor
Removal NOTE: Removal steps in this procedure may contain installation details. With the vehicle in NEUTRAL, position it on a hoist. Refer to: Jacking and Lifting - Overview (100-02 Jacking and Lifting, Description and Operation). Disconnect the electrical connector. Detach and remove the ambient air temperature sensor. Installation To ..
Ford Escape 2020-2026 Service Manual: Removal and Installation - Brake Pads
Materials Name Specification Motorcraft® Silicone Brake Caliper Grease and Dielectric CompoundXG-3-A ESA-M1C200-AESE-M1C171-A Motorcraft® Metal Brake Parts CleanerPM-4-A, PM-4-B, APM-4-C - Removal WARNING: Service actions on vehicles equipped with electronic brake booster and electronic parking brakes may cause unexpected brake application, wh..
Categories
- Manuals Home
- 4th Generation Ford Escape Owners Manual
- 4th Generation Ford Escape Service Manual
- Switching the Rear Window Wiper On and Off. Reverse Wipe
- Adjusting the Headlamps
- Rear View Camera
- New on site
- Most important about car
Master Access Code
What Is the Master Access Code
The master access code is a factory-set five-digit entry code. You can operate the keypad with the master access code at any time. The master access code is on the owner’s wallet card in the glove box and is available from an authorized dealer.
Displaying the Master Access Code
To display the factory-set code in the information display:

Copyright © 2026 www.fordescape4.com