Ford Escape: Front Seats / Removal and Installation - Front Seat Track Motor
Special Tool(s) / General Equipment
| Electric Drill |
Removal
NOTE: Driver seat shown, passenger seat similar.
-
NOTE: Positioning the seat fully upward provides access to service the seat track motor with the seat in the vehicle.
Move the front seat to the full upward position.
.jpg) |
-
Depower the SRS .
Refer to: Supplemental Restraint System (SRS) Depowering (501-20B Supplemental Restraint System, General Procedures).
-
Disconnect the front seat wiring harness electrical connector.
-
Detach the front seat wiring harness retainer.
-
Disconnect the front seat electrical connector.
-
Detach the front seat wiring harness retainer.
.jpg) |
-
-
Disconnect the seat position sensor electrical connector.
-
Detach the seat position sensor wiring harness retainer.
-
Detach the front seat electrical connector.
-
Disconnect the seat position sensor electrical connector.
.jpg) |
-
Remove the front seat side shield screws.
.jpg) |
-
-
Firmly grasp the front seat side shield, lift up and
out, separating the side shield from the recliner bracket.
-
Slide the front seat side shield forward and separate the side shield from the seat.
-
Firmly grasp the front seat side shield, lift up and
out, separating the side shield from the recliner bracket.
.jpg) |
-
Disconnect the electrical connector and remove the front seat side shield.
.jpg) |
-
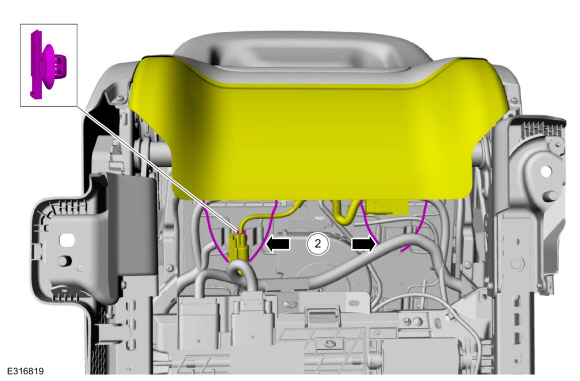
NOTE: Front seat track components are removed for clarity.
Disconnect the front seat track motor electrical connector, disconnect the front seatbelt buckle electrical connector, detach the front seat wiring harness retainers and position the front seat wiring harness aside.
.jpg) |
-
NOTE: Front seat track components and wiring harnesses are removed for clarity.
Remove the bolts and the front seat track motor.
.jpg) |
Installation
-
As necessary, transfer components to the new front seat track motor.
-
NOTE: Typical front seat track motor shown, other front seat track motors similar.
NOTE: Use the bolts from the old front seat track motor.
NOTE: Front seat side shield removed for clarity.
On both sides.
Install the front seat track motor bolts.
Torque: 124 lb.in (14 Nm)
.jpg) |
-
NOTICE: When using a drill to move the front seat track, do not move the front seat track to its forward or rearward end of travel stops, doing so can result in damage to the front seat track requiring replacement.
NOTE: Typical seat track shown, other seat tracks similar.
NOTE: Be sure to drive the seat track evenly or the track will bind during movement.
NOTE: Rotate the cables using 2 drills operating at similar speeds to most efficiently position the seat track.
Insert the original front seat track motor drive cables and drive the gearbox and seat track uniformly until the front edge of the upper and lower seat tracks are flush.
Use the General Equipment: Electric Drill
.jpg) |
-
The front edges of the upper and lower seat track rails must align with each other on both sides of the seat.
.jpg) |
-
NOTE: Typical seat track shown, other seat track similar.
NOTE: Front seat side shield removed for clarity.
On both sides, remove and discard the front seat track motor bolts.
.jpg) |
-
NOTE: Install a new seat track if the block is not in place.
Verify the block is in place at the rear of the inboard seat track rail.
.jpg) |
-
To aid installation, pull the long drive cable on the new front seat track motor assembly out of the sheathing.
.jpg) |
-
NOTE: Typical front seat track motor shown, other front seat track motors similar.
Insert the long drive cable into the seat track gearbox.
.jpg) |
-
NOTE: Typical seat track shown, other seat track similar.
Rotate the long drive cable to verify engagement to the seat track gearbox.
.jpg) |
-
NOTICE: Do not severely bend the short drive cable during installation or damage to the cable will occur.
NOTE: Typical front seat track motor shown, other seat track motors similar.
Insert the short drive cable into the seat track gearbox.
-
Position the front seat track motor while inserting the short cable into the seat track gearbox.
-
Rotate the short drive cable to verify engagement to the seat track motor gearbox.
-
Position the front seat track motor while inserting the short cable into the seat track gearbox.
 |
-
NOTICE: Do not cross-thread the bolts as they are load bearing. If the bolts are cross-threaded, a new seat track must be installed.
NOTE: Seat track components and wiring harness are removed for clarity.
Install the front seat track motor and install the new bolts in the sequence shown.
-
Install the rear inboard bolt.
Torque: 124 lb.in (14 Nm)
-
Install the front inboard bolt.
Torque: 124 lb.in (14 Nm)
-
Install the rear outboard bolt.
Torque: 124 lb.in (14 Nm)
-
Install the front outboard bolt.
Torque: 124 lb.in (14 Nm)
-
Install the rear inboard bolt.
.jpg) |
-
NOTE: Front seat track components are removed for clarity.
Connect the front seat track motor electrical connector, connect the front seatbelt buckle electrical connector, attach the front seat wiring harness retainers.
|
-
Install the front seat side shield.
-
Connect the front seat side shield electrical connector.
-
Slide the front seat side shield forward attaching the retainers.
-
Firmly grasp the front seat side shield, lift up and push in to attach the retainers.
-
Connect the front seat side shield electrical connector.
.jpg) |
-
Install the front seat side shield screws.
|
-
-
Connect the seat position sensor electrical connector.
-
Attach the seat position sensor wiring harness retainer.
-
Attach the front seat electrical connector.
-
Connect the seat position sensor electrical connector.
|
-
Connect the front seat wiring harness electrical connector.
-
Attach the front seat wiring harness retainer.
-
Connect the front seat electrical connector.
-
Attach the front seat wiring harness retainer.
|
-
Repower the SRS .
Refer to: Supplemental Restraint System (SRS) Repowering (501-20B Supplemental Restraint System, General Procedures).
Seats with memory
-
Operate the front seat track horizontal motor in
both directions through the full range of travel to set the soft stops
and avoid a premature stopping point occurrence after the vehicle has
been returned to the customer.
 Removal and Installation - Front Seat Track
Removal
Remove the front seat cushion cover and foam as an assembly.
Refer to: Front Seat Cushion Cover (501-10A Front Seats, Removal and Installation)...
 Rear Seats
..
Other information:
Ford Escape 2020-2026 Service Manual: Removal and Installation - Front Door Latch
Removal NOTE: LH (left-hand) side shown, RH (right-hand) side similar. NOTE: Removal steps in this procedure may contain installation details. Remove the front door window regulator and motor. Refer to: Front Door Window Regulator and Motor (501-11 Glass, Frames and Mechanisms, Removal and Installation). Remove the exterior front door handle. Refer to: Exterior F..
Ford Escape 2020-2026 Service Manual: Removal and Installation - Crankshaft Position (CKP) Sensor
Special Tool(s) / General Equipment 303-1699Tool, Crank Sensor Alignment 303-507Timing Peg, Crankshaft TDCTKIT-2001N-FLMTKIT-2001N-ROW Ford Diagnostic Equipment Removal NOTICE: During engine repair procedures, cleanliness is extremely important. Any foreign material, including any material created while cleaning gasket surfaces, that enters the oil passages, coolan..
Categories
- Manuals Home
- 4th Generation Ford Escape Owners Manual
- 4th Generation Ford Escape Service Manual
- Electric Parking Brake
- Symbols Glossary
- Adjusting the Headlamps
- New on site
- Most important about car
Symbols Glossary
These are some of the symbols you may see on your vehicle.
 Air conditioning system