Ford Escape: Accessory Charging / Removal and Installation - Wireless Accessory Charging Module (WACM)
Special Tool(s) / General Equipment
| Interior Trim Remover |
Removal
NOTE: Removal steps may contain installation details.
-
NOTE: If installing a new module, it is necessary to upload the module configuration information to the scan tool prior to removing the module. This information must be downloaded into the new module after installation. If installing a new module, it is necessary to upload the module configuration information to the scan tool prior to removing the module. This information must be downloaded into the new module after installation.
Using a diagnostic scan tool, begin the PMI process for the WACM following the on-screen instructions.
-
Release the clips and remove the trim panel.
-
Disconnect the electrical connectors.
Use the General Equipment: Interior Trim Remover
-
Disconnect the electrical connectors.
.jpg) |
-
Release the clips and remove the RH floor console side trim panel.
Use the General Equipment: Interior Trim Remover
.jpg) |
-
NOTE: LH side of floor console.
-
Remove the cover.
-
Remove the bolt.
-
Remove the cover.
.jpg) |
-
Release the clips and remove the LH floor console side trim panel.
Use the General Equipment: Interior Trim Remover
.jpg) |
-
Remove the bolts, release the clips and harness retainers and remove the trim panel.
-
Disconnect the electrical connectors.
Torque: 22 lb.in (2.5 Nm)
-
Disconnect the electrical connectors.
.jpg) |
-
Remove the screws and the WACM .
-
Disconnect the electrical connector.
-
Disconnect the electrical connector.
.jpg) |
Installation
-
To install, reverse the removal procedure.
-
NOTE: This step is only necessary if replacing the WACM .
Using a diagnostic scan tool, complete the PMI process for the WACM following the on-screen instructions.
 Diagnosis and Testing - Wireless Accessory Charging Module (WACM)
Diagnostic Trouble Code (DTC) Chart
Diagnostics in this manual assume a certain skill level and knowledge of Ford-specific diagnostic practices. REFER to: Diagnostic Methods (100-00 General Information, Description and Operation)...

Other information:
Ford Escape 2020-2024 Service Manual: Removal and Installation - Rear Door Trim Panel
Special Tool(s) / General Equipment Pick Hook Interior Trim Remover Removal NOTE: LH (left hand) shown, RH (right hand) similar. NOTE: Removal steps in this procedure may contain installation details. NOTICE: The door latch must be in the locked position prior to disassembly or the door lock feature may not function correctly after installation. Lock the d..
Ford Escape 2020-2024 Service Manual: Diagnosis and Testing - Glass, Frames and Mechanisms - Vehicles With: One-Touch Open Driver Window
Global Customer Symptom Code (GCSC) Chart Diagnostics in this manual assume a certain skill level and knowledge of Ford-specific diagnostic practices.REFER to: Diagnostic Methods (100-00 General Information, Description and Operation). Symptom Action Lighting/Glass/Vision > Windows/Glass > Door > Power Function GO to Pinpoint Test A Lighting/Glass/Vision > Windo..
Categories
- Manuals Home
- 4th Generation Ford Escape Owners Manual
- 4th Generation Ford Escape Service Manual
- Accessing the Trip Computer. Resetting the Trip Computer
- Fuel Quality
- General Procedures - Brake Service Mode Activation and Deactivation
- New on site
- Most important about car
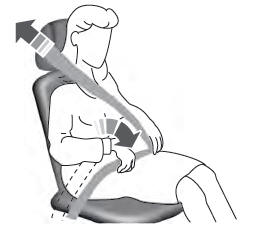
Adjusting the Seatbelts During Pregnancy
WARNING: Always ride and drive with your seatback upright and properly fasten your seatbelt. Fit the lap portion of the seatbelt snugly and low across the hips. Position the shoulder portion of the seatbelt across your chest. Pregnant women must follow this practice. See the following figure.