Ford Escape 2020-2026 Service Manual / Body and Paint / Body and Paint / Interior Trim and Ornamentation / Removal and Installation - Rear Door Trim Panel
Ford Escape: Interior Trim and Ornamentation / Removal and Installation - Rear Door Trim Panel
Special Tool(s) / General Equipment
| Pick Hook | |
| Interior Trim Remover |
Removal
NOTE: LH (left hand) shown, RH (right hand) similar.
NOTE: Removal steps in this procedure may contain installation details.
-
NOTICE: The door latch must be in the locked position prior to disassembly or the door lock feature may not function correctly after installation.
Lock the doors.
-
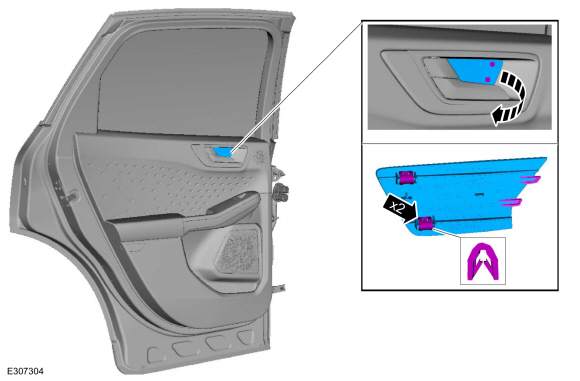
Release the clips and remove the interior rear door handle bolt cover.
Use the General Equipment: Pick Hook
 |
-
Remove the interior rear door handle bolt.
Torque: 40 lb.in (4.5 Nm)
.jpg) |
-
Remove the rear door window control switch.
Refer to: Rear Door Window Control Switch (501-11 Glass, Frames and Mechanisms, Removal and Installation).
-
Remove the rear door trim panel bolts.
Torque: 48 lb.in (5.4 Nm)
.jpg) |
-
Release the tab and remove the rear door trim panel bolt cover.
Use the General Equipment: Pick Hook
.jpg) |
-
Remove the rear door trim panel bolt.
Torque: 13 lb.in (1.5 Nm)
.jpg) |
-
Remove the rear door trim panel lower bolts.
Torque: 13 lb.in (1.5 Nm)
.jpg) |
-
Release the rear door trim panel upper clips in the order shown.
-
Release the rear door trim panel upper clip.
Use the General Equipment: Interior Trim Remover
-
Release the rear door trim panel upper clip.
Use the General Equipment: Interior Trim Remover
-
Release the rear door trim panel upper clip.
Use the General Equipment: Interior Trim Remover
-
Release the rear door trim panel upper clip.
Use the General Equipment: Interior Trim Remover
-
Release the rear door trim panel upper clip.
.jpg) |
-
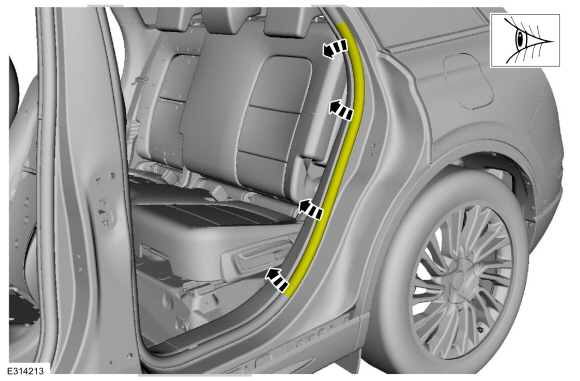
Release the rear door trim panel side clips in the order shown.
-
Release the rear door trim panel side clips.
Use the General Equipment: Interior Trim Remover
-
Release the rear door trim panel side clips.
Use the General Equipment: Interior Trim Remover
-
Release the rear door trim panel side clips.
Use the General Equipment: Interior Trim Remover
-
Release the rear door trim panel side clips.
Use the General Equipment: Interior Trim Remover
-
Release the rear door trim panel side clips.
Use the General Equipment: Interior Trim Remover
-
Release the rear door trim panel side clips.
.jpg) |
-
NOTICE: For re-installation, the retention tab must be re-engaged to prevent the interior rear door handle from becoming non-functional.
Remove the rear door trim panel.
-
Disengage the retention tab.
-
Position the interior rear door cable aside.
-
If equipped.
Disconnect the rear door tweeter speaker electrical connector.
-
Disengage the retention tab.
 |
Installation
-
NOTE: Transfer parts as necessary.
To install, reverse the removal procedure.
 Removal and Installation - Loadspace Trim Panel
Special Tool(s) /
General Equipment
Interior Trim Remover
Removal
NOTE:
LH (left hand) shown, RH (right hand) similar.
Remove the rear scuff plate trim panel...
 Removal and Installation - Rear Scuff Plate Trim Panel
Special Tool(s) /
General Equipment
Interior Trim Remover
Removal
NOTE:
LH (left hand) shown, RH (right hand) similar.
Release the clips and remove the rear scuff plate trim panel...
Other information:
Ford Escape 2020-2026 Owners Manual: SiriusXM Traffic and Travel Link (If Equipped). Michelin Travel Guide (If Equipped). Navigation Map Accuracy and Updates
SiriusXM Traffic and Travel Link (If Equipped) SiriusXM Traffic and Travel Link is available on vehicles equipped with navigation and only in select markets. You must activate and subscribe to receive SiriusXM Traffic and Travel Link information. It helps you locate the best gas prices, find movie listings, get current traffic alerts, view the weather map, get accurate ski conditions and s..
Ford Escape 2020-2026 Owners Manual: Introduction
About This Publication WARNING: Driving while distracted can result in loss of vehicle control, crash and injury. We strongly recommend that you use extreme caution when using any device that may take your focus off the road. Your primary responsibility is the safe operation of your vehicle. We recommend against the use of any hand-held device while driving and encourage the use of voice-..
Categories
- Manuals Home
- 4th Generation Ford Escape Owners Manual
- 4th Generation Ford Escape Service Manual
- Electric Parking Brake
- General Procedures - Transmission Fluid Level Check
- Switching the Rear Window Wiper On and Off. Reverse Wipe
- New on site
- Most important about car
Sitting in the Correct Position
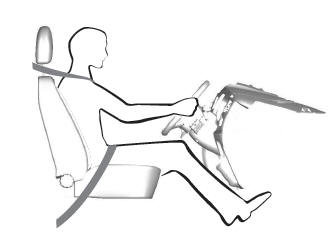
When you use them properly, the seat, head restraint, seatbelt and airbags will provide optimum protection in the event of a crash.
Copyright © 2026 www.fordescape4.com