Ford Escape 2020-2026 Service Manual / Chassis / Brake System / Brake System - General Information / General Procedures - Component Bleeding - Vehicles With: Vacuum Brake Booster
Ford Escape: Brake System - General Information / General Procedures - Component Bleeding - Vehicles With: Vacuum Brake Booster
Special Tool(s) / General Equipment
| Master Cylinder Bleeding Set |
Bleeding
NOTICE: If the fluid is spilled on the paintwork, the affected area must be immediately washed down with cold water.
Master Cylinder
NOTE: When a new brake master cylinder has been installed, it should be primed to prevent air from entering the system.
-
NOTE: Make sure the area around the master cylinder cap is clean and free of foreign material.
Remove the brake fluid reservoir cap.
 |
-
Fill the reservoir with clean, specified brake fluid.
Refer to: Specifications (206-00 Brake System - General Information, Specifications).
 |
-
Loosen and remove the brake tube fittings.
 |
-
Install the master cylinder bleeding set.
Use the General Equipment: Master Cylinder Bleeding Set
 |
-
Have an assistant pump the brake pedal slowly until clear bubble free fluid flows from the brake tubes.
 |
-
Remove the master cylinder bleeding set.
Remove the General Equipment: Master Cylinder Bleeding Set
|
-
Tighten the brake tube fittings.
Refer to: Specifications (206-00 Brake System - General Information, Specifications).
|
-
Fill the reservoir with clean, specified brake fluid.
Refer to: Specifications (206-00 Brake System - General Information, Specifications).
|
-
Refer to: Brake System Pressure Bleeding - Vehicles With: Vacuum Brake
Booster (206-00 Brake System - General Information, General Procedures).
Brake Caliper, Wheel Cylinder, Brake Hose or Brake Tube
-
NOTE: Pressure bleeding the brake system is required anytime a hydraulic brake system component has been disconnected.
Refer to: Brake System Pressure Bleeding - Vehicles With: Vacuum Brake Booster (206-00 Brake System - General Information, General Procedures).
 General Procedures - Brake System Pressure Bleeding - Vehicles With: Vacuum Brake Booster
Special Tool(s) /
General Equipment
Brake/Clutch System Pressure Bleeder/Filler
Fluid Container
Bleeding
All vehicles
NOTICE:
If the fluid is spilled on the paintwork, the affected area must be immediately washed down with cold water...

Other information:
Ford Escape 2020-2026 Service Manual: Description and Operation - Pump Assembly - Plug-In Hybrid Electric Vehicle (PHEV)
Transmission Fluid Pump Item Part Number Description 1 7A1037A103 Pump assembly 2 7P0867P086 Transmission fluid auxiliary pump The transmission fluid pump is an internal pump bolted to the transmission case. The transmission fluid pump is turned by the input shaft and circulates transmission fluid through the transmission for lubrication and through ..
Ford Escape 2020-2026 Owners Manual: MyKey – Troubleshooting
MyKey – Information Messages - Vehicles With: Push Button Start MyKey – Information Messages - Vehicles With: Flip Key MyKey – Frequently Asked Questions - Vehicles With: Push Button Start What is an admin key? An admin key is a key that you have not created as a MyKey. See Creating a MyKey. Why am I not able create a MyKey? You have not placed the admin key in the backup position. See ..
Categories
- Manuals Home
- 4th Generation Ford Escape Owners Manual
- 4th Generation Ford Escape Service Manual
- Opening and Closing the Hood
- All-Wheel Drive
- General Procedures - Transmission Fluid Level Check
- New on site
- Most important about car
Sitting in the Correct Position
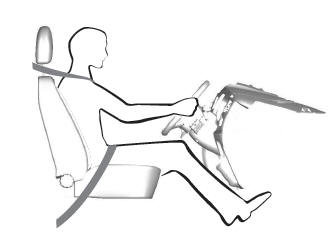
When you use them properly, the seat, head restraint, seatbelt and airbags will provide optimum protection in the event of a crash.
Copyright © 2026 www.fordescape4.com