Ford Escape: Brake System - General Information / General Procedures - Brake System Pressure Bleeding - Vehicles With: Vacuum Brake Booster
Special Tool(s) / General Equipment
| Brake/Clutch System Pressure Bleeder/Filler | |
| Fluid Container |
Bleeding
All vehicles
NOTICE: If the fluid is spilled on the paintwork, the affected area must be immediately washed down with cold water.
-
NOTE: Make sure the area around the master cylinder cap is clean and free of foreign material.
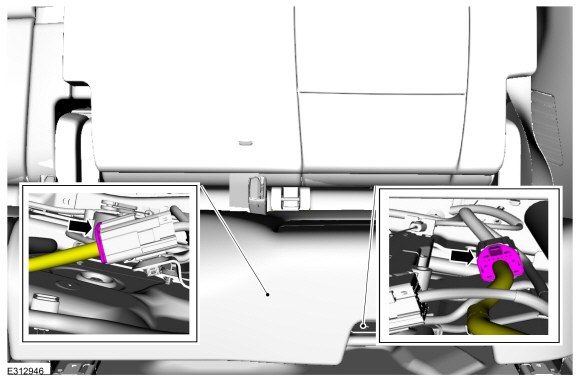
Remove the brake fluid reservoir cap.
 |
-
Make sure the fluid reservoir is filled with clean specified brake fluid.
Refer to: Specifications (206-00 Brake System - General Information, Specifications).
 |
-
-
NOTE: Master cylinder pressure bleeder adapter tools are available from various manufacturers of pressure bleeding equipment. Follow the instructions of the manufacturer when installing the adapter.
Install the bleeder adapter to the brake master cylinder reservoir and attach the bleeder tank hose to the fitting on the adapter.
Use the General Equipment: Brake/Clutch System Pressure Bleeder/Filler
-
NOTE: Make sure the bleeder tank contains enough clean, specified brake fluid to complete the bleeding operation.
Open the valve on the bleeder tank and apply 207-345 kPa (30-50 psi) to the brake system.
-
-
Refer to: Jacking and Lifting - Overview (100-02 Jacking and Lifting, Description and Operation).
-
Bleeding steps must be followed in the order indicated in the graphic.
 |
-
If equipped,
Remove the bleeder screw cap.
 |
-
Partially fill a clean brake fluid container with clean specified brake fluid.
Refer to: Specifications (206-00 Brake System - General Information, Specifications).
Use the General Equipment: Fluid Container
 |
-
Submerge a hose into the brake fluid in the container and connect the hose to bleeder screw.
 |
-
-
Loosen the bleeder screw.
Loosen:
: 180°
-
Leave open until clear, bubble-free brake fluid flows, then tighten the bleeder screw.
-
Loosen the bleeder screw.
Loosen:
 |
Vehicles with rear integral parking brake calipers
-
NOTE: Due to the complexity of the fluid path within the rear integral parking brake calipers, it is necessary to apply and release the parking brake during the bleed procedure.
-
Apply and release the parking brake 5 times.
- Loosen: 180°
-
Leave open until clear, bubble-free fluid flows and then tighten the bleeder screw.
-
Repeat as necessary.
-
Apply and release the parking brake 5 times.
 |
All vehicles
-
-
Tighten the bleeder screw to specification.
Refer to: Specifications (206-00 Brake System - General Information, Specifications).
-
Tighten the bleeder screw to specification.
 |
-
If equipped,
Install the bleeder screw cap.
|
-
Go to step 7 and repeat the bleeding steps at the remaining wheel ends.
-
Lower the vehicle.
-
Close the bleeder tank valve and release the pressure.
Remove the General Equipment: Brake/Clutch System Pressure Bleeder/Filler
-
Fill the reservoir with clean, specified brake fluid.
Refer to: Specifications (206-00 Brake System - General Information, Specifications).
|
-
Install the brake fluid reservoir cap.
|
-
Apply the brake pedal several times to verify correct brake system operation.
 General Procedures - Brake System Draining and Filling - Vehicles With: Vacuum Brake Booster
Special Tool(s) /
General Equipment
Fluid Container
Draining
Refer to: Brake and Clutch Systems Health and Safety Precautions (100-00 General Information, Description and Operation)...
 General Procedures - Component Bleeding - Vehicles With: Vacuum Brake Booster
Special Tool(s) /
General Equipment
Master Cylinder Bleeding Set
Bleeding
NOTICE:
If the fluid is spilled on the paintwork, the affected area must be immediately washed down with cold water...
Other information:
Ford Escape 2020-2026 Service Manual: Removal and Installation - Telematics Control Unit (TCU) Module Antenna
Removal NOTE: Removal steps in this procedure may contain installation details. Remove the instrument panel upper section. Refer to: Instrument Panel Upper Section (501-12 Instrument Panel and Console, Removal and Installation). Separate the wiring guide, remove the bolts and the TCU antenna and bracket as an assembly...
Ford Escape 2020-2026 Service Manual: Removal and Installation - Roof Opening Panel Center Beam Trim
Removal NOTE: Removal steps in this procedure may contain installation details. Pulling downward, remove the cross beam cover. Refer to: Roof Opening Panel Glass (501-17 Roof Opening Panel, Removal and Installation). Pulling downward, remove the cross beam cover...
Categories
- Manuals Home
- 4th Generation Ford Escape Owners Manual
- 4th Generation Ford Escape Service Manual
- Electric Parking Brake
- Description and Operation - Identification Codes
- Plug-In Hybrid Electric Vehicle Drive Modes
- New on site
- Most important about car
Engine Oil
Engine Oil Dipstick Overview