Ford Escape: High Voltage Battery, Mounting and Cables / General Procedures - High Voltage Battery Leak Test - Plug-In Hybrid Electric Vehicle (PHEV)
Special Tool(s) / General Equipment
.jpg) |
414-010 Leak Test Adapter |
.jpg) |
414-011 Leak Test Adapter |
.jpg) |
414-012 Leak Test Adapter |
.jpg) |
414-013 Leak Test Adapter |
 |
414-014 Leak Test Adapter |
.jpg) |
414-015 Leak Test Adapter |
.jpg) |
414-022 Adapter, Leak Test |
Leak detection
NOTE: This test is meant to be a secondary check after a service procedure is performed on the high voltage battery when a seal is disturbed. It is important to follow the workshop manual service procedure to verify a high voltage battery is sealed correctly.
Special Tool(s) / General Equipment
-
-
VACUTEC® Smoke Machine Fuel EVAP Emissions System Tester (or equivalent)
-
SNOOP Solution
-
Large Adhesive Bandage
-
Tape
-
Shop Air Supply
-
VACUTEC® Smoke Machine Fuel EVAP Emissions System Tester (or equivalent)
All Battery Packs
-
To begin the setup, make sure the high voltage
battery is removed from the vehicle and placed in an accessible area
where there is room to walk around the entire pack. The high voltage
battery cover should be installed and sealed according to the workshop
manual procedure.
BEV-A Battery Pack
-
Connect the pressure test connectors to the front of the high voltage battery.
Use Special Service Tool: 414-012 Leak Test Adapter. , 414-014 Leak Test Adapter. , 414-011 Leak Test Adapter.
.jpg) |
-
Connect the pressure test connector to the rear of the high voltage battery.
Use Special Service Tool: 414-015 Leak Test Adapter.
.jpg) |
BEV-G Battery Pack
-
Connect the pressure test connectors to the front of the high voltage battery.
Use Special Service Tool: 414-012 Leak Test Adapter. , 414-015 Leak Test Adapter. , 414-022 Adapter, Leak Test. , 414-014 Leak Test Adapter.
.jpg) |
PHEV-A Battery Pack
-
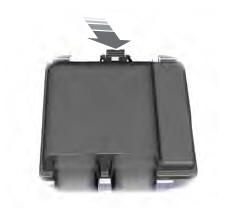
NOTE: If equipped.
Remove the high voltage battery rear outer shield and vent tube.
.jpg) |
-
Connect the pressure test connectors to the high voltage battery.
Use Special Service Tool: 414-013 Leak Test Adapter. , 414-012 Leak Test Adapter. , 414-011 Leak Test Adapter.
.jpg) |
PHEV-C Battery Pack
-
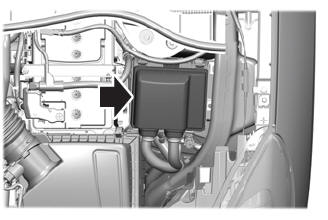
Connect the pressure test connector to the high voltage battery.
Use Special Service Tool: 414-010 Leak Test Adapter.
.jpg) |
All Battery Packs
NOTE: PHEV-C battery pack shown, other battery packs similiar.
-
NOTICE: To prevent damage to the vent patch It is important that the non-adhesive bandage be properly sized so that it completely covers the vent patch.
Seal the vent patch by placing a large adhesive bandage directly over the Vent Patch. The patch must be completely be covered by the bandage. Cover the bandage using duct tape or gorilla tape.
.jpg) |
-
NOTICE: To prevent damage to the high voltage battery pack make sure that the VACUTEC® Smoke Machine Fuel EVAP Emissions System Tester is set to Test and not Smoke. If the machine being used does not have a selection to test without smoke reference the user manual to remove the smoke container and empty the fluid into a clean container and reinstall the container into the machine. Purge all the smoke from the machine by pressing the power button and wait several minutes until no more can be seen exiting the outlet hose.
NOTICE: Make sure that the VACUTEC® Smoke Machine Fuel EVAP Emissions System Tester is set to a low pressure (<0.5 psi) mode designed to test EVAP systems. Using a high pressure mode will cause damage to the high voltage battery pack.
Connect the VACUTEC® Smoke Machine Fuel EVAP Emissions System Tester to a power source and verify it is powered ON (green light indicated on the battery symbol) and that it is connected to shop air. The shop air must be filtered to remove moisture and contaminates. Place and hold the air outlet hose into the air pressurization port on the connector. Set the VACUTEC® Smoke Machine Fuel EVAP Emissions System Tester to TEST.
.jpg) |
-
Press the Power button on the VACUTEC® Smoke Machine Fuel EVAP Emissions System Tester to begin pressurizing the pack.
-
NOTE: The flow meter bead should drop all the way to the bottom and stabilize in order to pass the Gross Leak Check. This can take between 2 to 15 minutes, depending on the pack size. Be aware that the machine may stop pressurizing before its done, which requires pressing the power button again.
As the gauge begins to stabilize, watch the bead.
-
If the pack has no gross leaks, the bead should
drop all the way to the bottom (0) and stabilize there. This indicates
the Gross Leak Check has passed. Continue to the SNOOP Solution Test.
-
If the bead does not drop all the way to the
bottom, there is a gross seal leak and indicates the Gross Leak Check
has failed. The source could be either loose battery pack cover bolt(s),
battery pack seal, vent patch not covered completely, or one of the
custom connectors. Make sure that the connections are secured.
-
Apply SNOOP solution to the pressure test
connector(s). If a leak is found the connector may be damaged and
require replacement.
-
If the leak cannot be located: For PHEV-C
battery packs, INSTALL a new battery cover gasket and repeat the Gross
Leak Test. If the leak is still present INSTALL new high voltage and low
voltage connector headers one at a time followed by repeating the Gross
Leak Test until the leak can be corrected. For PHEV-A battery packs,
INSTALL a new connector header and wiring harness assembly and high
voltage battery cover. Do not proceed to the SNOOP Solution Test if the Gross Leak test does not pass.
-
If the pack has no gross leaks, the bead should
drop all the way to the bottom (0) and stabilize there. This indicates
the Gross Leak Check has passed. Continue to the SNOOP Solution Test.
.jpg) |
-
NOTE: SNOOP solution can be difficult to apply in tight areas with deep wells. Instead of using a manual applicator, it is recommended to apply with a spray applicator.
Apply SNOOP solution according to the directions below:
-
Make sure the pressure test connector is
secured properly before applying SNOOP solution to all areas of the seal
that might be causing the leaks.
-
Apply the SNOOP solution around any seal
disturbed by a prior service procedure. The SNOOP solution should not
bubble anywhere around the seal. If the SNOOP solution actively bubbles
at any point, this indicates a leak exists. Repair or install new
components as necessary to repair the leak and repeat the Gross Leak
Test and the SNOOP Solution Test.
-
Make sure the pressure test connector is
secured properly before applying SNOOP solution to all areas of the seal
that might be causing the leaks.
.jpg) |
-
Apply SNOOP solution to the following components:
-
Fasteners
-
Gasket sealing surfaces
-
Electrical connector headers
-
Coolant port assembly
-
Weld joints
-
The following is an example of a confirmed leak:
-
Fasteners
.jpg) |
-
NOTICE: If the bandage and tape are not removed from the vent patch, damage to the high voltage battery can result.
-
Once the pack has been confirmed to be sealed,
disconnect the pressure test connector from the high voltage battery.
-
Remove the tape and bandage from the vent
patch. Ensure that the vent patch has not been damaged or pulled off the
battery pack. If damage is found INSTALL a new vent patch.
-
Once the pack has been confirmed to be sealed,
disconnect the pressure test connector from the high voltage battery.
.jpg) |
PHEV-A Battery Pack
-
NOTE: If equipped.
Inspect the vent tube seal and replace is nessesary.
.jpg) |
-
NOTE: If equipped.
Install the high voltage battery rear outer shield and vent tube.
|
 General Procedures - High Voltage Battery Charging - Hybrid Electric Vehicle (HEV)
Charging
WARNING:
To prevent the risk of high-voltage shock, always follow
precisely all warnings and service instructions, including instructions
to depower the system...
 General Procedures - High Voltage Connector Disconnect and Connect
Disconnect
WARNING:
To prevent the risk of high-voltage shock, always follow
precisely all warnings and service instructions, including instructions
to depower the system...
Other information:
Ford Escape 2020-2026 Owners Manual: Checking the Seatbelts
Check the seatbelts and child restraints periodically to make sure they work properly and are not damaged. Make sure there are no nicks, tears or cuts. Replace if necessary. Check the following seatbelt assemblies after a crash. Retractors. Buckles...
Ford Escape 2020-2026 Service Manual: Removal and Installation - Rear Window Wiper Pivot Arm
Special Tool(s) / General Equipment Two Leg Puller Removal Open the rear pivot arm nut cover. Remove the rear wiper pivot arm nut. Remove the rear wiper pivot arm...
Categories
- Manuals Home
- 4th Generation Ford Escape Owners Manual
- 4th Generation Ford Escape Service Manual
- Rear View Camera
- Adjusting the Headlamps
- Symbols Glossary
- New on site
- Most important about car
Under Hood Fuse Box
Locating the Under Hood Fuse Box
Accessing the Under Hood Fuse Box