Ford Escape: Engine System - General Information / General Procedures - Oil Leak Inspection
NOTE: If an overnight drive is done, the fan air or road air blast can cause erroneous readings.
NOTE: When diagnosing engine oil leaks, the source and location of the leak must be positively identified prior to repair.
-
Prior to carrying out this procedure, clean the cylinder
block, cylinder heads, valve covers, oil pan and flywheel/flexplate with
a suitable solvent to remove all traces of oil.
Engine Oil Leaks - Fluorescent Oil Additive Method
NOTE: If the factory fill engine oil with dye is present, change the engine oil and the oil filter prior to using the Dye-Lite® Oil-Based Fluid Dye (164-TP33200601).
-
Some fluid leaks are acceptable and considered
characteristic of the component seal depending on the component, system
or fluid it seals. These are called a weep or a seep.
-
Weep(s): A weep is detected under black light inspection
demonstrating a continuous yellow (die color) trace at the gasket joint
or seal surface and characterized by no detection of oil under white
light inspection. A weep is incidental and not acceptable for fuel,
brake or transmission lines. Weeps are acceptable for all other areas.
 |
-
Seep(s): A seep is considered a more pronounced weep but
not enough to result in dripping. When wiped off, the moistness should
not reoccur before renewed operation. A seep is oil detected under black
light inspection and characterized by oil detection under white light
inspection resulting in staining at the sealing and the adjacent flange.
A seep is not acceptable for fuel, brake or transmission lines, in
visible areas under hood or under vehicle. Seeps are acceptable around
engine ventilation components such as PCV components and oil fill caps.
.jpg) |
-
Leak(s): A leak is oil detected under black light
inspection and characterized by oil detection under white light
inspection resulting in accumulation of oil drops and/or pooling. All
leaks are considered unacceptable
 |
-
Use the UV Long-Wave W/12-foot Cord & Alligator
Clips (164-R3748) or Leak Tracker UV-LED Leak Detection Flashlight
(164-TP8695) to carry out the following procedure for oil leak
diagnosis.
-
Add 29.6 ml (1 oz) of Dye-Lite® Oil-Based Fluid Dye
(164-TP33200601) to a minimum of 0.47L (1/2 qt) and a maximum of 0.95L
(1 qt) engine oil. Thoroughly premix the oil based fluid dye or it will
not have enough time to reach the crankcase, oil galleries and seal
surfaces during this particular 15 minute test. The additive must be
added through the oil fill. Check the level on the oil level indicator
to determine what amount of oil to premix. If it is in the middle of the
crosshatch area or below the full mark, use 0.95L (1 qt). If it is at
the full mark, use 0.47L (1/2 qt).
-
NOTE: For best results allow the customer to drive the vehicle for a day.
Run the engine for 15 minutes. Stop the engine and inspect all seal and gasket areas for leaks using the UV Leak Detector Kit. A fluoresces white area will identify the leak. For extremely small leaks, several hours may be required for the leak to appear.
-
At the end of test, make sure the oil level is within
the upper and lower oil indicator marks. Remove oil as necessary if it
registers above the full mark.
 General Procedures - Oil Consumption Test
Nearly all engines consume oil, which is essential for
normal lubrication of the cylinder bore walls and pistons and rings.
Determining the level of oil consumption may require testing by
recording how much oil is being added over a given set of miles...
 General Procedures - Oil Pressure Test
NOTE:
It is necessary to disconnect the battery to avoid
setting any DTCs that could cause the PCM to command the oil pressure to
other than what should be observed from a correctly operating system
during the oil pressure test...
Other information:
Ford Escape 2020-2026 Service Manual: Removal and Installation - Cylinder Head Temperature (CHT) Sensor
Materials Name Specification Motorcraft® Silicone Brake Caliper Grease and Dielectric CompoundXG-3-A ESA-M1C200-AESE-M1C171-A Removal NOTE: Removal steps in this procedure may contain installation details. NOTICE: Do not pull the engine appearance cover forward or sideways to remove...
Ford Escape 2020-2026 Owners Manual: Air Conditioning System Capacity and Specification - 2.5L, Hybrid Electric Vehicle (HEV)/Plug-In Hybrid Electric Vehicle (PHEV)
WARNING: The air conditioning refrigerant system contains refrigerant under high pressure. Only qualified personnel should service the air conditioning refrigerant system. Opening the air conditioning refrigerant system can cause personal injury...
Categories
- Manuals Home
- 4th Generation Ford Escape Owners Manual
- 4th Generation Ford Escape Service Manual
- Child Safety Locks
- Rear View Camera
- Locating the Pre-Collision Assist Sensors
- New on site
- Most important about car
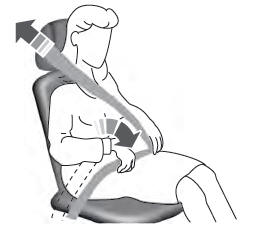
Adjusting the Seatbelts During Pregnancy
WARNING: Always ride and drive with your seatback upright and properly fasten your seatbelt. Fit the lap portion of the seatbelt snugly and low across the hips. Position the shoulder portion of the seatbelt across your chest. Pregnant women must follow this practice. See the following figure.

