Ford Escape: Fuel System - General Information / General Procedures - Spring Lock Couplings
Special Tool(s) / General Equipment
.jpg) |
310-250 Disconnect Tool, Fuel Line TKIT-2012A-FL TKIT-2012A-ROW |
Disconnect
NOTICE: When reusing liquid or vapor tube connectors, make sure to use compressed air to remove any foreign material from the connector retaining clip area before separating from the tube or damage to the tube or connector retaining clip can occur. Apply clean engine oil to the end of the tube before inserting the tube into the connector.
NOTICE: Fuel injection equipment is manufactured to very precise tolerances and fine clearances. It is essential that absolute cleanliness is observed when working with these components or component damage can occur. Always install plugs to any open orifices or tubes.
-
Refer to: Gasoline and Gasoline-Ethanol Fuel Systems Health and Safety Precautions (100-00 General Information, Description and Operation)..jpg) WARNING:
Before beginning any service procedure in this
section, refer to Safety Warnings in section 100-00 General Information.
Failure to follow this instruction may result in serious personal
injury.
WARNING:
Before beginning any service procedure in this
section, refer to Safety Warnings in section 100-00 General Information.
Failure to follow this instruction may result in serious personal
injury.
-
If servicing a liquid fuel tube spring lock coupling, release the fuel system pressure.
Refer to: Fuel System Pressure Release (310-00B) .
-
Disconnect the battery ground cable.
Refer to: Battery Disconnect and Connect (414-01) .
-
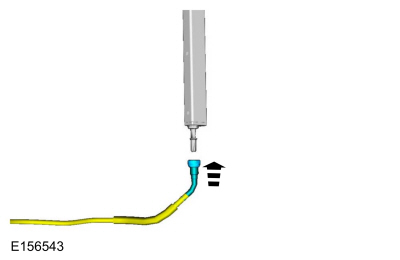
Install the Fuel Line Disconnect Tool on the tube and push into the spring lock coupling to release.
Use Special Service Tool: 310-250 Disconnect Tool, Fuel Line.
.jpg) |
-
Separate the spring lock coupling from the tube.
.jpg) |
Connect
-
Align and push the spring lock coupling onto the tube until fully seated.
 |
-
Pull on the coupling to make sure it is fully engaged.
-
Connect the battery ground cable.
Refer to: Battery Disconnect and Connect (414-01) .
 General Procedures - Fuel System Pressure Release
Pressure release
WARNING:
Fuel may remain pressurized in some fuel lines after the
Fuel System Pressure Release procedure. Wear safety gloves and a face
shield when disconnecting pressure lines to avoid skin and eye contact...
 General Procedures - Quick Release Coupling
Disconnect
NOTICE:
When reusing liquid or vapor tube connections, make sure to
use compressed air to remove any foreign material from the connector
retaining clip area before separating from the tube or damage to the
tube or connector retaining clip may occur...
Other information:
Ford Escape 2020-2026 Service Manual: Removal and Installation - Liftgate Latch
Removal NOTE: Removal steps in this procedure may contain installation details. Remove the liftgate trim panel. Refer to: Liftgate Trim Panel (501-05 Interior Trim and Ornamentation, Removal and Installation). Remove the liftgate latch bolts...
Ford Escape 2020-2026 Service Manual: Description and Operation - Roof Opening Panel - Overview
Panoramic Roof Opening Panel The roof opening panel consists of the following: Air deflector Front sliding glass panel (sunroof) Front sliding glass panel motor (sunroof motor) Shield (sunshade) assembly Shield (sunshade) motor Blinds (concertina blinds) Roof panel fixed glass (panoramic) Roof opening panel frame assembly Roof opening panel control ..
Categories
- Manuals Home
- 4th Generation Ford Escape Owners Manual
- 4th Generation Ford Escape Service Manual
- What Is the Tire Pressure Monitoring System. Tire Pressure Monitoring System Overview
- Description and Operation - Identification Codes
- Fuel Quality
- New on site
- Most important about car
Symbols Glossary
These are some of the symbols you may see on your vehicle.
 Air conditioning system