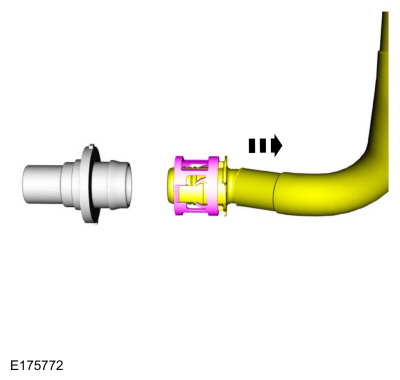
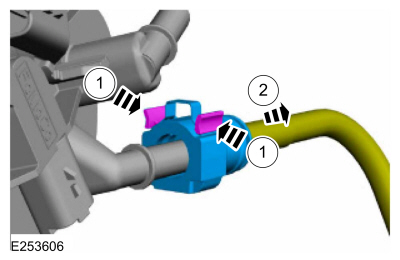
Ford Escape: Fuel System - General Information / General Procedures - Quick Release Coupling
Disconnect
NOTICE: When reusing liquid or vapor tube connections, make sure to use compressed air to remove any foreign material from the connector retaining clip area before separating from the tube or damage to the tube or connector retaining clip may occur.
NOTICE: Fuel injection equipment is manufactured to very precise tolerances and fine clearances. It is essential that absolute cleanliness is observed when working with these components or component damage may occur. Always install blanking plugs to any open orifices or tubes.
NOTICE: Do not use any tools. The use of tools may cause a deformity in the clip components which may cause fuel leaks.
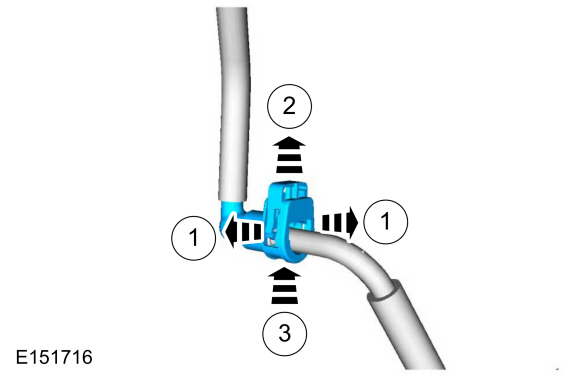
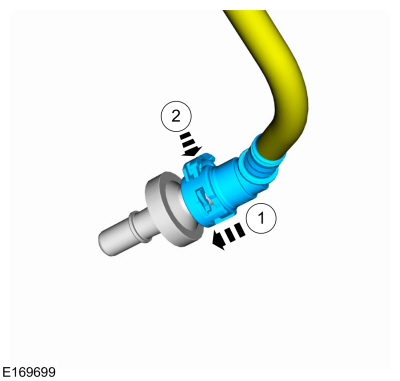
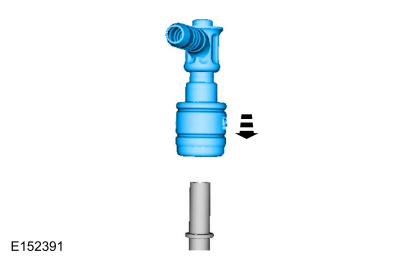
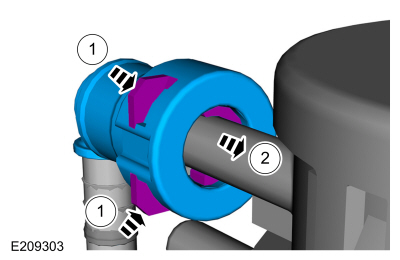
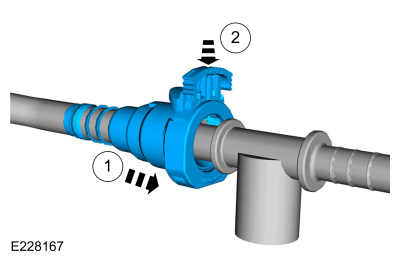
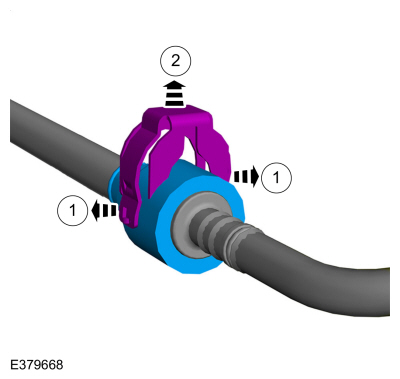
NOTE: Type 1
-
If servicing a liquid fuel tube quick release coupling, release the fuel system pressure.
Refer to: Fuel System Pressure Release (310-00C) .
-
Disconnect the battery ground cable.
Refer to: Battery Disconnect and Connect (414-01) .
 |
 |
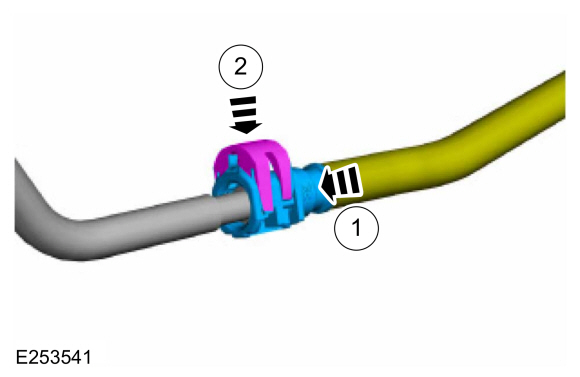
Connect
-
Push the quick release coupling onto the tube.
 |
-
NOTE: Make sure the retainer clip is fully seated and locked onto the tube by pulling on the quick connect coupling.
Press the retainer clip into the quick release coupling body until flush and the tabs are locked in place.
.jpg) |
-
Connect the battery ground cable.
Refer to: Battery Disconnect and Connect (414-01) .
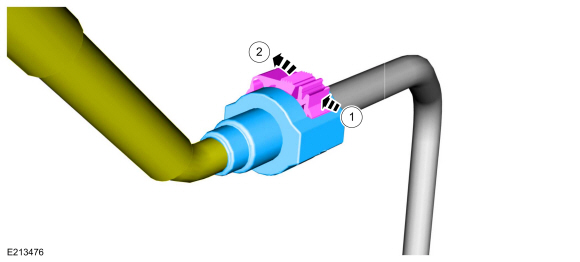
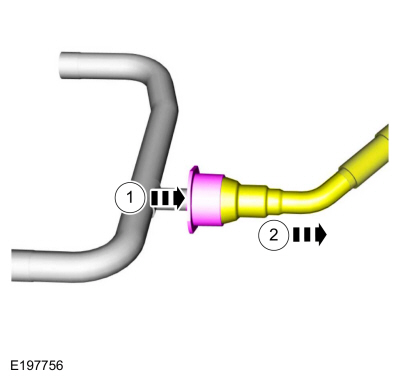
Disconnect
NOTICE: When reusing liquid or vapor tube connections, make sure to use compressed air to remove any foreign material from the connector retaining clip area before separating from the tube or damage to the tube or connector retaining clip may occur.
NOTICE: Fuel injection equipment is manufactured to very precise tolerances and fine clearances. It is essential that absolute cleanliness is observed when working with these components or component damage may occur. Always install blanking plugs to any open orifices or tubes.
NOTICE: Do not use any tools. The use of tools may cause a deformity in the clip components which may cause fuel leaks.
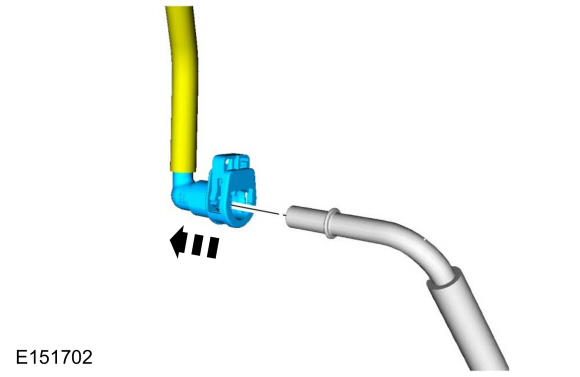
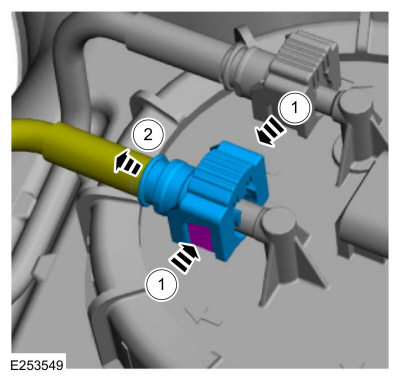
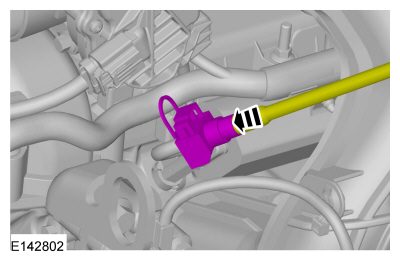
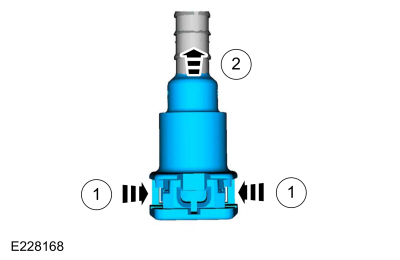
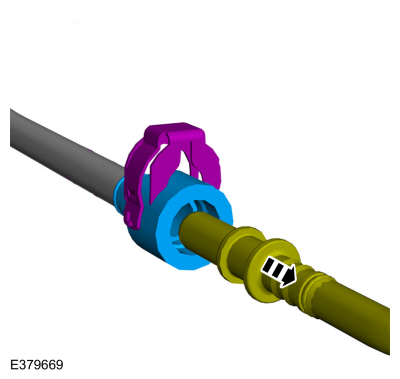
NOTE: Type 2
-
If servicing a liquid fuel tube quick release coupling, release the fuel system pressure.
Refer to: Fuel System Pressure Release (310-00C) .
-
Disconnect the battery ground cable.
Refer to: Battery Disconnect and Connect (414-01) .
.jpg) |
 |
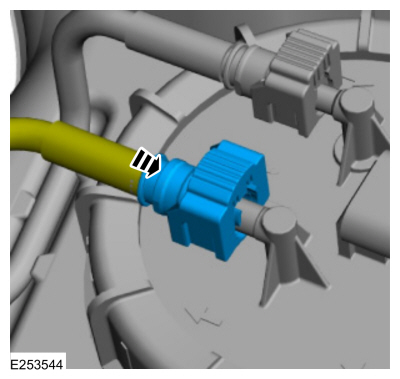
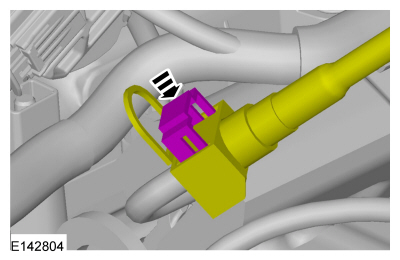
Connect
 |
 |
-
Connect the battery ground cable.
Refer to: Battery Disconnect and Connect (414-01) .
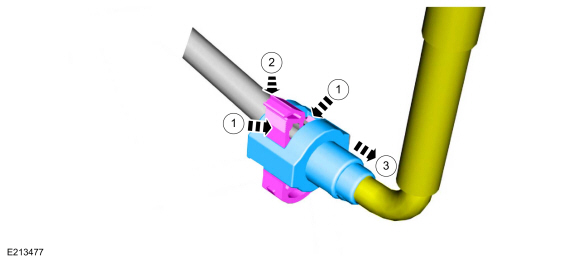
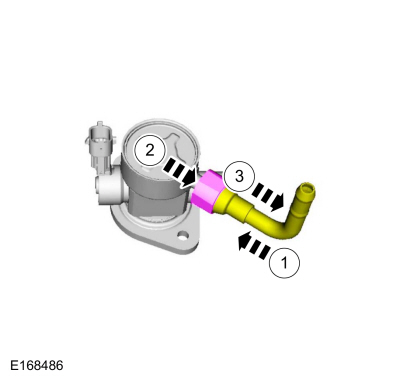
Disconnect
NOTICE: When reusing liquid or vapor tube connections, make sure to use compressed air to remove any foreign material from the connector retaining clip area before separating from the tube or damage to the tube or connector retaining clip may occur.
NOTICE: Fuel injection equipment is manufactured to very precise tolerances and fine clearances. It is essential that absolute cleanliness is observed when working with these components or component damage may occur. Always install blanking plugs to any open orifices or tubes.
NOTICE: Do not use any tools. The use of tools may cause a deformity in the clip components which may cause fuel leaks.
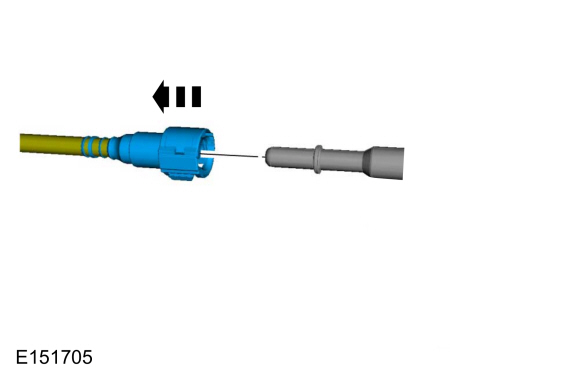
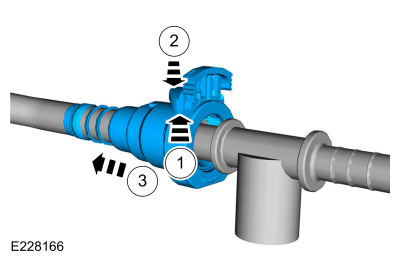
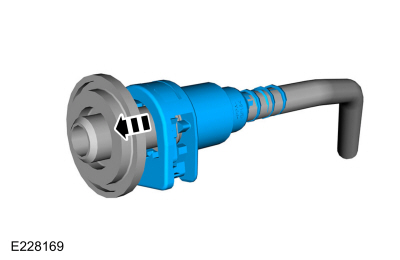
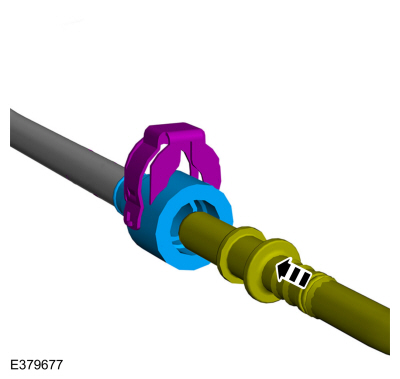
NOTE: Type 3
-
If servicing a liquid fuel tube quick release coupling, release the fuel system pressure.
Refer to: Fuel System Pressure Release (310-00C) .
-
Disconnect the battery ground cable.
Refer to: Battery Disconnect and Connect (414-01) .
.jpg) |
Connect
 |
 |
-
Connect the battery ground cable.
Refer to: Battery Disconnect and Connect (414-01) .
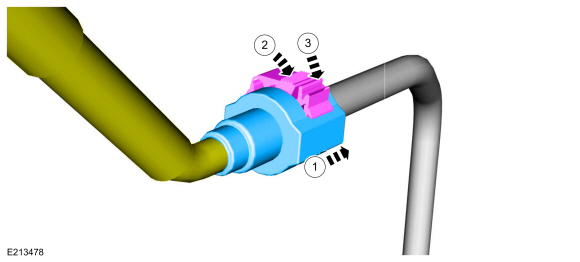
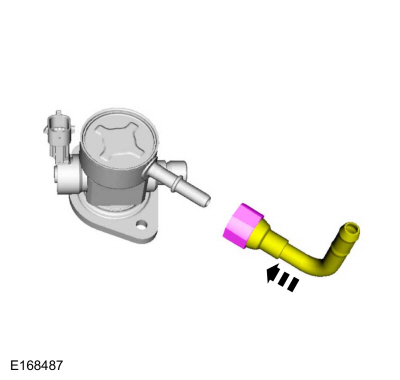
Disconnect
NOTICE: When reusing liquid or vapor tube connections, make sure to use compressed air to remove any foreign material from the connector retaining clip area before separating from the tube or damage to the tube or connector retaining clip may occur.
NOTICE: Fuel injection equipment is manufactured to very precise tolerances and fine clearances. It is essential that absolute cleanliness is observed when working with these components or component damage may occur. Always install blanking plugs to any open orifices or tubes.
NOTICE: Do not use any tools. The use of tools may cause a deformity in the clip components which may cause fuel leaks.
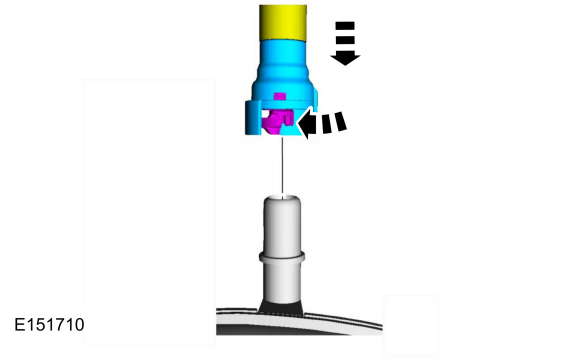
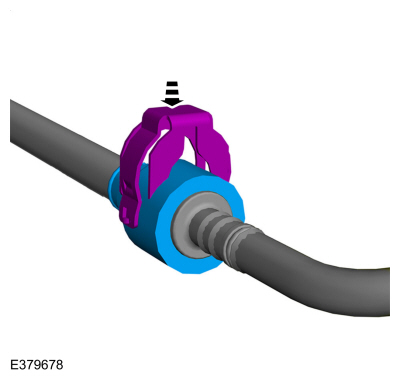
NOTE: Type 4
-
If servicing a liquid fuel tube quick release coupling, release the fuel system pressure.
Refer to: Fuel System Pressure Release (310-00C) .
-
Disconnect the battery ground cable.
Refer to: Battery Disconnect and Connect (414-01) .
 |
 |
Connect
 |
-
Connect the battery ground cable.
Refer to: Battery Disconnect and Connect (414-01) .
Disconnect
NOTICE: When reusing liquid tube connectors, make sure to use compressed air to remove any foreign material from the connector retaining clip area before separating from the tube or damage to the tube or connector retaining clip may occur.
NOTICE: Fuel injection equipment is manufactured to very precise tolerances and fine clearances. It is essential that absolute cleanliness is observed when working with these components or component damage may occur. Always install blanking plugs to any open orifices or tubes.
NOTICE: Do not use any tools. The use of tools may cause a deformity in the clip components which may cause fuel leaks.
NOTE: Type 5
-
If servicing a liquid fuel tube quick release coupling, release the fuel system pressure.
Refer to: Fuel System Pressure Release (310-00C) .
-
Disconnect the battery ground cable.
Refer to: Battery Disconnect and Connect (414-01) .
 |
.jpg) |
Connect
 |
-
Connect the battery ground cable.
Refer to: Battery Disconnect and Connect (414-01) .
Disconnect
NOTICE: When reusing liquid tube connectors, make sure to use compressed air to remove any foreign material from the connector retaining clip area before separating from the tube or damage to the tube or connector retaining clip may occur.
NOTICE: Fuel injection equipment is manufactured to very precise tolerances and fine clearances. It is essential that absolute cleanliness is observed when working with these components or component damage may occur. Always install blanking plugs to any open orifices or tubes.
NOTICE: Do not use any tools. The use of tools may cause a deformity in the clip components which may cause fuel leaks.
NOTE: Type 6
-
If servicing a liquid fuel tube quick release coupling, release the fuel system pressure.
Refer to: Fuel System Pressure Release (310-00C) .
-
Disconnect the battery ground cable.
Refer to: Battery Disconnect and Connect (414-01) .
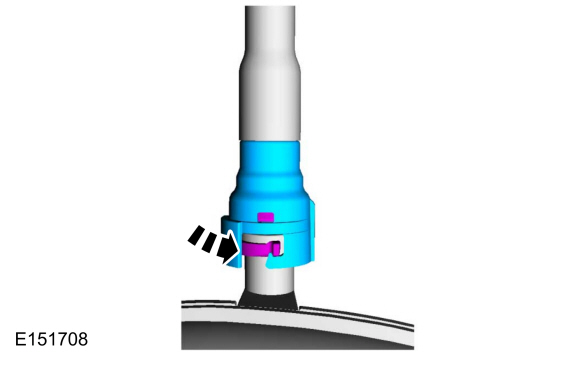
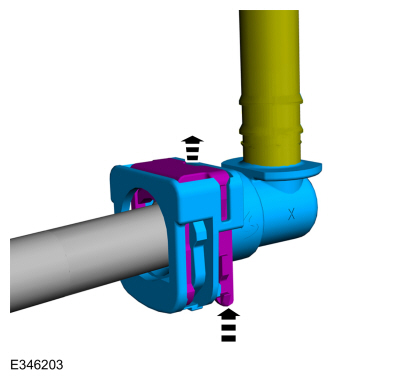
-
Press the tabs of the rear retainer clip and pull it to the outward position.
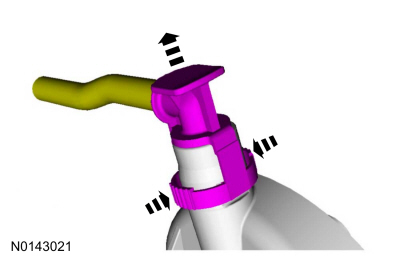 |
.jpg) |
Connect
-
Pull on the quick release coupling to make sure it is securely fastened.
.jpg) |
-
Connect the battery ground cable.
Refer to: Battery Disconnect and Connect (414-01) .
Disconnect
NOTICE: When reusing liquid tube connectors, make sure to use compressed air to remove any foreign material from the connector retaining clip area before separating from the tube or damage to the tube or connector retaining clip may occur.
NOTICE: Fuel injection equipment is manufactured to very precise tolerances and fine clearances. It is essential that absolute cleanliness is observed when working with these components or component damage may occur. Always install blanking plugs to any open orifices or tubes.
NOTICE: Do not use any tools. The use of tools may cause a deformity in the clip components which may cause fuel leaks.
NOTE: Type 7
-
If servicing a liquid fuel tube quick release coupling, release the fuel system pressure.
Refer to: Fuel System Pressure Release (310-00C) .
-
Disconnect the battery ground cable.
Refer to: Battery Disconnect and Connect (414-01) .
 |
 |
Connect
-
Pull on the quick connect coupling to make sure it is securely fastened.
 |
-
Connect the battery ground cable.
Refer to: Battery Disconnect and Connect (414-01) .
Disconnect
NOTICE: When reusing liquid tube connectors, make sure to use compressed air to remove any foreign material from the connector retaining clip area before separating from the tube or damage to the tube or connector retaining clip may occur.
NOTICE: Fuel injection equipment is manufactured to very precise tolerances and fine clearances. It is essential that absolute cleanliness is observed when working with these components or component damage may occur. Always install blanking plugs to any open orifices or tubes.
NOTICE: Do not use any tools. The use of tools may cause a deformity in the clip components which may cause fuel leaks.
NOTE: Type 8
-
If servicing a liquid fuel tube quick release coupling, release the fuel system pressure.
Refer to: Fuel System Pressure Release (310-00C) .
-
Disconnect the battery ground cable.
Refer to: Battery Disconnect and Connect (414-01) .
|
|
Connect
|
-
Connect the battery ground cable.
Refer to: Battery Disconnect and Connect (414-01) .
Disconnect
NOTICE: When reusing liquid tube connectors, make sure to use compressed air to remove any foreign material from the connector retaining clip area before separating from the tube or damage to the tube or connector retaining clip may occur.
NOTICE: Fuel injection equipment is manufactured to very precise tolerances and fine clearances. It is essential that absolute cleanliness is observed when working with these components or component damage may occur. Always install blanking plugs to any open orifices or tubes.
NOTICE: Do not use any tools. The use of tools may cause a deformity in the clip components which may cause fuel leaks.
NOTE: Type 9
-
If servicing a liquid fuel tube quick release coupling, release the fuel system pressure.
Refer to: Fuel System Pressure Release (310-00C) .
-
Disconnect the battery ground cable.
Refer to: Battery Disconnect and Connect (414-01) .
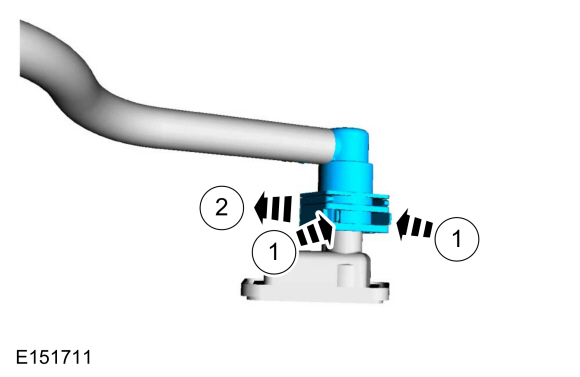
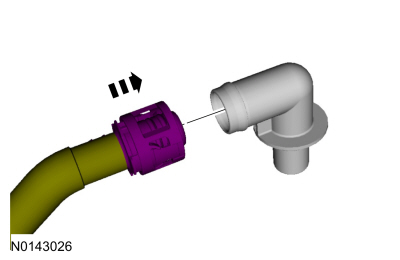
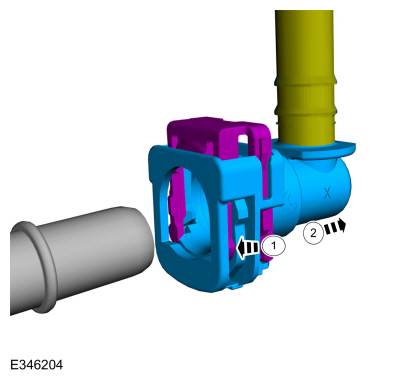
-
-
Release the secondary locking tab.
-
Depress the primary locking tab.
-
Separate the quick release coupling from the tube.
-
Release the secondary locking tab.
 |
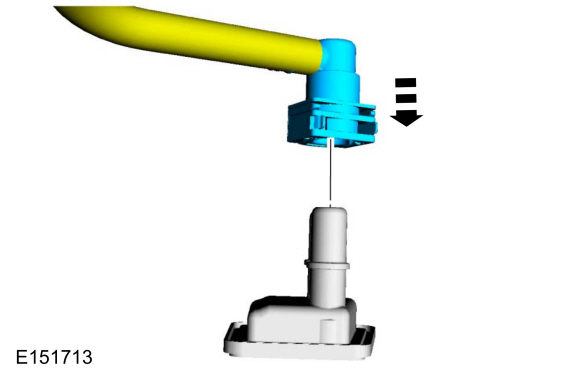
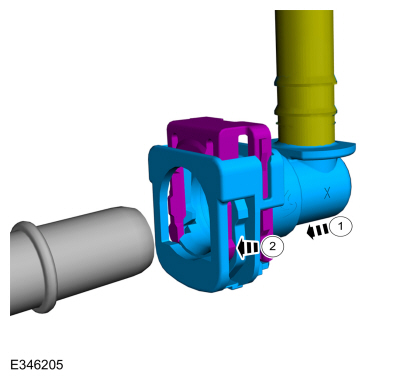
Connect
-
-
Push the quick release coupling onto the tube.
-
NOTE: Pull on the quick release coupling and the fitting to make sure it is securely fastened.
Lock the secondary locking tab.
-
Push the quick release coupling onto the tube.
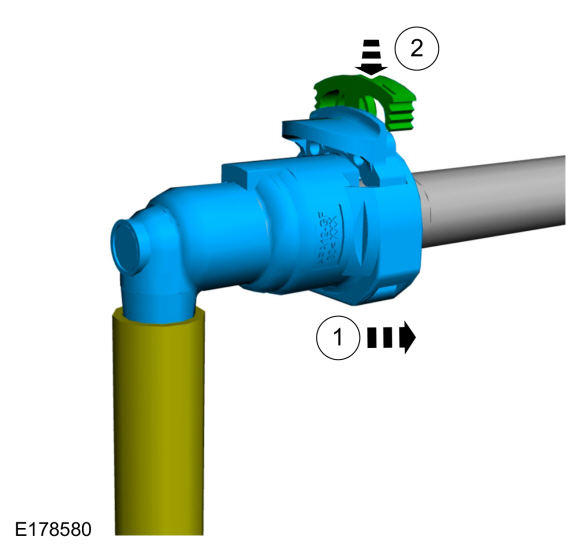 |
-
Connect the battery ground cable.
Refer to: Battery Disconnect and Connect (414-01) .
Disconnect
NOTICE: When reusing liquid tube connectors, make sure to use compressed air to remove any foreign material from the connector retaining clip area before separating from the tube or damage to the tube or connector retaining clip may occur.
NOTICE: Fuel injection equipment is manufactured to very precise tolerances and fine clearances. It is essential that absolute cleanliness is observed when working with these components or component damage may occur. Always install blanking plugs to any open orifices or tubes.
NOTICE: Do not use any tools. The use of tools may cause a deformity in the clip components which may cause fuel leaks.
NOTE: Type 10
-
If servicing a liquid fuel tube quick release coupling, release the fuel system pressure.
Refer to: Fuel System Pressure Release (310-00C) .
-
Disconnect the battery ground cable.
Refer to: Battery Disconnect and Connect (414-01) .
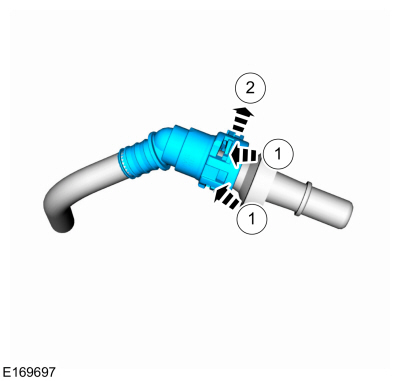
-
-
Push on the locking tab.
-
Lift the clip.
-
Push on the locking tab.
 |
-
-
Depress the tabs inward.
-
Push the clip downward.
-
Separate the quick release coupling from the fuel line.
-
Depress the tabs inward.
 |
Connect
-
-
Push the quick release coupling onto the tube.
-
Push the clip down into the quick release coupling.
-
NOTE: Pull on the quick release coupling and the fitting to make sure it is securely fastened.
Snap the locking tab into place.
-
Push the quick release coupling onto the tube.
 |
-
Connect the battery ground cable.
Refer to: Battery Disconnect and Connect (414-01) .
Disconnect
NOTICE: When reusing liquid tube connectors, make sure to use compressed air to remove any foreign material from the connector retaining clip area before separating from the tube or damage to the tube or connector retaining clip may occur.
NOTICE: Fuel injection equipment is manufactured to very precise tolerances and fine clearances. It is essential that absolute cleanliness is observed when working with these components or component damage may occur. Always install blanking plugs to any open orifices or tubes.
NOTICE: Do not use any tools. The use of tools may cause a deformity in the clip components which may cause fuel leaks.
NOTE: Type 11
-
If servicing a liquid fuel tube quick release coupling, release the fuel system pressure.
Refer to: Fuel System Pressure Release (310-00C) .
-
Disconnect the battery ground cable.
Refer to: Battery Disconnect and Connect (414-01) .
.jpg) |
Connect
-
-
NOTE: Pull on the quick release coupling and the fitting to make sure it is securely fastened.
Snap the locking tab into place.
-
|
-
Connect the battery ground cable.
Refer to: Battery Disconnect and Connect (414-01) .
Disconnect
NOTICE: When reusing liquid tube connectors, make sure to use compressed air to remove any foreign material from the connector retaining clip area before separating from the tube or damage to the tube or connector retaining clip may occur.
NOTICE: Fuel injection equipment is manufactured to very precise tolerances and fine clearances. It is essential that absolute cleanliness is observed when working with these components or component damage may occur. Always install blanking plugs to any open orifices or tubes.
NOTICE: Do not use any tools. The use of tools may cause a deformity in the clip components which may cause fuel leaks.
NOTE: Type 12
-
If servicing a liquid fuel tube quick release coupling, release the fuel system pressure.
Refer to: Fuel System Pressure Release (310-00C) .
-
Disconnect the battery ground cable.
Refer to: Battery Disconnect and Connect (414-01) .
 |
 |
Connect
-
-
NOTE: Pull on the quick release coupling and the fitting to make sure it is securely fastened.
Snap the locking tab into place.
-
 |
-
Connect the battery ground cable.
Refer to: Battery Disconnect and Connect (414-01) .
Disconnect
NOTICE: When reusing liquid tube connectors, make sure to use compressed air to remove any foreign material from the connector retaining clip area before separating from the tube or damage to the tube or connector retaining clip may occur.
NOTICE: Fuel injection equipment is manufactured to very precise tolerances and fine clearances. It is essential that absolute cleanliness is observed when working with these components or component damage may occur. Always install blanking plugs to any open orifices or tubes.
NOTICE: Do not use any tools. The use of tools may cause a deformity in the clip components which may cause fuel leaks.
NOTE: Type 13
-
If servicing a liquid fuel tube quick release coupling, release the fuel system pressure.
Refer to: Fuel System Pressure Release (310-00C) .
-
Disconnect the battery ground cable.
Refer to: Battery Disconnect and Connect (414-01) .
 |
Connect
-
-
NOTE: Pull on the quick release coupling and the fitting to make sure it is securely fastened.
Snap the locking tab into place.
-
.jpg) |
-
Connect the battery ground cable.
Refer to: Battery Disconnect and Connect (414-01) .
Disconnect
NOTICE: When reusing liquid tube connectors, make sure to use compressed air to remove any foreign material from the connector retaining clip area before separating from the tube or damage to the tube or connector retaining clip may occur.
NOTICE: Fuel injection equipment is manufactured to very precise tolerances and fine clearances. It is essential that absolute cleanliness is observed when working with these components or component damage may occur. Always install blanking plugs to any open orifices or tubes.
NOTICE: Do not use any tools. The use of tools may cause a deformity in the clip components which may cause fuel leaks.
NOTE: Type 14
-
If servicing a liquid fuel tube quick release coupling, release the fuel system pressure.
Refer to: Fuel System Pressure Release (310-00C) .
-
Disconnect the battery ground cable.
Refer to: Battery Disconnect and Connect (414-01) .
 |
Connect
 |
-
Connect the battery ground cable.
Refer to: Battery Disconnect and Connect (414-01) .
Disconnect
NOTICE: When reusing liquid or vapor tube connections, make sure to use compressed air to remove any foreign material from the connector retaining clip area before separating from the tube or damage to the tube or connector retaining clip may occur.
NOTICE: Fuel injection equipment is manufactured to very precise tolerances and fine clearances. It is essential that absolute cleanliness is observed when working with these components or component damage may occur. Always install blanking plugs to any open orifices or tubes.
NOTICE: Do not use any tools. The use of tools may cause a deformity in the clip components which may cause fuel leaks.
NOTE: Type 15
-
If servicing a liquid fuel tube quick release coupling, release the fuel system pressure.
-
Press both retaining tabs inward and remove quick release coupling from fuel tube.
 |
Connect
-
NOTE: Inspect and clean both quick release coupling ends.
Install the quick release coupling onto the tube until it is fully seated.
 |
-
Connect the battery ground cable.
Refer to: Battery Disconnect and Connect (414-01) .
Disconnect
NOTICE: When reusing liquid tube connectors, make sure to use compressed air to remove any foreign material from the connector retaining clip area before separating from the tube or damage to the tube or connector retaining clip may occur.
NOTICE: Fuel injection equipment is manufactured to very precise tolerances and fine clearances. It is essential that absolute cleanliness is observed when working with these components or component damage may occur. Always install blanking plugs to any open orifices or tubes.
NOTICE: Do not use any tools. The use of tools may cause a deformity in the clip components which may cause fuel leaks.
NOTE: Type 16
-
If servicing a liquid fuel tube quick release coupling, release the fuel system pressure.
Refer to: Fuel System Pressure Release (310-00C) .
-
Disconnect the battery ground cable.
Refer to: Battery Disconnect and Connect (414-01) .
.jpg) |
Connect
-
-
NOTE: Pull on the quick release coupling and the fitting to make sure it is securely fastened.
Snap the locking tab into place.
-
|
-
Connect the battery ground cable.
Refer to: Battery Disconnect and Connect (414-01) .
Disconnect
NOTICE: When reusing liquid tube connectors, make sure to use compressed air to remove any foreign material from the connector retaining clip area before separating from the tube or damage to the tube or connector retaining clip may occur.
NOTICE: Fuel injection equipment is manufactured to very precise tolerances and fine clearances. It is essential that absolute cleanliness is observed when working with these components or component damage may occur. Always install blanking plugs to any open orifices or tubes.
NOTICE: Do not use any tools. The use of tools may cause a deformity in the clip components which may cause fuel leaks.
NOTE: Type 17
-
If servicing a liquid fuel tube quick release coupling, release the fuel system pressure.
Refer to: Fuel System Pressure Release (310-00C) .
-
Disconnect the battery ground cable.
Refer to: Battery Disconnect and Connect (414-01) .
 |
Connect
-
-
NOTE: Pull on the quick release coupling and the fitting to make sure it is securely fastened.
Snap the locking tab into place.
-
 |
-
Connect the battery ground cable.
Refer to: Battery Disconnect and Connect (414-01) .
Disconnect
NOTICE: When reusing liquid tube connectors, make sure to use compressed air to remove any foreign material from the connector retaining clip area before separating from the tube or damage to the tube or connector retaining clip may occur.
NOTICE: Fuel injection equipment is manufactured to very precise tolerances and fine clearances. It is essential that absolute cleanliness is observed when working with these components or component damage may occur. Always install blanking plugs to any open orifices or tubes.
NOTICE: Do not use any tools. The use of tools may cause a deformity in the clip components which may cause fuel leaks.
NOTE: Type 18
-
If servicing a liquid fuel tube quick release coupling, release the fuel system pressure.
Refer to: Fuel System Pressure Release (310-00C) .
-
Disconnect the battery ground cable.
Refer to: Battery Disconnect and Connect (414-01) .
 |
Connect
-
-
NOTE: Pull on the quick release coupling and the fitting to make sure it is securely fastened.
Snap the locking tab into place.
-
 |
-
Connect the battery ground cable.
Refer to: Battery Disconnect and Connect (414-01) .
Disconnect
NOTICE: When reusing liquid tube connectors, make sure to use compressed air to remove any foreign material from the connector retaining clip area before separating from the tube or damage to the tube or connector retaining clip may occur.
NOTICE: Fuel injection equipment is manufactured to very precise tolerances and fine clearances. It is essential that absolute cleanliness is observed when working with these components or component damage may occur. Always install blanking plugs to any open orifices or tubes.
NOTICE: Do not use any tools. The use of tools may cause a deformity in the clip components which may cause fuel leaks.
NOTE: Type 19
-
If servicing a liquid fuel tube quick release coupling, release the fuel system pressure.
Refer to: Fuel System Pressure Release (310-00C) .
-
Disconnect the battery ground cable.
Refer to: Battery Disconnect and Connect (414-01) .
.jpg) |
Connect
-
-
NOTE: Pull on the quick release coupling and the fitting to make sure it is securely fastened.
Snap the locking tab into place.
-
.jpg) |
-
Connect the battery ground cable.
Refer to: Battery Disconnect and Connect (414-01) .
Disconnect
NOTICE: When reusing liquid tube connectors, make sure to use compressed air to remove any foreign material from the connector retaining clip area before separating from the tube or damage to the tube or connector retaining clip may occur.
NOTICE: Fuel injection equipment is manufactured to very precise tolerances and fine clearances. It is essential that absolute cleanliness is observed when working with these components or component damage may occur. Always install blanking plugs to any open orifices or tubes.
NOTICE: Do not use any tools. The use of tools may cause a deformity in the clip components which may cause fuel leaks.
NOTE: Type 20
-
If servicing a liquid fuel tube quick release coupling, release the fuel system pressure.
Refer to: Fuel System Pressure Release (310-00C) .
-
Disconnect the battery ground cable.
Refer to: Battery Disconnect and Connect (414-01) .
.jpg) |
Connect
-
-
NOTE: Pull on the quick release coupling and the fitting to make sure it is securely fastened.
Snap the locking tab into place.
-
.jpg) |
-
Connect the battery ground cable.
Refer to: Battery Disconnect and Connect (414-01) .
Disconnect
NOTICE: When reusing liquid tube connectors, make sure to use compressed air to remove any foreign material from the connector retaining clip area before separating from the tube or damage to the tube or connector retaining clip may occur.
NOTICE: Fuel injection equipment is manufactured to very precise tolerances and fine clearances. It is essential that absolute cleanliness is observed when working with these components or component damage may occur. Always install blanking plugs to any open orifices or tubes.
NOTICE: Do not use any tools. The use of tools may cause a deformity in the clip components which may cause fuel leaks.
NOTE: Type 21
-
If servicing a liquid fuel tube quick release coupling, release the fuel system pressure.
Refer to: Fuel System Pressure Release (310-00C) .
-
Disconnect the battery ground cable.
Refer to: Battery Disconnect and Connect (414-01) .
 |
Connect
-
-
NOTE: Pull on the quick release coupling and the fitting to make sure it is securely fastened.
Snap the locking tab into place.
-
.jpg) |
-
Connect the battery ground cable.
Refer to: Battery Disconnect and Connect (414-01) .
Disconnect
NOTICE: When reusing liquid tube connectors, make sure to use compressed air to remove any foreign material from the connector retaining clip area before separating from the tube or damage to the tube or connector retaining clip may occur.
NOTICE: Fuel injection equipment is manufactured to very precise tolerances and fine clearances. It is essential that absolute cleanliness is observed when working with these components or component damage may occur. Always install blanking plugs to any open orifices or tubes.
NOTICE: Do not use any tools. The use of tools may cause a deformity in the clip components which may cause fuel leaks.
NOTE: Type 22
-
If servicing a liquid fuel tube quick release coupling, release the fuel system pressure.
Refer to: Fuel System Pressure Release (310-00C) .
-
Disconnect the battery ground cable.
Refer to: Battery Disconnect and Connect (414-01) .
.jpg) |
Connect
 |
-
-
NOTE: Pull on the quick release coupling and the fitting to make sure it is securely fastened.
Snap the locking tab into place.
-
 |
-
NOTICE: Make sure that all fuel connections are checked for leaks.
NOTE: This step is only neccessary if a new component is installed.
-
NOTE: Pull on the quick release coupling and the fitting to make sure it is securely fastened.
Snap the locking tab into place.
-
.jpg) |
-
Connect the battery ground cable.
Refer to: Battery Disconnect and Connect (414-01) .
Disconnect
NOTICE: When reusing liquid tube connectors, make sure to use compressed air to remove any foreign material from the connector retaining clip area before separating from the tube or damage to the tube or connector retaining clip may occur.
NOTICE: Fuel injection equipment is manufactured to very precise tolerances and fine clearances. It is essential that absolute cleanliness is observed when working with these components or component damage may occur. Always install blanking plugs to any open orifices or tubes.
NOTICE: Do not use any tools. The use of tools may cause a deformity in the clip components which may cause fuel leaks.
NOTE: Type 23
-
If servicing a liquid fuel tube quick release coupling, release the fuel system pressure.
Refer to: Fuel System Pressure Release (310-00C) .
-
Disconnect the battery ground cable.
Refer to: Battery Disconnect and Connect (414-01) .
 |
Connect
-
NOTE: Make sure the retainer clip is fully seated and locked onto the tube by pulling on the quick connect coupling.
-
NOTE: Pull on the quick release coupling and the fitting to make sure it is securely fastened.
Snap the locking tab into place.
-
 |
-
Connect the battery ground cable.
Refer to: Battery Disconnect and Connect (414-01) .
Disconnect
NOTICE: When reusing liquid tube connectors, make sure to use compressed air to remove any foreign material from the connector retaining clip area before separating from the tube or damage to the tube or connector retaining clip may occur.
NOTICE: Fuel injection equipment is manufactured to very precise tolerances and fine clearances. It is essential that absolute cleanliness is observed when working with these components or component damage may occur. Always install blanking plugs to any open orifices or tubes.
NOTICE: Do not use any tools. The use of tools may cause a deformity in the clip components which may cause fuel leaks.
NOTE: Type 24
-
If servicing a liquid fuel tube quick release coupling, release the fuel system pressure.
Refer to: Fuel System Pressure Release (310-00C) .
-
Disconnect the battery ground cable.
Refer to: Battery Disconnect and Connect (414-01) .
 |
Connect
-
-
NOTE: Pull on the quick release coupling and the fitting to make sure it is securely fastened.
Snap the locking tab into place.
-
 |
-
Connect the battery ground cable.
Refer to: Battery Disconnect and Connect (414-01) .
Disconnect
NOTICE: When reusing liquid tube connectors, make sure to use compressed air to remove any foreign material from the connector retaining clip area before separating from the tube or damage to the tube or connector retaining clip may occur.
NOTICE: Fuel injection equipment is manufactured to very precise tolerances and fine clearances. It is essential that absolute cleanliness is observed when working with these components or component damage may occur. Always install blanking plugs to any open orifices or tubes.
NOTICE: Do not use any tools. The use of tools may cause a deformity in the clip components which may cause fuel leaks.
NOTE: Type 25
-
If servicing a liquid fuel tube quick release coupling, release the fuel system pressure.
Refer to: Fuel System Pressure Release (310-00C) .
-
Disconnect the battery ground cable.
Refer to: Battery Disconnect and Connect (414-01) .
-
-
Depress the clip into the quick release coupling.
-
Separate the quick release coupling from the tube.
-
Depress the clip into the quick release coupling.
 |
Connect
-
-
NOTE: Pull on the quick release coupling and the fitting to make sure it is securely fastened.
Snap the locking tab into place.
-
 |
-
Connect the battery ground cable.
Refer to: Battery Disconnect and Connect (414-01) .
Disconnect
NOTICE: When reusing liquid tube connectors, make sure to use compressed air to remove any foreign material from the connector retaining clip area before separating from the tube or damage to the tube or connector retaining clip may occur.
NOTICE: Fuel injection equipment is manufactured to very precise tolerances and fine clearances. It is essential that absolute cleanliness is observed when working with these components or component damage may occur. Always install blanking plugs to any open orifices or tubes.
NOTICE: Do not use any tools. The use of tools may cause a deformity in the clip components which may cause fuel leaks.
NOTE: Type 26
-
If servicing a liquid fuel tube quick release coupling, release the fuel system pressure.
Refer to: Fuel System Pressure Release (310-00C) .
-
Disconnect the battery ground cable.
Refer to: Battery Disconnect and Connect (414-01) .
-
-
Remove the quick release coupling from the tube.
-
Remove the quick release coupling from the tube.
 |
Connect
-
-
NOTE: Pull on the quick release coupling and the fitting to make sure it is securely fastened.
Snap the locking tab into place.
-
.jpg) |
-
Connect the battery ground cable.
Refer to: Battery Disconnect and Connect (414-01) .
Disconnect
NOTICE: When reusing liquid or vapor tube connections, make sure to use compressed air to remove any foreign material from the connector retaining clip area before separating from the tube or damage to the tube or connector retaining clip may occur.
NOTICE: Fuel injection equipment is manufactured to very precise tolerances and fine clearances. It is essential that absolute cleanliness is observed when working with these components or component damage may occur. Always install blanking plugs to any open orifices or tubes.
NOTICE: Do not use any tools. The use of tools may cause a deformity in the clip components which may cause fuel leaks.
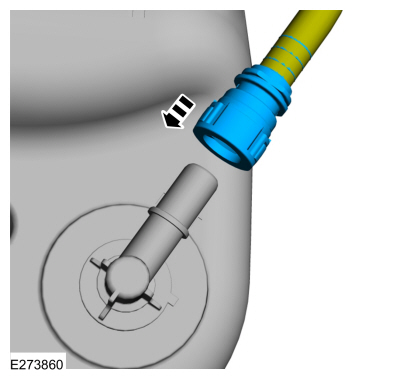
NOTE: Type 27
-
If servicing a liquid fuel tube quick release coupling, release the fuel system pressure.
Refer to: Fuel System Pressure Release (310-00C) .
-
Disconnect the battery ground cable.
Refer to: Battery Disconnect and Connect (414-01) .
 |
-
Remove the quick release coupling from the tube.
 |
Connect
-
-
NOTE: Pull on the quick release coupling and the fitting to make sure it is securely fastened.
Snap the locking tab into place.
-
 |
-
Connect the battery ground cable.
Refer to: Battery Disconnect and Connect (414-01) .
Disconnect
NOTICE: When reusing liquid or vapor tube connections, make sure to use compressed air to remove any foreign material from the connector retaining clip area before separating from the tube or damage to the tube or connector retaining clip may occur.
NOTICE: Fuel injection equipment is manufactured to very precise tolerances and fine clearances. It is essential that absolute cleanliness is observed when working with these components or component damage may occur. Always install blanking plugs to any open orifices or tubes.
NOTICE: Do not use any tools. The use of tools may cause a deformity in the clip components which may cause fuel leaks.
NOTE: Quick connect retainer clip is a serviceable part and can be replaced if it is lost during assembly.
NOTE: Type 28
-
If servicing a liquid fuel tube quick release coupling, release the fuel system pressure.
Refer to: Fuel System Pressure Release (310-00C) .
-
Disconnect the battery ground cable.
Refer to: Battery Disconnect and Connect (414-01) .
-
-
Dislodge the clip.
-
Pulling out the clip upward.
-
Dislodge the clip.
 |
-
Remove the tube.
 |
Connect
-
Insert the tube.
 |
-
NOTE: Make sure the retainer clip is fully seated and locked onto the tube by pulling on the quick connect coupling.
Press the retainer clip into the quick release coupling body until flush and the tabs are locked in place.
 |
-
Connect the battery ground cable.
Refer to: Battery Disconnect and Connect (414-01) .
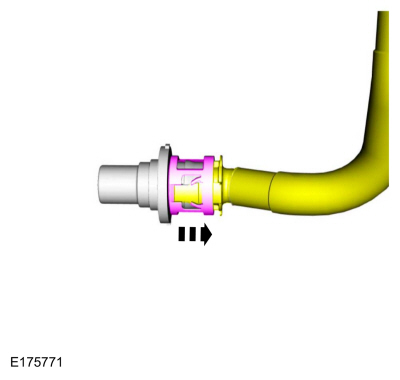
 General Procedures - Spring Lock Couplings
Special Tool(s) /
General Equipment
310-250Disconnect Tool, Fuel LineTKIT-2012A-FLTKIT-2012A-ROW
Disconnect
NOTICE:
When reusing liquid or vapor tube connectors, make sure to
use compressed air to remove any foreign material from the connector
retaining clip area before separating from the tube or damage to the
tube or connector retaining clip can occur...

Other information:
Ford Escape 2020-2026 Service Manual: Description and Operation - Electric Powertrain Control - System Operation and Component Description
System Operation System Diagram Item Description 1 BECM 2 DC/DC 3 ECM 4 BCM 5 AWD 6 GWM 7 ISC 8 APIM 9 BCMC 10 SOBDM 11 Transmission 12 Resolver Generator 13 Resolver Motor 14 Gear Shift Module Network Message Chart - Inverter System Controller (ISC) Broa..
Ford Escape 2020-2026 Service Manual: General Procedures - Power Roof Opening Panel Initialization
Initialization WARNING: Keep objects and body parts clear of the glass panel when carrying out the initialization procedure. During the initialization procedure, the glass panel closes with high force and cannot detect objects in its path. Failure to follow this instruction may result in serious personal injury. NOTE: The roof opening panel motor must be initialized when repa..
Categories
- Manuals Home
- 4th Generation Ford Escape Owners Manual
- 4th Generation Ford Escape Service Manual
- Switching the Rear Window Wiper On and Off. Reverse Wipe
- Plug-In Hybrid Electric Vehicle Drive Modes
- Removal and Installation - All-Wheel Drive (AWD) Module - 1.5L EcoBoost (132kW/180PS) – I3 (Y1)/2.0L EcoBoost (177kW/240PS) – MI4
- New on site
- Most important about car
Fastening the Seatbelts
