Ford Escape 2020-2026 Service Manual / Powertrain / Automatic Transmission / Automatic Transmission - Automatic Transmission – HF45 / General Procedures - Transmission Fluid Level Check
Ford Escape: Automatic Transmission - Automatic Transmission – HF45 / General Procedures - Transmission Fluid Level Check
Materials
| Name | Specification |
|---|---|
| Motorcraft® MERCON® ULV Automatic Transmission Fluid XT-12-QULV |
WSS-M2C949-A, MERCON® ULV |
Check
-
Start the engine and allow to run for 1 minute. Turn engine off and wait 5 minutes.
-
With the vehicle in NEUTRAL, position it on a hoist.
Refer to: Jacking and Lifting - Overview (100-02 Jacking and Lifting, Description and Operation).
-
Remove the screws and the engine front undershield.
.jpg) |
-
Rotate the steering wheel counter clockwise to access the transmission fluid leveling plug.
.jpg) |
-
NOTE: The transmission fluid should be even with the bottom of the transmission fluid leveling plug hole.
Remove the transmission fluid leveling plug and check the transmission fluid level.
.jpg) |
Adding Additional Transmission Fluid
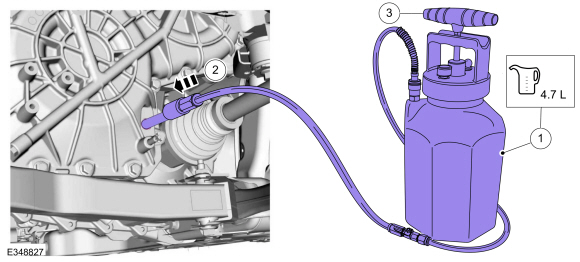
NOTE: The following procedure uses the Mityvac MVA7212 ATF Refill System.
-
Install the adapter into transmission fluid leveling plug hole hand tight.
.jpg) |
-
Fill the transmission with transmission fluid.
-
Fill the Mityvac MVA7212 with transmission fluid.
Material: Motorcraft® MERCON® ULV Automatic Transmission Fluid / XT-12-QULV (WSS-M2C949-A, ) (MERCON® ULV)
-
Connect the Mityvac MVA7212.
-
Follow the manufacturer instructions to dispense the fluid into the transmission.
-
Fill the Mityvac MVA7212 with transmission fluid.
 |
-
Release the pressure and remove the Mityvac MVA7212. Allow all excess fluid to drain into a pan.
-
Install the transmission fluid leveling plug.
Torque: 26 lb.ft (35 Nm)
 |
-
Install the engine front undershield and the screws.
|
 General Procedures - Transmission Fluid Drain and Refill
Materials
Name
Specification
Motorcraft® MERCON® ULV Automatic Transmission FluidXT-12-QULV
WSS-M2C949-A, MERCON® ULV
Draining
With the vehicle in NEUTRAL, position it on a hoist...
 General Procedures - Transmission Strategy Download
Configuration
NOTE:
The inverter system controller (ISC) is called the SOBDMC
(secondary on-board diagnostic control module C) in the scan tool.
Using the scan tool, enter the transmission 11-digit
identification and 13-digit strategy recorded from the transmission tag...
Other information:
Ford Escape 2020-2026 Service Manual: Removal and Installation - Rear Center Seatbelt Buckle
Removal NOTE: Removal steps in this procedure may contain installation details. Remove the LH rear seat cushion. Refer to: Rear Seat Cushion Cover (501-10B Rear Seats, Removal and Installation). Disconnect the rear center seatbelt buckle electrical connector...
Ford Escape 2020-2026 Owners Manual: Wireless Accessory Charger
What Is the Wireless Accessory Charger The wireless accessory charger allows you to charge one compatible Qi wireless charging device on the charging area. Wireless Accessory Charger Precautions WARNING: Wireless charging devices can affect the operation of implanted medical devices, including cardiac pacemakers...
Categories
- Manuals Home
- 4th Generation Ford Escape Owners Manual
- 4th Generation Ford Escape Service Manual
- All-Wheel Drive
- Electric Parking Brake
- Drive Modes
- New on site
- Most important about car
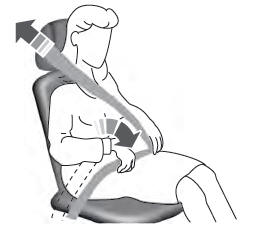
Adjusting the Seatbelts During Pregnancy
WARNING: Always ride and drive with your seatback upright and properly fasten your seatbelt. Fit the lap portion of the seatbelt snugly and low across the hips. Position the shoulder portion of the seatbelt across your chest. Pregnant women must follow this practice. See the following figure.
Copyright © 2026 www.fordescape4.com