Ford Escape: Information and Entertainment System - General Information / Removal and Installation - Audio Front Control Module (ACM)
Special Tool(s) /
General Equipment
Removal
NOTE:
Removal steps in this procedure may contain installation details.
-
NOTE:
If installing a new module, it is necessary to
upload the module configuration information to the scan tool prior to
removing the module. This information must be downloaded into the new
module after installation.
Using a diagnostic scan tool, begin the PMI process for the ACM following the on-screen instructions.
-
Remove the instrument panel center register.
Refer to: Center Registers (412-00 Climate Control System - General Information, Removal and Installation).
-
NOTICE:
After releasing the clips and hooks position the
assembly forward off the locating dowels then up or damage to the trim
plate may occur.
Position the console center top trim panel up for access.
-
Release the clips.
-
Release the retaining hooks and position front of
the assembly up. Position the assembly forward off the rear locating
dowels then up.
-
Disconnect the connectors and remove the console center top trim panel.
-
Remove the screw cover.
Use the General Equipment: Interior Trim Remover
-
Remove the screw, release the clips and remove the LH console side trim panel.
Use the General Equipment: Interior Trim Remover
-
Release the clips and remove the RH console side trim panel.
Use the General Equipment: Interior Trim Remover
-
Remove the front USB port.
Refer to: Universal Serial Bus (USB) Port (415-00 Information and
Entertainment System - General Information, Removal and Installation).
-
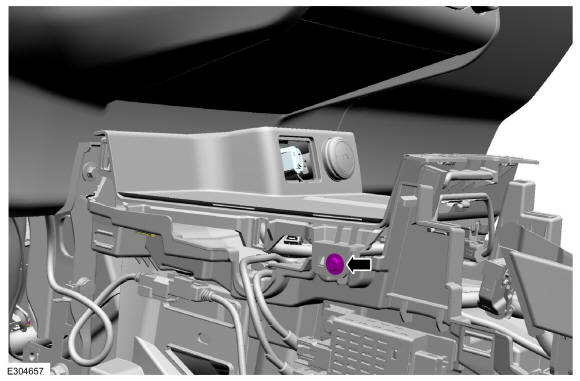
Remove the LH bolt.
-
Disconnect the electrical connector, separate the wiring guide and remove the bolt.
-
Release the clips and remove the media bin.
-
Disconnect the electrical connector.
Use the General Equipment: Interior Trim Remover
-
Release the clips and remove the climate controls lower trim panel.
Use the General Equipment: Interior Trim Remover
-
Remove the screws.
Torque:
22 lb.in (2.5 Nm)
-
Position aside the LH front door weatherstrip.
-
Release the clip and remove the center A-pillar trim panel.
Use the General Equipment: Interior Trim Remover
-
Release the clips and remove the LH instrument panel finish panel.
Use the General Equipment: Interior Trim Remover
-
Release the clips, disconnect the electrical connector and remove the LH steering column opening trim panel.
Use the General Equipment: Interior Trim Remover
-
Remove the screws.
Torque:
22 lb.in (2.5 Nm)
-
Release the clips, disconnect the electrical connectors and remove theRH steering column opening trim panel.
Use the General Equipment: Interior Trim Remover
-
Disconnect the electrical connectors, separate the wiring guides and position the harness aside.
-
Remove the screws and the ACM .
Torque:
22 lb.in (2.5 Nm)
Installation
-
To install, reverse the removal procedure.
-
NOTE:
This step is only necessary when installing a new component.
Using a diagnostic scan tool, complete the PMI process for the ACM following the on-screen instructions.
Removal
NOTE:
Removal steps in this procedure may contain installation details.
NOTE:
If installing a new module, it is necessary to
upload the module configuration information to the scan tool prior to
removing the module...
Special Tool(s) /
General Equipment
Interior Trim Remover
Removal
NOTE:
Removal steps in this procedure may contain installation details...
Other information:
Overview
The forward collision warning system works in conjunction with the ACC
system. The forward collision warning system alerts the driver of a
collision risk by illuminating the red warning indicator located in the
IPC information center and in the HUD ...
WARNING: If the tire does not
inflate to the recommended tire pressure
within 15 minutes, stop and call roadside
assistance.
WARNING: The power plug may
get hot after use and should be handled
carefully when unplugging.
Check the air pressure of your tires as
follows:
Remove the valve cap from the tire
valve...
Categories
What Is the Master Access Code
The master access code is a factory-set
five-digit entry code. You can operate the
keypad with the master access code at
any time. The master access code is on the
owner’s wallet card in the glove box and
is available from an authorized dealer.
Displaying the Master Access Code
To display the factory-set code in the
information display:

Remove the rubber mat.
Insert the first programmed key in the
backup slot.
Press the push button ignition switch
once and wait a few seconds.
Press the push button ignition switch
again and remove the key.
Within 10 seconds, place a second
programmed intelligent access key in
the backup slot and press the push
button ignition switch.
read more
.jpg)
.jpg)
.jpg)
.jpg)
.jpg)
.jpg)
.jpg)
.jpg)
.jpg)
.jpg)
.jpg)
.jpg)
.jpg)
.jpg)
.jpg)
.jpg)
.jpg)
 Removal and Installation - Audio Digital Signal Processing (DSP) Module
 Removal and Installation - Audio Unit Antenna Cable