
Ford Escape: Evaporative Emissions / Removal and Installation - Evaporative Emission Canister Ventilation Filter - Plug-In Hybrid Electric Vehicle (PHEV)
Removal
 WARNING:
Do not smoke, carry lighted tobacco or have an open flame of
any type when working on or near any fuel-related component. Highly
flammable mixtures may be present and may be ignited. Failure to follow
these instructions may result in serious personal injury.
WARNING:
Do not carry personal electronic devices such as cell
phones, pagers or audio equipment of any type when working on or near
any fuel-related component. Highly flammable mixtures may be present and
may be ignited. Failure to follow these instructions may result in
serious personal injury.
WARNING:
Always disconnect the battery ground cable at the battery
when working on an evaporative emission (EVAP) system or fuel-related
component. Highly flammable mixtures may be present and may be ignited.
Failure to follow these instructions may result in serious personal
injury.
NOTE: Removal steps in this procedure may contain installation details.
-
With the vehicle in NEUTRAL, position it on a hoist.
Refer to: Jacking and Lifting (100-02 Jacking and Lifting - 2.5L Duratec – Hybrid (121kW/164PS) (BG)) .
-
Disconnect the negative battery cable.
Refer to: Battery Disconnect and Connect (414-01 Battery, Mounting and Cables, General Procedures).
-
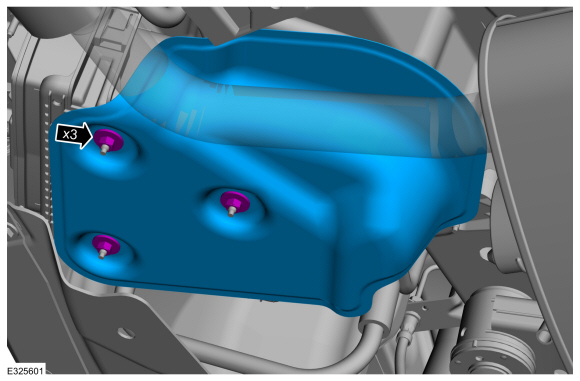
Remove the retainers and the EVAP canister heat shield.
Torque: 18 lb.in (2 Nm)
 |
-
-
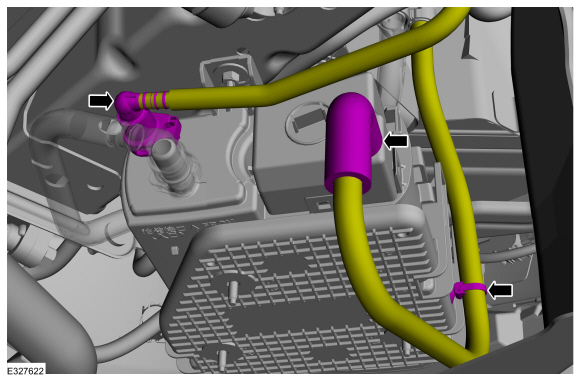
Disconnect the EVAP canister quick release coupling.
Refer to: Quick Release Coupling (310-00 Fuel System - General Information - 2.5L Duratec – Hybrid (121kW/164PS) (BG)) .
-
Disconnect the fresh air hose and retainer.
-
Disconnect the EVAP canister quick release coupling.
 |
-
Release the tabs and remove EVAP canister ventilation filter.
 |
Installation
-
To install, reverse the removal procedure.
 Removal and Installation - Evaporative Emission Canister Purge Valve - Hybrid Electric Vehicle (HEV)
Removal
WARNING:
Do not smoke, carry lighted tobacco or have an open flame of
any type when working on or near any fuel-related component...
 Removal and Installation - Fuel Tank Pressure Sensor and Tube - Plug-In Hybrid Electric Vehicle (PHEV)
Removal
WARNING:
Do not smoke, carry lighted tobacco or have an open flame of
any type when working on or near any fuel-related component...
Other information:
Ford Escape 2020-2026 Service Manual: Removal and Installation - Cabin Coolant Heater
Removal NOTE: Removal steps in this procedure may contain installation details. Remove the RH fender splash shield. Refer to: Fender Splash Shield (501-02 Front End Body Panels, Removal and Installation). Remove the retainer and the ground wire...
Ford Escape 2020-2026 Owners Manual: CD (If Equipped)
Once you select this option, the system returns you to the main audio screen. The current audio information appears on the screen. The following buttons are also available: You can use the forward, reverse, pause or play buttons to control the audio playback...
Categories
- Manuals Home
- 4th Generation Ford Escape Owners Manual
- 4th Generation Ford Escape Service Manual
- Locating the Pre-Collision Assist Sensors
- Accessing the Trip Computer. Resetting the Trip Computer
- Child Safety Locks
- New on site
- Most important about car
Symbols Glossary
These are some of the symbols you may see on your vehicle.
 Air conditioning system
