Ford Escape 2020-2026 Service Manual / Body and Paint / Frame and Mounting / Uni-Body, Subframe and Mounting System / Removal and Installation - Rear Differential Subframe Bushings
Ford Escape: Uni-Body, Subframe and Mounting System / Removal and Installation - Rear Differential Subframe Bushings
Special Tool(s) / General Equipment
.jpg) |
205-1075 Remover/Installer, Rear Drive Unit Front |
Removal
Front bushings
NOTE: LH shown, RH similar.
-
Remove the RDU .
Refer to: Axle Assembly (205-02 Rear Drive Axle/Differential, Removal and Installation).
-
Assemble the spindle and thrust washer of the special service tool.
Use Special Service Tool: 205-1075 Remover/Installer, Rear Drive Unit Front.
.jpg) |
-
Assemble the tube and cover of the special service tool.
Use Special Service Tool: 205-1075 Remover/Installer, Rear Drive Unit Front.
.jpg) |
-
Remove the RDU front bushing from the rear subframe.
.jpg) |
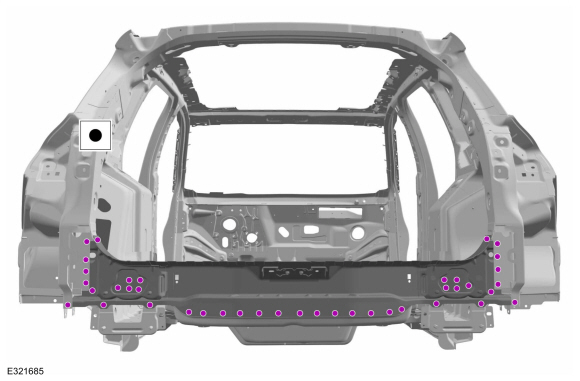
Rear bushings
-
Remove the RDU .
Refer to: Axle Assembly (205-02 Rear Drive Axle/Differential, Removal and Installation).
-
Assemble the special service tool.
Use Special Service Tool: 205-1075 Remover/Installer, Rear Drive Unit Front.
 |
-
Remove the RDU rear bushing from the rear subframe.
.jpg) |
Installation
Front bushings
NOTE: LH shown, RH similar.
-
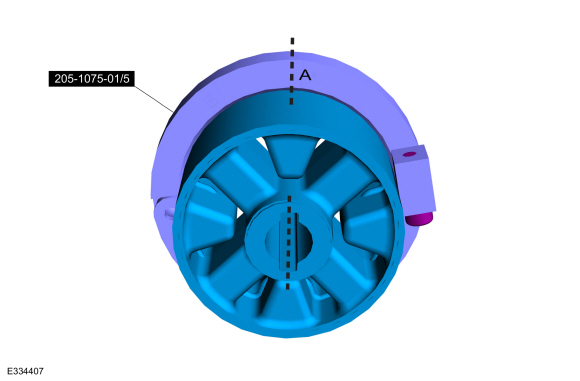
NOTE: Make sure the alignment marks on the RDU bushing remover/installers are aligned with the anti-rotation tabs on the RDU bushing.
Align the bush and the markings on the clamping ring.
-
Marking "A" on clamping ring - RH side bushing.
Use Special Service Tool: 205-1075 Remover/Installer, Rear Drive Unit Front.
-
Marking "B" on clamping ring - LH side bushing.
Use Special Service Tool: 205-1075 Remover/Installer, Rear Drive Unit Front.
-
Marking "A" on clamping ring - RH side bushing.
.jpg) |
-
Align the alignment contour of the clamping ring with the recess in the bushing receiver.
.jpg) |
-
Assemble the special service tool.
Use Special Service Tool: 205-1075 Remover/Installer, Rear Drive Unit Front.
.jpg) |
-
Gently pull the front bushing into the rear subframe.
.jpg) |
-
Remove the clamping ring.
.jpg) |
-
Install the front bushing into the rear subframe.
.jpg) |
-
Install the RDU.
Refer to: Axle Assembly (205-02 Rear Drive Axle/Differential, Removal and Installation).
Rear bushings
-
NOTE: Make sure the alignment marks on the RDU bushing remover/installers are aligned with the anti-rotation tabs on the RDU bushing.
Align the bush and the markings on the clamping ring.
-
Marking "A" on clamping ring - LH side bushing.
Use Special Service Tool: 205-1075 Remover/Installer, Rear Drive Unit Front.
-
Marking "B" on clamping ring - RH side bushing.
Use Special Service Tool: 205-1075 Remover/Installer, Rear Drive Unit Front.
-
Marking "A" on clamping ring - LH side bushing.
 |
-
Align the alignment contour of the clamping ring with the recess in the bushing receiver.
.jpg) |
-
Assemble the special service tool and gently pull the rear bushing into the rear subframe.
Use Special Service Tool: 205-1075 Remover/Installer, Rear Drive Unit Front.
.jpg) |
-
Remove the clamping ring.
.jpg) |
-
Install the rear bushing into the rear subframe.
|
-
Install the RDU.
Refer to: Axle Assembly (205-02 Rear Drive Axle/Differential, Removal and Installation).

 Removal and Installation - Rear Subframe
Special Tool(s) /
General Equipment
300-OTC1585AEPowertrain Lift
Wooden Block
Removal
NOTICE:
Suspension fasteners are critical parts that affect the
performance of vital components and systems...
Other information:
Ford Escape 2020-2026 Service Manual: Removal and Installation - Rear Wheel Speed Sensor - AWD
Materials Name Specification Motorcraft® Metal Brake Parts CleanerPM-4-A, PM-4-B, APM-4-C - Removal NOTE: Removal steps in this procedure may contain installation details. Remove the wheel and tire. Refer to: Wheel and Tire (204-04A Wheels and Tires, Removal and Installation)...
Ford Escape 2020-2026 Service Manual: Removal and Installation - Seat Position Sensor
Removal NOTE: RH (right-hand) seat shown, LH (left-hand) seat similar. NOTE: Removal steps in this procedure may contain installation details. Disconnect the seat position sensor electrical connector. Remove the seat position sensor screw...
Categories
- Manuals Home
- 4th Generation Ford Escape Owners Manual
- 4th Generation Ford Escape Service Manual
- Accessing the Trip Computer. Resetting the Trip Computer
- Rear View Camera
- Description and Operation - Identification Codes
- New on site
- Most important about car
Push Button Ignition Switch

Switching the Ignition Off
When the ignition is on or in accessory mode, press the push button ignition switch once without your foot on the brake pedal.
Copyright © 2026 www.fordescape4.com