Ford Escape: Rear Drive Axle/Differential / Diagnosis and Testing - Rear Drive Axle and Differential
Symptom Chart(s)
Diagnostics in this manual assume a certain skill level and knowledge of Ford-specific diagnostic practices.
REFER to: Diagnostic Methods (100-00 General Information, Description and Operation).
Symptom Chart: Differential
Symptom Chart - Differential
| Condition | Actions |
|---|---|
| Axle overheating | GO to Pinpoint Test A |
| No torque available at the rear wheels | GO to Pinpoint Test B |
| Check AWD system fault message on message center | GO to Pinpoint Test B |
| Yellow or green or milky axle lubricant in low mileage vehicles | GO to Pinpoint Test C |
| Lubricant leaking from the pinion seal, halfshaft oil seals, housing joints, clutch motor or RDU speed sensor | GO to Pinpoint Test D |
Symptom Chart: NVH
Symptom Chart
| Condition | Actions |
|---|---|
| Axle howling or whine – rear axle | GO to Pinpoint Test E |
| Driveline clunk - loud clunk when shifting from REVERSE to DRIVE | GO to Pinpoint Test F |
| Driveline clunk — occurs as the vehicle starts to move forward following a stop | GO to Pinpoint Test G |
| Grinding, popping or chattering – noise from the rear axle when the vehicle is turning | GO to Pinpoint Test H |
| Grunting — normally associated with a shudder experienced during acceleration from a complete stop | GO to Pinpoint Test I |
| Noise isolated to the RDU using normal NVH diagnostics | GO to Pinpoint Test J |
| Driveline shudder – occurs during acceleration from a slow speed or stop | GO to Pinpoint Test K |
Global Customer Symptom Code (GCSC) Chart
Diagnostics in this manual assume a certain skill level and knowledge of Ford-specific diagnostic practices.
REFER to: Diagnostic Methods (100-00 General Information, Description and Operation).
| Symptom | Action |
|---|---|
| Start/Run/Move > Running > Overheats > Always | GO to Pinpoint Test A |
| Start/Run/Move > Moving > 4 x 4 Function > Inoperative | GO to Pinpoint Test B |
| Start/Run/Move > Fluids > Axle > Consumption | GO to Pinpoint Test A |
| Start/Run/Move > Fluids > Axle > Visible Leak | GO to Pinpoint Test A |
| Start/Run/Move > Fluids > Axle > Visible Leak | GO to Pinpoint Test D |
| Start/Run/Move > Fluids > Axle > Visible Leak | GO to Pinpoint Test E |
| Start/Run/Move > Fluids > Axle > Contamination | GO to Pinpoint Test A |
| Start/Run/Move > Fluids > Axle > Contamination | GO to Pinpoint Test C |
| Start/Run/Move > Noise > Moving/Driving > Always | GO to Pinpoint Test E |
| Start/Run/Move > Noise > Moving/Driving > Always | GO to Pinpoint Test F |
| Start/Run/Move > Noise > Moving/Driving > Always | GO to Pinpoint Test G |
| Start/Run/Move > Noise > Moving/Driving > Always | GO to Pinpoint Test H |
| Start/Run/Move > Noise > Moving/Driving > Always | GO to Pinpoint Test J |
| Start/Run/Move > Vibration > Moving/Driving > Intermittent | GO to Pinpoint Test I |
| Start/Run/Move > Vibration > Moving/Driving > Intermittent | GO to Pinpoint Test K |
Pinpoint Tests
|
Normal Operation and Fault Conditions
REFER to: Rear Drive Axle and Differential - Overview (205-02 Rear Drive Axle/Differential, Description and Operation). Possible Sources
|
||||
| A1 CHECK AXLE LUBRICANT LEVEL | ||||
Is the lubricant level low?
|
||||
| A2 CHECK AXLE CONDITION | ||||
Was damage found?
|
|
Normal Operation and Fault Conditions
REFER to: Rear Drive Axle and Differential - Overview (205-02 Rear Drive Axle/Differential, Description and Operation). Possible Sources
|
||||
| B1 CHECK AWD (ALL-WHEEL DRIVE) SYSTEM FAULT MESSAGE ON MESSAGE CENTER | ||||
Is there a AWD system fault message on the message center?
|
||||
| B2 CHECK AWD (ALL-WHEEL DRIVE) SYSTEM OPERATION | ||||
Is the AWD system operating?
|
|
Normal Operation and Fault Conditions
REFER to: Rear Drive Axle and Differential - Overview (205-02 Rear Drive Axle/Differential, Description and Operation). Possible Sources
|
||||
| C1 INSPECT AXLE HOUSING AND VENT | ||||
Was any damage or leaks found?
|
|
Normal Operation and Fault Conditions
REFER to: Rear Drive Axle and Differential - Overview (205-02 Rear Drive Axle/Differential, Description and Operation). Possible Sources
|
||||
| D1 INSPECT AXLE VENT | ||||
Was blockage found?
|
||||
| D2 INSPECT THE PINION SEAL, AXLE SHAFT OIL SEALS AND DUST SLINGER | ||||
Was any damage found?
|
|
Normal Operation and Fault Conditions
REFER to: Rear Drive Axle and Differential - Overview (205-02 Rear Drive Axle/Differential, Description and Operation). Possible Sources
|
||||
| E1 CHECK THE LUBRICANT LEVEL | ||||
Is the lubricant level low?
|
||||
| E2 INSPECT AXLE HOUSING FOR DAMAGE | ||||
Was any damage found?
|
|
Normal Operation and Fault Conditions
REFER to: Rear Drive Axle and Differential - Overview (205-02 Rear Drive Axle/Differential, Description and Operation). Possible Sources
|
||||
| F1 CHECK THE LUBRICATION LEVEL | ||||
Is the lubricant level low?
|
|
Normal Operation and Fault Conditions
REFER to: Rear Drive Axle and Differential - Overview (205-02 Rear Drive Axle/Differential, Description and Operation). Possible Sources
|
||||
| G1 CHECK FOR LOOSE BOLTS. | ||||
Are any bolts loose?
|
|
Normal Operation and Fault Conditions
REFER to: Rear Drive Axle and Differential - Overview (205-02 Rear Drive Axle/Differential, Description and Operation). Possible Sources
|
||||
| H1 CHECK AXLE CONDITION | ||||
Was damage found?
|
||||
| H2 INSPECT THE HALFSHAFT OR HALFSHAFT CIRCLIP | ||||
Was any damage found?
|
||||
| H3 INSPECT THE DIFFERENTIAL | ||||
Was any damage found?
|
|
Normal Operation and Fault Conditions
REFER to: Rear Drive Axle and Differential - Overview (205-02 Rear Drive Axle/Differential, Description and Operation). Possible Sources
|
||||
| I1 CHECK FOR LOOSE BOLTS | ||||
Are any bolts loose?
|
|
Normal Operation and Fault Conditions
REFER to: Rear Drive Axle and Differential - Overview (205-02 Rear Drive Axle/Differential, Description and Operation). Possible Sources
|
||||
| J1 CHECK AXLE CONDITION | ||||
Was damage found?
|
||||
| J2 INSPECT THE DIFFERENTIAL | ||||
Was any damage found?
|
|
Normal Operation and Fault Conditions
REFER to: Rear Drive Axle and Differential - Overview (205-02 Rear Drive Axle/Differential, Description and Operation). Possible Sources
|
||||
| K1 CHECK THE AXLE MOUNTS AND THE REAR SUSPENSION FOR DAMAGE OR WEAR | ||||
Was wear or damage found?
|
||||
| K2 CHECK THE REAR AXLE FOR LOOSE BOLTS | ||||
Were any bolts loose?
|
||||
| K3 CHECK FOR CORRECT DRIVELINE ANGLES | ||||
Are the driveline angles correct?
|
Axle Fluid Analysis
The appearance of milky or yellow or green axle fluid in early mileage axles is a result of yellow marking compound used at the assembly plant to verify gear mesh contact pattern. The marking compound within the fluid will darken some over time. The milky fluid appearance will diminish and cause no harm and does not require a fluid change.
Analysis of Leakage
Clean up the leaking area enough to identify the exact source.
A plugged RDU housing vent can cause excessive pinion seal lip wear due to internal pressure buildup.
Verify the RDU lubricant level is at least 3-5 mm (1/8-3/16) below the bottom of the fill hole.
Axle Vent
A plugged vent will cause excessive seal lip wear due to internal pressure buildup. If a leak occurs, check the vent fitting or hose assembly. If the vent cannot be cleared, install a new vent.
Drive Pinion Seal
Leaks at the drive pinion seal originate from the following causes:
- Damaged seal
- Worn seal journal surface
A new drive pinion seal must be installed if any of these conditions exist.
- The drive pinion seal can be torn, cut or gouged if it is not installed correctly. The spring that holds the drive pinion seal against the pinion flange may be knocked out and allow fluid to pass the lip.
- Metal chips trapped at the sealing lip can cause oil leaks. These can cause a wear groove on the drive pinion flange and result in pinion seal wear.
- When a seal leak occurs, install a new drive pinion seal and check the vent to make sure it is clean and free of foreign material.
Replace the drive pinion seals as necessary,
REFER to: Drive Pinion Seal (205-02 Rear Drive Axle/Differential, Removal and Installation).
Drive Pinion Nut
On
some high-mileage vehicles, oil may leak through the threads of the
drive pinion nut. INSTALL a new drive pinion nut as necessary.
REFER to: Drive Pinion Flange (205-02 Rear Drive Axle/Differential, Removal and Installation).
Differential Seals
NOTICE: When installing shafts, do not allow splines to contact seals during installation or damage to the seals may occur.
Halfshaft seals are susceptible to the same types of damage as drive pinion seals if incorrectly installed. The seal bore must be clean and the lip handled carefully to avoid cutting or tearing it. The seal journal surface must be free of nicks, gouges and rough surface texture.
For information on differential seals,
REFER to: Rear Halfshaft Seal (205-02 Rear Drive Axle/Differential, Removal and Installation).

 General Procedures - Differential Draining and Filling
Draining
With the vehicle in NEUTRAL, position it on a hoist.
Refer to: Jacking and Lifting - Overview (100-02 Jacking and Lifting, Description and Operation)...
Other information:
Ford Escape 2020-2026 Service Manual: Removal and Installation - Telematics Control Unit (TCU) Module Antenna Coaxial Cable
Removal Upper TCU module antenna coaxial cable Remove the instrument panel upper section. Refer to: Instrument Panel Upper Section (501-12 Instrument Panel and Console, Removal and Installation). Separate the wiring guide, remove the bolts and the TCU antenna and bracket as an assembly...
Ford Escape 2020-2026 Service Manual: Description and Operation - Power Brake System - Vehicles With: Electric Brake Booster - System Operation and Component Description
System Operation System Diagram - Electric Brake Boost E347819 *.sttxt { visibility: hidden; } *.stcallout { visibility: visible; } HS-CAN3 HS-CAN1 HS-CAN2 1 IPC 2 RCM 3 BCM 4 PCM 5 GWM ..
Categories
- Manuals Home
- 4th Generation Ford Escape Owners Manual
- 4th Generation Ford Escape Service Manual
- Plug-In Hybrid Electric Vehicle Drive Modes
- Locating the Pre-Collision Assist Sensors
- General Procedures - Brake Service Mode Activation and Deactivation
- New on site
- Most important about car
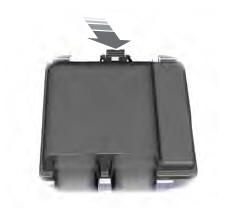
Under Hood Fuse Box
Locating the Under Hood Fuse Box
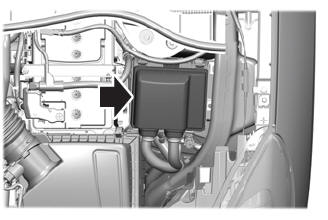
Accessing the Under Hood Fuse Box