Ford Escape: Body Closures / General Procedures - Liftgate Alignment
Special Tool(s) /
General Equipment
Inspection
NOTE:
Removal steps in this procedure may contain installation details.
-
Inspect the body-to-liftgate door dimensions.
-
Open the liftgate.
-
Position the liftgate opening weather strip aside.
-
Release the tabs and remove the liftgate striker cover.
Use the General Equipment: Interior Trim Remover
-
Remove the fasteners and liftgate striker.
Torque:
18 lb.ft (25 Nm)
Liftgate left and right, up and down alignment
-
Loosen the bolts to permit movement of the liftgate.
Loosen:
:
2 turn(s)
-
Carefully close the liftgate.
-
Adjust the liftgate as required.
-
Carefully open the liftgate.
-
Tighten the fasteners.
Torque:
22 lb.ft (30 Nm)
Liftgate in and out alignment
-
Adjust the stops.
-
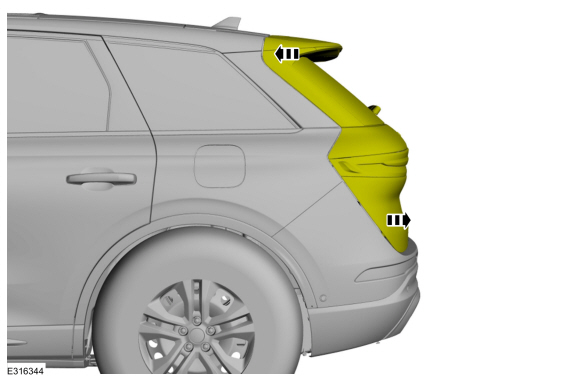
Remove the C-pillar trim panel.
Refer to: C-Pillar Trim Panel (501-05 Interior Trim and Ornamentation, Removal and Installation).
-
-
Release the clips.
-
Lower the rear headliner.
-
Loosen the bolts to permit movement of the liftgate.
Loosen:
:
2 turn(s)
-
Adjust the liftgate as required.
-
Tighten the fasteners.
Torque:
22 lb.ft (30 Nm)
-
-
Attach the clips.
-
Position back the rear headliner.
-
Install the C-pillar trim panel.
Refer to: C-Pillar Trim Panel (501-05 Interior Trim and Ornamentation, Removal and Installation).
All alignments
-
Inspect the liftgate dimentions.
-
If equipped with power liftgate, carry out the power liftgate initialization.
Refer to: Power Liftgate Initialization (501-03 Body Closures, General Procedures).
Inspection
Inspect the hood-to-body dimensions.
All alignments
Open the hood.
Remove the hood latch...
Programming
NOTE:
This procedure clears and then sets new open and close end points in the RGTM memory.
Turn the ignition ON.
Using a scan tool perform the RGTM self test to complete power liftgate
initialization...
Other information:
Locating the Cross Traffic Alert Sensors
The sensors are behind the rear bumper
on both sides of your vehicle.
Note: Keep the sensors free from snow, ice
and large accumulations of dirt.
Note: Do not cover the sensors with bumper
stickers, repair compound or other objects...
Symptom Chart
Symptom Chart: Forward Collision Warning
Diagnostics in this manual assume a certain skill level and knowledge of Ford-specific diagnostic practices. REFER to: Diagnostic Methods (100-00 General Information, Description and Operation)...
Categories
What Is the Master Access Code
The master access code is a factory-set
five-digit entry code. You can operate the
keypad with the master access code at
any time. The master access code is on the
owner’s wallet card in the glove box and
is available from an authorized dealer.
Displaying the Master Access Code
To display the factory-set code in the
information display:

Remove the rubber mat.
Insert the first programmed key in the
backup slot.
Press the push button ignition switch
once and wait a few seconds.
Press the push button ignition switch
again and remove the key.
Within 10 seconds, place a second
programmed intelligent access key in
the backup slot and press the push
button ignition switch.
read more
.jpg)
.jpg)
.jpg)
.jpg)
.jpg)
.jpg)
.jpg)
.jpg)
.jpg)
.jpg)
.jpg)
.jpg)
.jpg)
.jpg)
 General Procedures - Hood Alignment
 General Procedures - Power Liftgate Initialization