Ford Escape: Accessory Drive - 1.5L EcoBoost (132kW/180PS) – I3 (Y1) / Removal and Installation - Accessory Drive Belt Tensioner
Removal
NOTICE: Under no circumstances should the accessory drive belt, tensioner or pulleys be lubricated as potential damage to the belt material and tensioner damping mechanism will occur. Do not apply any fluids or belt dressing to the accessory drive belt or pulleys.
NOTE: Removal steps in this procedure may contain installation details.
-
Refer to: Health and Safety Precautions (100-00 General Information, Description and Operation).
-
Remove the accessory drive belt.
Refer to: Accessory Drive Belt - Vehicles Built Up To: 1-October-2020 (303-05A Accessory Drive - 1.5L EcoBoost (132kW/180PS) – I3 (Y1), Removal and Installation).
-
.jpg) WARNING:
The tensioner is under spring tension. Be careful
when handling the tensioner. Failure to follow this instruction may
result in personal injury.
WARNING:
The tensioner is under spring tension. Be careful
when handling the tensioner. Failure to follow this instruction may
result in personal injury.
NOTE: The accessory drive belt tensioner must be replaced as a complete unit.
-
Loosen the bolt and remove the accessory drive belt tensioner.
Torque: 35 lb.ft (47.5 Nm)
-
Loosen the bolt and remove the accessory drive belt tensioner.
 |
Installation
-
NOTE: Safety shield must be re-installed, to protect hands in the case of an un-expected start.
To install, reverse the removal procedure.
 Removal and Installation - Accessory Drive Belt Idler Pulley
Removal
Refer to: Accessory Drive Belt - Vehicles Built Up To: 1-October-2020
(303-05A Accessory Drive - 1.5L EcoBoost (132kW/180PS) – I3 (Y1),
Removal and Installation)...

Other information:
Ford Escape 2020-2026 Owners Manual: Passive Anti-Theft System. Anti-Theft Alarm System
Passive Anti-Theft System What Is the Passive Anti-Theft System The passive anti-theft system prevents someone from starting the vehicle with an incorrectly coded key. How Does the Passive Anti-Theft System Work The passive anti-theft system arms when you switch the ignition off. It disarms when the ignition is switched on with a correctly coded key. Note: The system is not compatible with no..
Ford Escape 2020-2026 Owners Manual: Locating the Brake Fluid Reservoir. Checking the Brake Fluid.
Locating the Brake Fluid Reservoir See Under Hood Overview. Checking the Brake Fluid WARNING: Do not use any fluid other than the recommended brake fluid as this will reduce brake efficiency. Use of incorrect fluid could result in the loss of vehicle control, serious personal injury or death. WARNING: Only use brake fluid from a sealed container. Contamination with dirt, water, petroleum pr..
Categories
- Manuals Home
- 4th Generation Ford Escape Owners Manual
- 4th Generation Ford Escape Service Manual
- Plug-In Hybrid Electric Vehicle Drive Modes
- Description and Operation - Identification Codes
- General Procedures - Brake Service Mode Activation and Deactivation
- New on site
- Most important about car
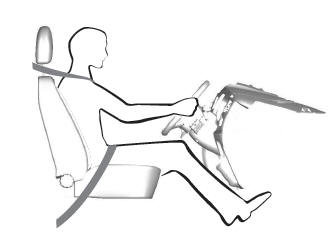
Sitting in the Correct Position
When you use them properly, the seat, head restraint, seatbelt and airbags will provide optimum protection in the event of a crash.