Ford Escape: Roof Opening Panel / Removal and Installation - Air Deflector
Removal
-
Place the roof opening panel glass in the fully OPEN position.
-
Disconnect the air deflector wire.
-
Push metal rod down to unclip rod from plastic clips.
-
Pull the air deflector rod out and slightly upward and detach the from the clips.
-
Pull the air deflector metal rod slightly upward and detach both the wire ends.
-
Roll the front of the air deflector rearward 90 degrees and remove the air deflector.
-
Unclip end cap by rolling the air deflector arm around 90 degree from pivot point.
Installation
-
Mount and install the air deflector onto the frame.
-
Make sure the spring is seated correctly inside the guide rail.
-
Attach all the 6 clips firmly with the air deflector rod.
-
Place the air deflector rod in to hole of plastic part on both sides.
-
Make sure that the spring is inside the sliding area from the end cap.
-
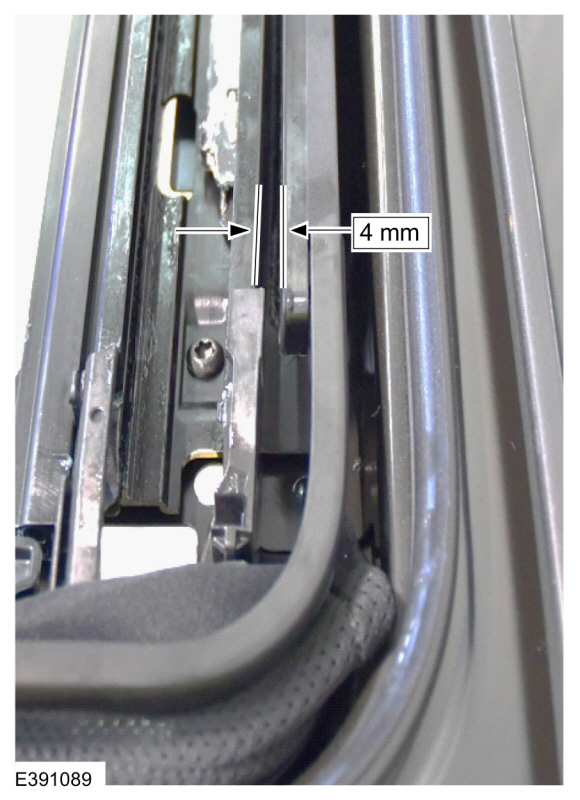
NOTE:
On both sides.
Make sure that the Y-Gap between the guide and the end cap should be ~ 4 mm.
-
Place the roof opening panel glass in the fully CLOSE position.
-
Carry out the roof opening panel initialization.
Refer to: Power Roof Opening Panel Initialization (501-17 Roof Opening Panel, General Procedures).
Adjustment
Measurement
Measure the roof opening panel movable glass height/flushness.
Measure the roof opening panel sliding glass
front edge-to-header panel height/flushness...
Removal
NOTE:
Removal steps in this procedure may contain installation details.
Pulling downward, remove the cross beam cover.
Refer to: Roof Opening Panel Glass (501-17 Roof Opening Panel, Removal and Installation)...
Other information:
Removal
NOTE:
Removal steps in this procedure may contain installation details.
Remove the RH rear seat cushion.
Refer to: Rear Seat Cushion Cover (501-10B Rear Seats, Removal and Installation).
Disconnect the RH seatbelt buckle electrical connector...
Removal
Front USB port
Release the tabs, position the USB port out and disconnect the USB cable.
Rear USB port
Open the floor console lid.
Release the tabs, position the USB port out and disconnect the USB cable...
.jpg)
.jpg)
.jpg)
.jpg)

.jpg)
.jpg)
.jpg)
.jpg)
.jpg)
 General Procedures - Roof Opening Panel Alignment
 Removal and Installation - Roof Opening Panel Center Beam Trim