Ford Escape 2020-2026 Service Manual / Powertrain / Engine / Engine / Removal and Installation - Crankshaft Rear Seal
Ford Escape: Engine / Removal and Installation - Crankshaft Rear Seal
Special Tool(s) / General Equipment
.jpg) |
303-328
(T88P-6701-B1)
Replacer, Rear Seal TKIT-1988-FLM TKIT-1988-F TKIT-1988-LM |
| Plastic Scraper | |
Materials
| Name | Specification |
|---|---|
| Motorcraft® High Performance Engine RTV Silicone TA-357 |
WSE-M4G323-A6 |
| Motorcraft® Silicone Gasket Remover ZC-30-A, AZC-30-C |
- |
| Motorcraft® Metal Surface Prep Wipes ZC-31-B |
- |
| Motorcraft® Metal Brake Parts Cleaner PM-4-A, PM-4-B, APM-4-C |
- |
Removal
-
Remove the flexplate.
Refer to: Flywheel (303-01C Engine, Removal and Installation).
-
Remove the bolts and the crankshaft rear seal, discard the crankshaft rear seal.
.jpg) |
-
NOTICE: Do not use metal scrapers, wire brushes, power abrasive discs or other abrasive means to clean the sealing surfaces. These tools cause scratches and gouges, which make leak paths. Use a plastic scraping tool to remove traces of sealant.
Clean and inspect the oil pan and cylinder block mating surfaces.
Refer to: RTV Sealing Surface Cleaning and Preparation (303-00 Engine System - General Information, General Procedures).
Use the General Equipment: Plastic Scraper
Material: Motorcraft® Silicone Gasket Remover / ZC-30-A, AZC-30-C
Material: Motorcraft® Metal Brake Parts Cleaner / PM-4-A, PM-4-B, APM-4-C
Material: Motorcraft® Metal Surface Prep Wipes / ZC-31-B
 |
Installation
-
NOTE: If the crankshaft rear seal is not secured within 10 minutes of sealant application, the sealant must be removed and the sealing area cleaned. Failure to follow this procedure can cause future oil leakage.
Apply a 3 mm (0.118 in) bead of silicone to the oil pan surface and a 5 mm (0.196 in) bead at the T-joints.
Material: Motorcraft® High Performance Engine RTV Silicone / TA-357 (WSE-M4G323-A6)
.jpg) |
-
-
Install the crankshaft rear main oil seal installer.
Use Special Service Tool: 303-328 (T88P-6701-B1) Replacer, Rear Seal.
-
Install the crankshaft rear seal retainer at an
angle above the oil pan flange to avoid scraping off the sealer.
-
Tilt the seal retainer up and onto the rear of the cylinder block.
-
Install the crankshaft rear main oil seal installer.
 |
-
Using the special tool, seat the crankshaft rear seal.
Use Special Service Tool: 303-328 (T88P-6701-B1) Replacer, Rear Seal.
.jpg) |
-
Install the bolts and tighten in sequence shown.
Remove Special Service Tool: 303-328 (T88P-6701-B1) Replacer, Rear Seal.
Torque: 89 lb.in (10 Nm)
.jpg) |
-
Drain and fill the oil.
Refer to: Engine Oil Draining and Filling (303-01C Engine, General Procedures).
-
Install the flexplate.
Refer to: Flywheel (303-01C Engine, Removal and Installation).

 Removal and Installation - Cylinder Head
Special Tool(s) /
General Equipment
303-476
(T94P-9472-A)
Socket, Exhaust Gas Oxygen SensorTKIT-1994-LM/MTKIT-1994-FTKIT-1994-FLM/FM
Oil Drain Equipment
Hose Clamp Remover/Installer
Materials
Name
Specification
Motorcraft® High Performance Engine RTV SiliconeTA-357
WSE-M4G323-A6
Motorcraft® High Temperature Nickel Anti-Seize LubricantXL-2
-
..
Other information:
Ford Escape 2020-2026 Service Manual: Removal and Installation - Manifold Absolute Pressure and Temperature (MAPT) Sensor
Removal NOTE: Removal steps in this procedure may contain installation details. Disconnect the electrical connector, remove the retainer and the MAP sensor. Torque: 35 lb.in (4 Nm) Installation To install, reverse the removal procedure. ..
Ford Escape 2020-2026 Service Manual: Removal and Installation - Rear Door
Special Tool(s) / General Equipment Door Lift Removal NOTE: Removal steps in this procedure may contain installation details. NOTE: LH side shown, RH side similar. Open the door. Remove the rear door check arm bolt. Torque: 18 lb.ft (25 Nm) Disconnect the rear door electrical connectors. ..
Categories
- Manuals Home
- 4th Generation Ford Escape Owners Manual
- 4th Generation Ford Escape Service Manual
- General Procedures - Brake Service Mode Activation and Deactivation
- Fuel Quality
- Electric Parking Brake
- New on site
- Most important about car
Vehicle Identification
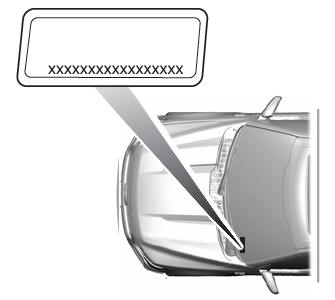
Locating the Vehicle Identification Number
The vehicle identification number is on the left-hand side of the instrument panel.
Copyright © 2026 www.fordescape4.com