Ford Escape: Glass, Frames and Mechanisms / Removal and Installation - Front Door Window Regulator and Motor
Special Tool(s) / General Equipment
| Punch |
Removal
 WARNING:
The following procedure prescribes critical repair steps
required for correct restraint system operation during a crash. Follow
all notes and steps carefully. Failure to follow step instructions may
result in incorrect operation of the restraint system and increases the
risk of serious personal injury or death in a crash.
WARNING:
The following procedure prescribes critical repair steps
required for correct restraint system operation during a crash. Follow
all notes and steps carefully. Failure to follow step instructions may
result in incorrect operation of the restraint system and increases the
risk of serious personal injury or death in a crash.
NOTE: Left hand (LH) shown, right hand (RH) similar.
NOTE: For front door window regulator motors that are non-functional it will be necessary to remove the front door window regulator motor prior to removing the front door window regulator.
NOTE: Removal steps in this procedure may contain installation details.
-
Depower the SRS .
WARNING:
Before beginning any service procedure in this
manual, refer to health and safety warnings in section 100-00 General
Information. Failure to follow this instruction may result in serious
personal injury.
Refer to: Supplemental Restraint System (SRS) Depowering (501-20B Supplemental Restraint System, General Procedures).
-
Remove the front door trim panel.
Refer to: Front Door Trim Panel (501-05 Interior Trim and Ornamentation, Removal and Installation).
-
Remove the front door window glass release access covers.
.jpg) |
-
Lower the front door window glass to the half down position.
-
Connect the window control switch.
-
Lower the front door window glass to the half down position.
-
Align the front door window glass retaining clips with the access windows.
-
Disconnect the window control switch.
-
Connect the window control switch.
.jpg) |
-
Release the front door window glass and tape in the full up position.
-
Release the front door window glass retaining clips.
Use the General Equipment: Punch
-
Raise the front door window glass in the full up position.
-
Tape the front door window glass in the full up position.
-
Release the front door window glass retaining clips.
.jpg) |
-
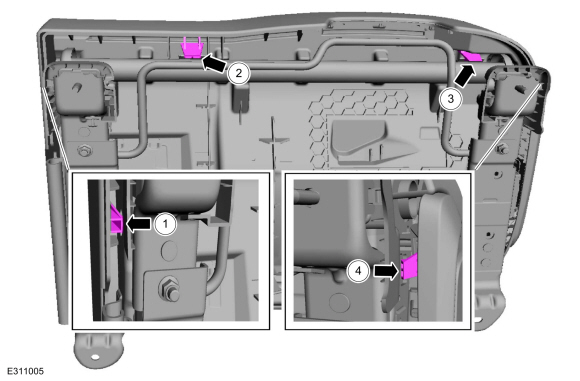
Position the front door wiring harness aside.
-
Disconnect the front side door impact sensor electrical connector.
-
Disconnect the front door window regulator motor and front door speaker electrical connectors.
-
Disconnect the DDM electrical connectors.
-
Disconnect the exterior mirror electrical connector.
-
Release the front door wiring harness routing clips and position the front door wiring harness aside.
-
Disconnect the front side door impact sensor electrical connector.
.jpg) |
-
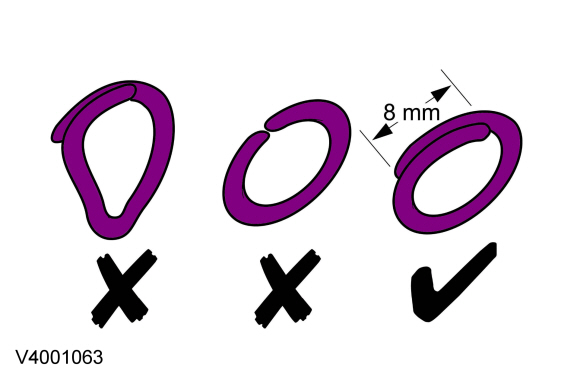
Remove the front door window regulator nut adhesive covers.
.jpg) |
-
NOTE: Follow the unique instructions or graphic for this step in installation
Loosen the front door window regulator nuts.
Torque: 71 lb.in (8 Nm)
 |
-
NOTE: Follow the unique instructions or graphic for this step in installation.
Release the front door window regulator retaining clips.
-
Release the front door window regulator retaining clips.
Torque: 42 lb.in (4.8 Nm)
-
Position the front door window regulator retaining clips into the service position.
-
Release the front door window regulator retaining clips.
.jpg) |
-
Remove the front door window regulator.
-
Remove the front door window regulator.
-
Route the interior door handle cable, door lock
indicator cable and grommet through the front door window regulator.
-
Remove the front door window regulator.
.jpg) |
-
NOTE: This step is only necessary when installing a new component.
Remove the screws and the front door speaker.
Torque: 13 lb.in (1.5 Nm)
.jpg) |
-
NOTE: This step is only necessary when installing a new component.
Remove the front door window regulator motor.
-
Remove the front door window regulator bolts.
-
Remove the front door window regulator motor.
-
Remove the front door window regulator bolts.
 |
-
NOTE: This step is only necessary when installing a new component.
Remove the front side door impact sensor.
 |
Installation
-
To install, reverse the removal procedure.
-
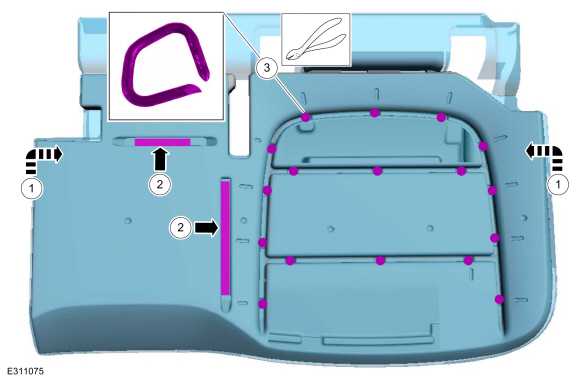
Torque the retainers and nuts in the sequence shown.
-
Torque the retainers in the sequence shown.
Torque: 42 lb.in (4.8 Nm)
-
Torque the nuts in the sequence shown.
Torque: 71 lb.in (8 Nm)
-
Torque the retainers in the sequence shown.
.jpg) |
-
Repower the SRS .
Refer to: Supplemental Restraint System (SRS) Repowering (501-20B Supplemental Restraint System, General Procedures).
-
If the door is equipped with one touch up/down, carry out the power
door window initialization.
Refer to: Power Door Window Initialization - Vehicles With: One-Touch
Open and Close Front Windows (501-11 Glass, Frames and Mechanisms,
General Procedures).
 Removal and Installation - Front Door Window Glass
Special Tool(s) /
General Equipment
Punch
Removal
NOTE:
LH (left-hand) side shown, RH (right-hand) side similar.
Remove the front door trim panel...
 Removal and Installation - Front Door Window Regulator Motor
Removal
NOTE:
Left hand (LH) shown, right hand (RH) similar.
NOTE:
For front door window regulator motors that are
non-functional it may be necessary to remove the front door window
regulator motor prior to securing the front door window glass...
Other information:
Ford Escape 2020-2024 Owners Manual: Automatic Climate Control - Vehicles With: Electronic Automatic Temperature Control (EATC)
Note: Depending on your vehicle option package, the controls may look different from what you see here. Note: For Hybrid vehicles, the air conditioning compressor may run and airflow may be felt when the climate control is off to provide cooling to the battery...
Ford Escape 2020-2024 Service Manual: Removal and Installation - Rear Subframe
Special Tool(s) / General Equipment 300-OTC1585AEPowertrain Lift Wooden Block Removal NOTICE: Suspension fasteners are critical parts that affect the performance of vital components and systems. Failure of these fasteners may result in major service expense...
Categories
- Manuals Home
- 4th Generation Ford Escape Owners Manual
- 4th Generation Ford Escape Service Manual
- Opening and Closing the Hood
- Drive Modes
- Switching the Rear Window Wiper On and Off. Reverse Wipe
- New on site
- Most important about car
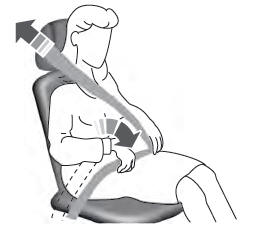
Adjusting the Seatbelts During Pregnancy
WARNING: Always ride and drive with your seatback upright and properly fasten your seatbelt. Fit the lap portion of the seatbelt snugly and low across the hips. Position the shoulder portion of the seatbelt across your chest. Pregnant women must follow this practice. See the following figure.