Ford Escape: Engine Ignition - 1.5L EcoBoost (132kW/180PS) – I3 (Y1) / Removal and Installation - Ignition Coil-On-Plug
Removal
NOTE: Removal steps in this procedure may contain installation details.
-
NOTICE: Do not pull the engine appearance cover forward or sideways to remove. Failure to press straight upward on the underside of the cover at the attachment points may result in damage to the cover or engine components.
NOTE: Lubricating the grommets with silicone grease will aid in the installation of the engine appearance cover, and any future removal and installation of the cover.
Remove the engine appearance cover.
 |
-
Remove the evaporative emission canister purge valve.
Refer to: Evaporative Emission Canister Purge Valve (303-13A Evaporative Emissions - 1.5L EcoBoost (132kW/180PS) – I3 (Y1), Removal and Installation).
-
Disconnect the ignition coil-on-plug electrical connectors.
 |
-
NOTE: Use compressed air to remove any foreign material from the ignition coil-on-plugs and surrounding area before removing the ignition coil-on-plugs.
NOTE: When removing the ignition coil-on-plugs, a slight twisting motion will break the seal and ease removal.
Remove the bolts and the ignition coil-on-plugs.
Torque: 89 lb.in (10 Nm)
.jpg) |
-
Inspect the ignition coil-on-plug assembly for cracks,
rips or tears. Replace any damaged coil-on-plug assemblies.
.jpg) |
Installation
-
To install, reverse the removal procedure.
 Diagnosis and Testing - Engine Ignition
Diagnostic Trouble Code (DTC) Chart
Diagnostics in this manual assume a certain skill level and knowledge of Ford-specific diagnostic practices. REFER to: Diagnostic Methods (100-00 General Information, Description and Operation)...
 Removal and Installation - Spark Plugs
Special Tool(s) /
General Equipment
303-1625Socket, Spark Plug
Removal
NOTE:
Removal steps in this procedure may contain installation details...
Other information:
Ford Escape 2020-2026 Owners Manual: MyKey – Troubleshooting
MyKey – Information Messages - Vehicles With: Push Button Start MyKey – Information Messages - Vehicles With: Flip Key MyKey – Frequently Asked Questions - Vehicles With: Push Button Start What is an admin key? An admin key is a key that you have not created as a MyKey...
Ford Escape 2020-2026 Service Manual: Removal and Installation - High Voltage Battery Cables - Hybrid Electric Vehicle (HEV)
Removal WARNING: To prevent the risk of high-voltage shock, always follow precisely all warnings and service instructions, including instructions to depower the system. The high-voltage system utilizes approximately 450 volts DC, provided through high-voltage cables to its components and modules...
Categories
- Manuals Home
- 4th Generation Ford Escape Owners Manual
- 4th Generation Ford Escape Service Manual
- Drive Modes
- Accessing the Trip Computer. Resetting the Trip Computer
- Description and Operation - Identification Codes
- New on site
- Most important about car
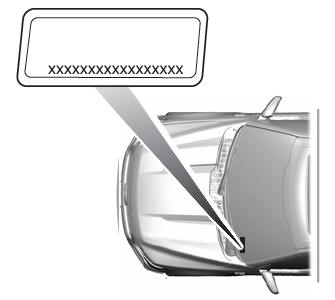
Vehicle Identification
Locating the Vehicle Identification Number
The vehicle identification number is on the left-hand side of the instrument panel.