Ford Escape 2020-2026 Service Manual / Body and Paint / Body and Paint / Exterior Trim and Ornamentation / Removal and Installation - Rear Door Upper Moulding
Ford Escape: Exterior Trim and Ornamentation / Removal and Installation - Rear Door Upper Moulding
Removal
NOTE: Removal steps in this procedure may contain installation details.
NOTE: LH side shown, RH side similar.
-
Remove the upper belt moulding screw at front of the door.
Torque: 8 lb.in (0.9 Nm)
.jpg) |
-
Remove the upper belt moulding screw at rear of the door.
Torque: 8 lb.in (0.9 Nm)
.jpg) |
-
Lift the moulding at the front edge using a non-marring
trim tool and slide forward to disengage from the tab at the rear and
remove the moulding.
.jpg) |
-
Pull the rear door glass runner.
.jpg) |
-
Remove the screw.
Torque: 8 lb.in (0.9 Nm)
.jpg) |
-
NOTE: Use new retainer clips.
-
Remove and discard the retainer clips and dislodge the 4 way clip.
-
Remove the rear door upper moulding.
-
Remove and discard the retainer clips and dislodge the 4 way clip.
.jpg) |
-
Pull the rear door glass runner.
.jpg) |
-
Remove the screw.
Torque: 8 lb.in (0.9 Nm)
.jpg) |
-
NOTE: Use new retainer clips.
-
Remove and discard the retainer clips and dislodge the 4 way clip.
-
Remove the rear door upper moulding.
-
Remove and discard the retainer clips and dislodge the 4 way clip.
 |
Installation
-
To install, reverse the removal procedure.
 Removal and Installation - Rear Door Moulding
Removal
NOTE:
Removal steps in this procedure may contain installation details.
NOTE:
LH side door shown, RH side door similar.
NOTE:
Do not use excessive force when removing retainers, to avoid damage to moulding...
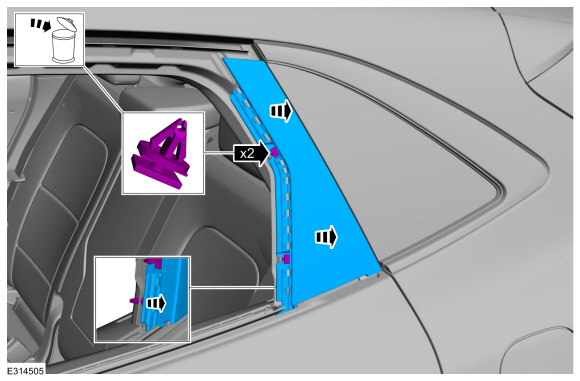
 Removal and Installation - Rear Quarter Panel Moulding
Special Tool(s) /
General Equipment
Interior Trim Remover
Removal
NOTE:
Removal steps in this procedure may contain installation details...
Other information:
Ford Escape 2020-2026 Service Manual: Removal - Power Transfer Unit
Special Tool(s) / General Equipment Punch Copper Hammer Remove the front subframe. Refer to: Front Subframe (502-00 Uni-Body, Subframe and Mounting System, Removal and Installation). Drain the PTU. Refer to: Power Transfer Unit Draining and Filling (308-07D) ...
Ford Escape 2020-2026 Owners Manual: Cooling System Capacity and Specification - 2.0L EcoBoost™
Use coolant that meets the defined specification. If you do not use coolant that meets the defined specification, it could result in: Component damage that your vehicle warranty does not cover. Reduced vehicle performance. Capacities Materials ..
Categories
- Manuals Home
- 4th Generation Ford Escape Owners Manual
- 4th Generation Ford Escape Service Manual
- Switching the Rear Window Wiper On and Off. Reverse Wipe
- Fuel Quality
- Rear View Camera
- New on site
- Most important about car
Engine Oil
Engine Oil Dipstick Overview
Copyright © 2026 www.fordescape4.com