Ford Escape: Engine / Removal and Installation - Timing Chain
Removal
NOTE: During engine repair procedures, cleanliness is extremely important. Any foreign material, including any material created while cleaning gasket surfaces, that enters the oil passages, coolant passages or the oil pan can cause engine failure.
-
Remove the engine front cover.
Refer to: Engine Front Cover (303-01C Engine, Removal and Installation).
-
Remove the bolts and the timing chain tensioner.
 |
-
Remove the timing chain tensioner arm.
.jpg) |
-
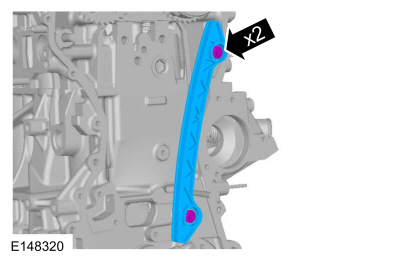
Remove the timing chain.
.jpg) |
-
Remove the bolts and the timing chain guide.
 |
-
NOTE: Use an open-ended wrench to prevent the component from turning.
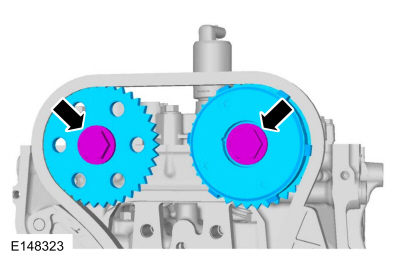
Using the flats on the camshaft to prevent camshaft rotation, loosen the bolts 2 revolutions on the camshaft phaser and sprocket.
.jpg) |
Installation
-
Install the timing chain guide and the bolts.
Torque: 89 lb.in (10 Nm)
|
-
Install the timing chain.
|
-
Install the timing chain tensioner arm.
|
NOTE: If the timing chain tensioner plunger is not pinned in the compressed position, follow the next step.
-
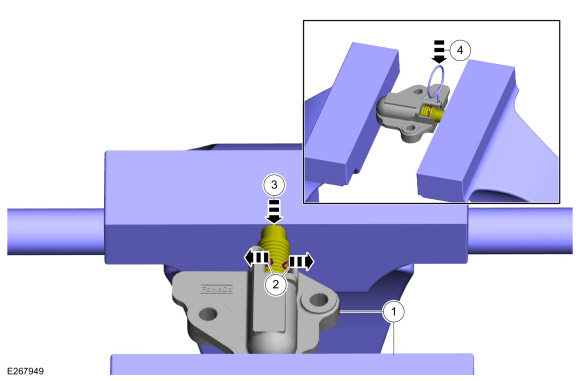
Reset the timing chain tensioner.
-
Position the timing chain tensioner in a soft-jawed vise.
-
Spread the ends of the ratchet wire clip apart.
-
Using the soft-jawed vise, compress the plunger to the reset position.
-
Install a locking pin in the 2 holes of the timing chain tensioner body to hold the plunger in place.
-
Position the timing chain tensioner in a soft-jawed vise.
 |
-
NOTE: Do not remove the locking pin until the tensioner bolts are tightened.
-
Install the timing chain tensioner and the bolts.
Torque: 89 lb.in (10 Nm)
-
Remove the locking pin.
-
Install the timing chain tensioner and the bolts.
.jpg) |
-
NOTE: Use an open-ended wrench to prevent the component from turning.
Using the flats on the camshaft to prevent camshaft rotation, tighten the bolts on the camshaft phaser and sprocket. Tighten in 2 stages.
Torque:
Stage 1: 30 lb.ft (40 Nm)
Stage 2: 60°
 |
-
Install the engine front cover.
Refer to: Engine Front Cover (303-01C Engine, Removal and Installation).

 Removal and Installation - Timing Chain Tensioner
Removal
NOTICE:
Do not loosen or remove the crankshaft pulley bolt without
first installing the special tools as instructed in this procedure. The
crankshaft pulley and the crankshaft timing sprocket are not keyed to
the crankshaft...
Other information:
Ford Escape 2020-2026 Service Manual: Removal and Installation - Rear Seatbelt Buckle LH
Removal NOTE: Removal steps in this procedure may contain installation details. Remove the LH rear seat cushion. Refer to: Rear Seat Cushion Cover (501-10B Rear Seats, Removal and Installation). Remove the LH rear seatbelt buckle...
Ford Escape 2020-2026 Service Manual: Removal and Installation - Low Voltage Differential Signalling (LVDS) Cable
Removal NOTE: Removal steps in this procedure may contain installation details. NOTE: The original equipment LVDS cable is part of the wiring harness and cannot be removed. This procedure refers to replacement of the cable only by overlaying the cable...
Categories
- Manuals Home
- 4th Generation Ford Escape Owners Manual
- 4th Generation Ford Escape Service Manual
- Drive Modes
- Switching the Lane Keeping System On and Off. Switching the Lane Keeping System Mode. Alert Mode
- Power Outlet - Vehicles With: 12V Power Outlet
- New on site
- Most important about car
Push Button Ignition Switch
Switching the Ignition Off
When the ignition is on or in accessory mode, press the push button ignition switch once without your foot on the brake pedal.