Ford Escape: Automatic Transmission - Automatic Transmission – HF45 / Removal and Installation - Transmission
Special Tool(s) / General Equipment
 |
307-805 Alignment Pins (2) |
| Ford Diagnostic Equipment | |
Removal
-
NOTE: This step is only necessary when installing a new transmission or ISC (Inverter System Controller).
Download the module information to the diagnostic tool using the Programmable Modules Installation routine.
Use the General Equipment: Ford Diagnostic Equipment
-
NOTE: It is not necessary to drain the transmission fluid if the transmission is being removed for an engine repair.
Remove the transmission fluid drain plug and allow the transmission fluid to drain.
Torque: 106 lb.in (12 Nm)
.jpg) |
-
NOTE: The transmission cannot be removed from the vehicle separate from the engine. Refer to engine removal to remove the transmission. Separate the transmission from the engine following the additional steps in this procedure.
NOTE: To service the transmission, it is not necessary to drain the engine oil or remove the engine oil filter.
Remove the engine.
Refer to: Engine (303-01C Engine, Removal).
Refer to: Engine (303-01C Engine, Removal).
-
Remove the RH bolts from the engine.
.jpg) |
-
NOTE: When servicing the transmission, it is not necessary to remove the engine from the drivetrain lift.
Remove the LH bolts and the transmission from the engine.
.jpg) |
-
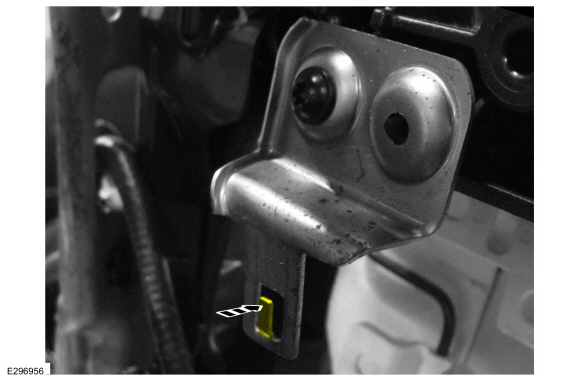
NOTICE: When removing side cover, pull cover straight out approximately 2 inches before moving upwards or damage to the high voltage interlock connector may occur.
NOTICE: Place ISC side cover on a clean surface with high voltage connector facing upwards or damage to the connector may occur.
NOTE: If the new transmission does not come with an ISC, or transmission disassembly is necessary, remove the ISC.
Remove and discard the bolts and remove the ISC side cover.
.jpg) |
-
Remove the high voltage terminal bolts.
 |
-
NOTICE: If the ISC is being reinstalled, place the ISC on a clean surface, transmission side down. It is important to keep all debris and fluid away from the open ISC or damage to the ISC may occur.
NOTE: Note the location of the studbolts for assembly.
NOTE: Cover all coolant ports to avoid spilling coolant remaining inside the ISC. If the ISC is being replaced, plug the coolant ports with the caps included with the replacement ISC.
Remove the bolts, studbolts and the ISC.
 |
-
Remove the ISC gasket.
 |
Installation
-
NOTICE: Use only a lint free cloth.
Clean and inspect the ISC gasket, replace if necessary.
.jpg) |
-
NOTICE: Use only a lint free cloth.
Inspect and clean the inside of the transmission cavity of any debris or fluid.
 |
-
Install the ISC gasket.
|
-
Install the special tools.
Use Special Service Tool: 307-805 Alignment Pins (2).
.jpg) |
-
Install the ISC and remove the special tools.
Use Special Service Tool: 307-805 Alignment Pins (2).
.jpg) |
-
-
Install the ISC bolts.
Torque: 89 lb.in (10 Nm)
-
Install the ISC studbolts.
Torque: 89 lb.in (10 Nm)
-
Install the ISC bolts.
.jpg) |
-
Install the high-voltage terminal bolts.
Torque: 89 lb.in (10 Nm)
|
-
NOTICE: Use a lint free cloth.
Clean and inspect the ISC side cover and gasket, replace the ISC side cover if necessary.
.jpg) |
-
Install the ISC side cover and new bolts.
Torque: 71 lb.in (8 Nm)
 |
-
Install the transmission and the LH bolts.
Torque: 35 lb.ft (48 Nm)
|
-
Install the RH bolts.
Torque: 35 lb.ft (48 Nm)
|
-
Install the engine.
Refer to: Engine (303-01C Engine, Installation).
Refer to: Engine (303-01C Engine, Installation).
-
Fill the transmission.
Refer to: Transmission Fluid Drain and Refill (307-01B Automatic Transmission - Automatic Transmission – HF45, General Procedures).
-
If a new transmission or ISC was installed, perform the Transmission Strategy Download.
Refer to: Transmission Strategy Download (307-01B Automatic Transmission - Automatic Transmission – HF45, General Procedures).
-
NOTE: This step is only necessary when installing a new transmission or ISC.
Upload the module information from the diagnostic tool to the module using the Programmable Modules Installation routine.
Use the General Equipment: Ford Diagnostic Equipment
 Removal and Installation - Roll Restrictor RH
Special Tool(s) /
General Equipment
Wooden Block
Removal
With the vehicle in NEUTRAL, position it on a hoist.
Refer to: Jacking and Lifting - Overview (100-02 Jacking and Lifting, Description and Operation)...
 Removal and Installation - Transmission Case Cover
Materials
Name
Specification
Motorcraft® Ultra Silicone SealantTA-29
WSS-M4G323-A8
Removal
Remove the transmission...
Other information:
Ford Escape 2020-2026 Service Manual: Diagnosis and Testing - Electronic Throttle Control System
Diagnostic Trouble Code (DTC) Chart Diagnostics in this manual assume a certain skill level and knowledge of Ford-specific diagnostic practices.REFER to: Diagnostic Methods (100-00 General Information, Description and Operation). Module DTC Description Action PCM P0068:00 MAP / MAF - Throttle Position Correlation: No Sub Type Information GO to Pinpoint Test DV PCM P0120:00..
Ford Escape 2020-2026 Service Manual: Description and Operation - Evaporative Emissions - Overview
Overview The EVAP system prevents hydrocarbon emissions from entering the atmosphere by storing fuel vapors and routing the vapors to the engine to be consumed during normal engine operation. The EVAP system consists of: EVAP canister EVAP canister purge valve Fuel Tank Pressure (FTP) sensor and tube Easy Fuel™ (capless) fuel tank filler pipe Fuel vapor vent val..
Categories
- Manuals Home
- 4th Generation Ford Escape Owners Manual
- 4th Generation Ford Escape Service Manual
- Electric Parking Brake
- Locating the Pre-Collision Assist Sensors
- All-Wheel Drive
- New on site
- Most important about car
Symbols Glossary
These are some of the symbols you may see on your vehicle.
 Air conditioning system