Ford Escape 2020-2026 Service Manual / Powertrain / Automatic Transmission / Transmission Cooling - Automatic Transmission – HF45 / Removal and Installation - Transmission Fluid Cooler Tubes
Ford Escape: Transmission Cooling - Automatic Transmission – HF45 / Removal and Installation - Transmission Fluid Cooler Tubes
Materials
| Name | Specification |
|---|---|
| Motorcraft® MERCON® ULV Automatic Transmission Fluid XT-12-QULV |
WSS-M2C949-A, MERCON® ULV |
Removal
-
With the vehicle in NEUTRAL, position it on a hoist.
Refer to: Jacking and Lifting - Overview (100-02 Jacking and Lifting, Description and Operation).
-
Remove the retainers and the underbody shield.
.jpg) |
-
Disconnect the wiring harness retainer.
.jpg) |
-
Remove the bolt and disconnect the transmission fluid cooler tubes from the transmission.
 |
-
Inspect the transmission to be sure the transmission
fluid tube seals and backing rings were removed with the transmission
fluid tubes and are not stuck in the transmission. If the transmission
fluid tube seals or backing rings are stuck in the transmission, remove
the seals and backing rings.
.jpg) |
-
Disconnect the transmission fluid cooler tubes from the fluid cooler and remove the cooler tubes.
.jpg) |
Installation
-
Connect the transmission fluid cooler tubes to the fluid cooler.
|
-
Inspect the transmission fluid cooler tube assembly backing rings and seals for damage and install new backing rings or seals if necessary.
-
Backing ring (7J324)
-
Seal (7D258)
Material: Motorcraft® MERCON® ULV Automatic Transmission Fluid / XT-12-QULV (WSS-M2C949-A, ) (MERCON® ULV)
-
Backing ring (7J324)
 |
-
Connect the transmission fluid cooler tubes to the transmission and install the bolt.
Torque: 18 lb.ft (25 Nm)
|
-
Connect the wiring harness retainer.
|
-
Install the underbody shield and the retainers.
|
-
Check the transmission fluid level and adjust as necessary.
Refer to: Transmission Fluid Level Check (307-01A Automatic Transmission - 8-Speed Automatic Transmission – 8F35/8F40, General Procedures).
 Removal and Installation - Transmission Fluid Cooler
Removal
Remove the A/C condenser.
Refer to: Transmission Fluid Cooler (307-02A Transmission Cooling -
8-Speed Automatic Transmission – 8F35/8F40, Removal and Installation)...
 Removal and Installation - Transmission Fluid Cooler Tubes - Plug-In Hybrid Electric Vehicle (PHEV)
Materials
Name
Specification
Motorcraft® MERCON® ULV Automatic Transmission FluidXT-12-QULV
WSS-M2C949-A, MERCON® ULV
Removal
With the vehicle in NEUTRAL, position it on a hoist...
Other information:
Ford Escape 2020-2026 Service Manual: Removal and Installation - Steering Wheel
Special Tool(s) / General Equipment Adhesive Tape Removal NOTICE: To prevent damage to the clockspring, make sure the front wheels are in the straight-ahead position. NOTE: Removal steps in this procedure may contain installation details...
Ford Escape 2020-2026 Service Manual: General Procedures - Door Latch Lubrication
Special Tool(s) / General Equipment Flat-Bladed Screwdriver Materials Name Specification Motorcraft® Multi-Purpose Grease SprayXL-5-A ESB-M1C93-B Activation NOTE: Typical left front door shown, others similar. Open the door...
Categories
- Manuals Home
- 4th Generation Ford Escape Owners Manual
- 4th Generation Ford Escape Service Manual
- Adjusting the Headlamps
- Fuel Quality
- Symbols Glossary
- New on site
- Most important about car
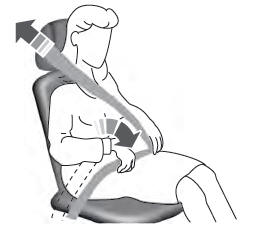
Adjusting the Seatbelts During Pregnancy
WARNING: Always ride and drive with your seatback upright and properly fasten your seatbelt. Fit the lap portion of the seatbelt snugly and low across the hips. Position the shoulder portion of the seatbelt across your chest. Pregnant women must follow this practice. See the following figure.
Copyright © 2026 www.fordescape4.com