Ford Escape 2020-2026 Service Manual / Body and Paint / Body and Paint / Body Repairs - General Information / General Procedures - Corrosion Prevention
Ford Escape: Body Repairs - General Information / General Procedures - Corrosion Prevention
Special Tool(s) / General Equipment
| Rust Protection Coating Gun | |
| Undercoating Gun |
Materials
| Name | Specification |
|---|---|
| ValuGard™ Premium Undercoating VG101, VG101A |
- |
| ValuGard™ Rust Inhibitor VG104, VG104A |
- |
| Motorcraft® Metal Surface Prep Wipes ZC-31-B |
- |
Repair
NOTE: Undercoating
NOTE: The following illustrations are not vehicle specific and are intended for reference only.
-
Refer to: Body Repair Health and Safety and General Precautions (100-00 General Information, Description and Operation). WARNING:
Before beginning any service procedure in this
section, REFER to Safety Warnings in section 100-00 General Information.
Failure to follow this instruction may result in serious personal
injury.
WARNING:
Before beginning any service procedure in this
section, REFER to Safety Warnings in section 100-00 General Information.
Failure to follow this instruction may result in serious personal
injury.
-
Wire brush the area and make sure the surfaces are free
of oil, dirt and other foreign material. Carry out the undercoating
process in the following sequence.
-
Thoroughly clean and degrease metal surfaces to remove wax and grease.
Material: Motorcraft® Metal Surface Prep Wipes / ZC-31-B
-
For best results, the vehicle should be at room temperature.
-
Attach the undercoating canister to the dispensing gun.
Use the General Equipment: Undercoating Gun
Material: ValuGard™ Premium Undercoating / VG101, VG101A
-
Undercoating should be applied after the welding and refinishing process. Product cannot be welded through.
-
Air pressure setting for applicator gun is 552 kPa (80.06 psi) – 621 kPa (90.07 psi).
-
Apply light mist coats, applicator sprays in fogging pattern. Material displaces moisture.
-
Clean up any overspray with a mild solvent such as mineral spirits or bug and tar remover.
-
NOTE: Frame rail exterior spot-weld flange view.
Apply Premium Undercoating material to the exterior exposed edges after carrying out the welding and refinishing process.
.jpg) |
-
NOTE: Cross section view of typical unibody frame rail shown.
Apply Rust Inhibitor to the inner surfaces of the rail after carrying out welding process. Depress trigger and wait 2-3 seconds and slowly pull the wand to make sure the area is completely fogged.
.jpg) |
-
NOTE: Full frame vehicle, front rail-to-mid rail section repair shown.
Apply Premium Undercoating to the exposed surfaces after carrying out the welding process. Make sure to completely cover any bare metal areas.
.jpg) |
Repair
NOTE: Rust Inhibitor
-
The surfaces must be free of oil, dirt and other foreign
material. Carry out the process in the following sequence.
-
Thoroughly clean and degrease metal surfaces to remove wax and grease.
Material: Motorcraft® Metal Surface Prep Wipes / ZC-31-B
-
For best results, the vehicle should be at room
temperature. Attach the rust inhibitor canister to the dispensing gun.
Use the General Equipment: Rust Protection Coating Gun
Material: ValuGard™ Rust Inhibitor / VG104, VG104A
-
Rust inhibitor should be applied after the welding and refinishing process. Product cannot be welded through.
-
Air pressure setting for applicator gun is 448 kPa (64.97 psi) - 517 kPa (74.98 psi).
-
Use the appropriate length wand when spraying enclosed
areas. Insert the wand as far as possible into the access hole, pull the
trigger and wait 2-3 seconds and slowly pull the wand out of the access
hole. Apply the material in light mist coats. Material displaces
moisture.
-
Clean up any overspray with a mild solvent such as mineral spirits or bug and tar remover.
-
NOTE: Door assembly lower view.
Apply as shown to the inside of the door shell on all the interior metal surfaces using the most suitable applicator wand. Apply material to the exposed edges after carrying out the welding process. Make sure horizontal surfaces are well protected as they are more susceptible to corrosion. Keep door drain holes clear to prevent moisture buildup.
Material: ValuGard™ Rust Inhibitor / VG104, VG104A
.jpg) |
-
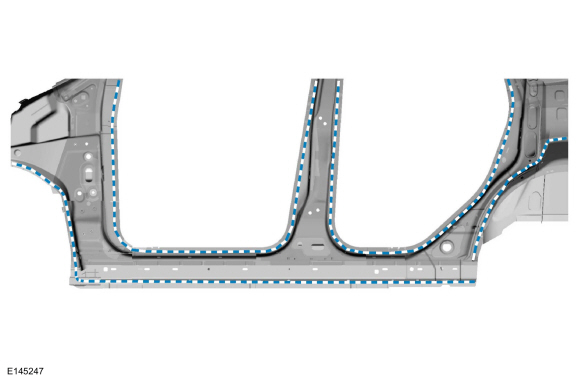
NOTE: Quarter panel inner view.
Apply to the closed channel portion of the spot weld flange areas. Apply to the exposed edges after carrying out the welding process. Make sure horizontal surfaces are well protected as they are more susceptible to corrosion.
Material: ValuGard™ Rust Inhibitor / VG104, VG104A
.jpg) |
-
NOTE: Door frame opening view.
Apply to the closed channel portion of the spot weld flange areas. Make sure horizontal surfaces are well protected as they are more susceptible to corrosion.
Material: ValuGard™ Rust Inhibitor / VG104, VG104A
 |
 General Procedures - Plastic Repairs
Materials
Name
Specification
Plastic Bonding AdhesiveTA-9
-
Repair
NOTICE:
Plastic repairs on vehicles equipped with Advanced Driver
Assistance System (ADAS) must not exceed 12 mils (300 microns) of paint
thickness after refinishing...
 General Procedures - Welding Precautions
Check
WARNING:
Invisible ultraviolet and infrared rays emitted in welding
can injure unprotected eyes and skin. Always use protection such as a
welder's helmet with dark-colored filter lenses of the correct density...
Other information:
Ford Escape 2020-2026 Service Manual: Diagnosis and Testing - Body Closures
Diagnostic Trouble Code (DTC) Chart Diagnostics in this manual assume a certain skill level and knowledge of Ford-specific diagnostic practices. REFER to: Diagnostic Methods (100-00 General Information, Description and Operation). Diagnostic Trouble Code Chart Module DTC Description Action BCM B11C4..
Ford Escape 2020-2026 Owners Manual: Engine Oil Capacity and Specification - 2.0L EcoBoost™
Use oil that meets the defined specification and viscosity grade. If you do not use oil that meets the defined specification and viscosity grade, it could result in: Component damage that your vehicle warranty does not cover. Longer engine cranking periods. Increased emission levels. Reduced vehicle performance. Reduced fuel economy. An oil that displays this symbol conforms to curre..
Categories
- Manuals Home
- 4th Generation Ford Escape Owners Manual
- 4th Generation Ford Escape Service Manual
- Symbols Glossary
- Opening and Closing the Hood
- Rear View Camera
- New on site
- Most important about car
Fastening the Seatbelts

Copyright © 2026 www.fordescape4.com