Ford Escape 2020-2026 Service Manual / Body and Paint / Body and Paint / Interior Trim and Ornamentation / Removal and Installation - A-Pillar Trim Panel
Ford Escape: Interior Trim and Ornamentation / Removal and Installation - A-Pillar Trim Panel
Special Tool(s) / General Equipment
| Interior Trim Remover |
Removal
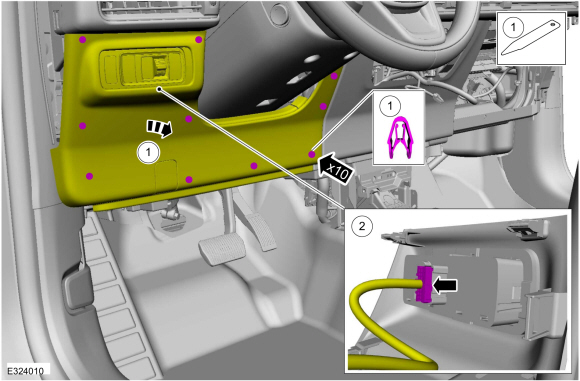
NOTE: LH (left hand) shown, RH (right hand) similar.
-
Disconnect the tether clips from the A-pillar trim panel.
-
Release the A-pillar trim panel clip from the tether clips.
-
Rotate the tether clip lines to align the ends with openings.
-
Slide the tether clip ends out of the A-pillar trim panel.
-
Release the A-pillar trim panel clip from the tether clips.
.jpg) |
-
Lift upward and backward and remove the A-pillar trim panel.
.jpg) |
-
Remove the A-pillar tether clips from the bracket.
-
Release the A-pillar tether clip front tabs.
Use the General Equipment: Interior Trim Remover
-
Rotate the front of the A-pillar tether clip downward.
-
Release the A-pillar tether clip rear tabs.
Use the General Equipment: Interior Trim Remover
-
Rotate the rear of the A-pillar tether clip downward.
-
Release the A-pillar tether clip front tabs.
.jpg) |
Installation
-
Install the A-pillar tether clips onto the A-pillar trim panel.
-
Install the A-pillar trim panel clip from the tether clips.
-
Rotate the tether clip lines to align the ends with openings.
-
Slide the tether clip ends into the A-pillar trim panel.
-
Install the A-pillar trim panel clip from the tether clips.
.jpg) |
-
Install the A-pillar trim panel.
-
Install the A-pillar trim panel tabs into the instrument panel.
-
Install the A-pillar trim panel tether clips into the A-pillar bracket.
-
Install the A-pillar trim panel tabs into the instrument panel.
 |
-
Inspect and position the front door weather strip lip so that it overlaps the top of the A-pillar trim panel.
.jpg) |

 Removal and Installation - B-Pillar Trim Panel
Special Tool(s) /
General Equipment
Interior Trim Remover
Removal
NOTE:
LH (left hand) shown, RH (right hand) similar.
Upper and lower B-pillar trim panels
Remove the front scuff plate trim panel...
Other information:
Ford Escape 2020-2026 Service Manual: Removal and Installation - Wheel Studs
Removal NOTE: Wheel studs are not serviceable separately. Wheel bearing and wheel hub assembly must be replaced. Remove the front wheel bearing and wheel hub. Refer to: Front Wheel Bearing and Wheel Hub (204-01 Front Suspension, Removal and Installation)...
Ford Escape 2020-2026 Owners Manual: Locating the Tire label. Department of Transportation Uniform Tire Quality Grades
Locating the Tire label You will find a Tire Label containing tire inflation pressure by tire size and other important information located on the B-Pillar or the edge of the driver's door. Department of Transportation Uniform Tire Quality Grades Tire Quality Grades apply to new pneumatic passenger car tires...
Categories
- Manuals Home
- 4th Generation Ford Escape Owners Manual
- 4th Generation Ford Escape Service Manual
- Power Outlet - Vehicles With: 12V Power Outlet
- Drive Modes
- All-Wheel Drive
- New on site
- Most important about car
Sitting in the Correct Position
When you use them properly, the seat, head restraint, seatbelt and airbags will provide optimum protection in the event of a crash.
Copyright © 2026 www.fordescape4.com