Ford Escape: High Voltage Battery, Mounting and Cables / Removal and Installation - High Voltage Battery Coolant Tube Assembly - Hybrid Electric Vehicle (HEV)
Special Tool(s) / General Equipment
| Locking Pliers |
Removal
 WARNING:
To prevent the risk of high-voltage shock, always follow
precisely all warnings and service instructions, including instructions
to depower the system. The high-voltage system utilizes approximately
450 volts DC, provided through high-voltage cables to its components and
modules. The high-voltage cables and wiring are identified by orange
harness tape or orange wire covering. All high-voltage components are
marked with high-voltage warning labels with a high-voltage symbol.
Failure to follow these instructions may result in serious personal
injury or death.
WARNING:
To prevent the risk of high-voltage shock, always follow
precisely all warnings and service instructions, including instructions
to depower the system. The high-voltage system utilizes approximately
450 volts DC, provided through high-voltage cables to its components and
modules. The high-voltage cables and wiring are identified by orange
harness tape or orange wire covering. All high-voltage components are
marked with high-voltage warning labels with a high-voltage symbol.
Failure to follow these instructions may result in serious personal
injury or death.
NOTE: Removal steps in this procedure may contain installation details.
-
Refer to: Health and Safety Precautions (100-00 General Information, Description and Operation).
WARNING:
Before beginning any service procedure, refer to
health and safety warnings in section 100-00 General Information within
workshop manual. Failure to follow this instruction may result in
serious personal injury.
-
With the vehicle in NEUTRAL, position it on a hoist.
Refer to: Jacking and Lifting - Overview (100-02 Jacking and Lifting, Description and Operation).
-
De-energize the high voltage system.
Refer to: High Voltage System De-energizing (414-03A High Voltage Battery, Mounting and Cables, General Procedures).
-
Disconnect the battery negative terminals.
Refer to: Battery Disconnect and Connect (414-01 Battery, Mounting and Cables, General Procedures).
-
-
Remove the underbody shield screws.
-
Remove the underbody shield pushpins.
-
Remove the nuts and the underbody shield.
-
Remove the underbody shield screws.
.jpg) |
-
-
Remove the exhaust shield nuts.
-
Remove the bolt and position the exhaust shield aside.
-
Remove the exhaust shield nuts.
.jpg) |
-
-
Clamp the high voltage battery coolant hoses.
Use the General Equipment: Locking Pliers
-
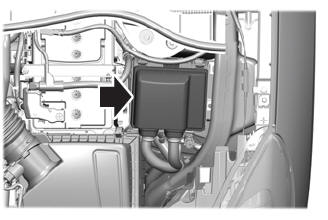
Disconnect the coolant hoses from the high voltage battery.
-
Disconnect the retainers from the high voltage battery and position coolant hoses aside.
-
Clamp the high voltage battery coolant hoses.
.jpg) |
-
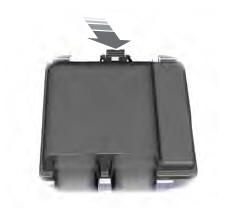
Remove the high voltage battery coolant tubes.
Torque: 177 lb.in (20 Nm)
.jpg) |
Installation
-
To install, reverse the removal procedure.
-
Bleed the cooling system.
Refer to: Engine Cooling System Draining, Vacuum Filling and Bleeding (303-03C Engine Cooling, General Procedures).
 Removal and Installation - High Voltage Battery Coolant Cover - Hybrid Electric Vehicle (HEV)
Special Tool(s) /
General Equipment
Locking Pliers
Removal
WARNING:
To prevent the risk of high-voltage shock, always follow
precisely all warnings and service instructions, including instructions
to depower the system...
 Removal and Installation - High Voltage Battery Wiring Harness - Hybrid Electric Vehicle (HEV)
Removal
WARNING:
To prevent the risk of high-voltage shock, always follow
precisely all warnings and service instructions, including instructions
to depower the system...
Other information:
Ford Escape 2020-2024 Service Manual: Diagnosis and Testing - Tire Pressure Monitoring System (TPMS) - Vehicles With: Keyless Entry With Remote Start
Diagnostic Trouble Code (DTC) Chart Diagnostics in this manual assume a certain skill level and knowledge of Ford-specific diagnostic practices. REFER to: Diagnostic Methods (100-00 General Information, Description and Operation). Diagnostic Trouble Code Chart Module DTC Description Action BCM B1182..
Ford Escape 2020-2024 Service Manual: Description and Operation - Sealer, Underbody Protection Material and Adhesives
NOTE: The following illustrations are examples of structural adhesive and sealer applications and are not all inclusive. Sealers and Adhesives The correct adhesive bonding and sealing is essential to repairing the vehicle correctly. Adhesives and sealers are used in many areas of the body structure. In addition to providing a structural bond or seal between components, adhesives a..
Categories
- Manuals Home
- 4th Generation Ford Escape Owners Manual
- 4th Generation Ford Escape Service Manual
- What Is the Speedometer. Fuel Gauge
- Child Safety Locks
- Power Outlet - Vehicles With: 12V Power Outlet
- New on site
- Most important about car
Under Hood Fuse Box
Locating the Under Hood Fuse Box
Accessing the Under Hood Fuse Box