Ford Escape 2020-2026 Service Manual / Body and Paint / Body and Paint / Interior Trim and Ornamentation / Removal and Installation - Loadspace Scuff Plate Trim Panel
Ford Escape: Interior Trim and Ornamentation / Removal and Installation - Loadspace Scuff Plate Trim Panel
Special Tool(s) / General Equipment
| Interior Trim Remover |
Removal
NOTE: Removal steps in this procedure may contain installation details.
-
Remove the luggage compartment floor cover.
.jpg) |
-
Remove the RH loadspace storage compartment.
-
Remove the pin-type retainers.
Use the General Equipment: Interior Trim Remover
-
Lift upward and remove the RH loadspace storage compartment.
-
Remove the pin-type retainers.
.jpg) |
-
Remove the LH loadspace storage compartment.
-
Remove the pin-type retainer.
Use the General Equipment: Interior Trim Remover
-
Lift upward and remove the LH loadspace storage compartment.
-
Remove the pin-type retainer.
.jpg) |
-
Position the liftgate opening weather strip aside.
 |
-
Release the tabs and remove the liftgate striker cover.
Use the General Equipment: Interior Trim Remover
.jpg) |
-
Remove the loadspace tie down loops.
-
Position the loadspace tie down loop bolt cover up.
-
Remove the loadspace tie down loop bolt.
Torque: 48 lb.in (5.4 Nm)
-
Position the loadspace tie down loop bolt cover up.
.jpg) |
-
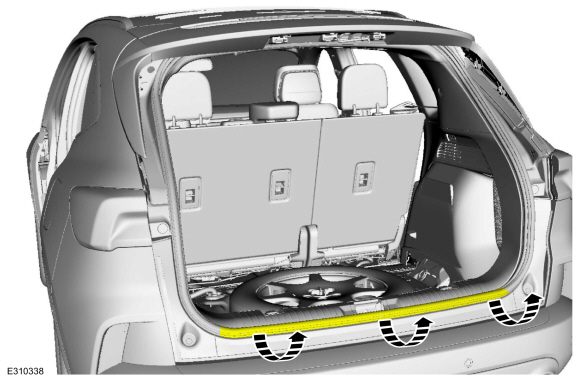
Remove the loadspace scuff plate trim panel bolts.
Torque: 9 lb.in (1 Nm)
.jpg) |
-
Release the clips and remove the loadspace scuff plate trim panel.
Use the General Equipment: Interior Trim Remover
.jpg) |
Installation
-
To install, reverse the removal procedure.
 Removal and Installation - Liftgate Trim Panel
Special Tool(s) /
General Equipment
Interior Trim Remover
Removal
Release the clips and remove the liftgate center upper trim panel...
 Removal and Installation - Loadspace Trim Panel
Special Tool(s) /
General Equipment
Interior Trim Remover
Removal
NOTE:
LH (left hand) shown, RH (right hand) similar.
Remove the rear scuff plate trim panel...
Other information:
Ford Escape 2020-2026 Owners Manual: Changing the Engine Air Filter - 1.5L EcoBoost™/2.0L EcoBoost™
WARNING: To reduce the risk of vehicle damage and personal burn injuries, do not start your engine with the air cleaner removed and do not remove it while the engine is running. When changing the air filter element, use only parts that meet or exceed our specifications...
Ford Escape 2020-2026 Service Manual: Removal and Installation - Rear Lamp Assembly
Special Tool(s) / General Equipment Interior Trim Remover Removal NOTE: Removal steps in this procedure may contain installation details. NOTE: Left hand side shown, right hand similar. Liftgate mounted rear lamp assemblies Remove the liftgate trim panel...
Categories
- Manuals Home
- 4th Generation Ford Escape Owners Manual
- 4th Generation Ford Escape Service Manual
- Plug-In Hybrid Electric Vehicle Drive Modes
- Opening and Closing the Hood
- Description and Operation - Identification Codes
- New on site
- Most important about car
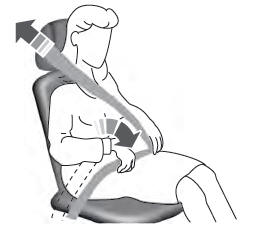
Adjusting the Seatbelts During Pregnancy
WARNING: Always ride and drive with your seatback upright and properly fasten your seatbelt. Fit the lap portion of the seatbelt snugly and low across the hips. Position the shoulder portion of the seatbelt across your chest. Pregnant women must follow this practice. See the following figure.
Copyright © 2026 www.fordescape4.com