Ford Escape 2020-2026 Service Manual / Body and Paint / Body and Paint / Body Closures / Removal and Installation - Rear Door
Ford Escape: Body Closures / Removal and Installation - Rear Door
Special Tool(s) / General Equipment
| Door Lift |
Removal
NOTE: Removal steps in this procedure may contain installation details.
NOTE: LH side shown, RH side similar.
-
Open the door.
.jpg) |
-
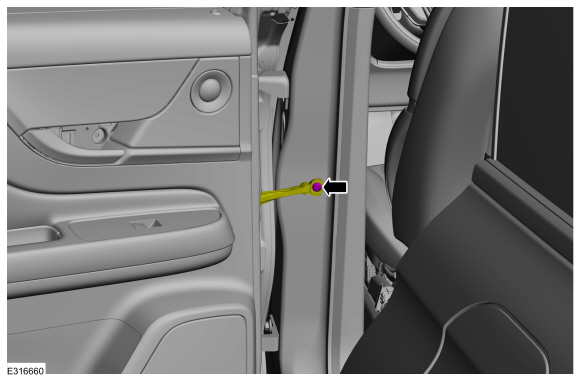
Remove the rear door check arm bolt.
Torque: 18 lb.ft (25 Nm)
.jpg) |
-
Disconnect the rear door electrical connectors.
.jpg) |
-
-
Remove the fastener.
Use the General Equipment: Door Lift
Torque: 22 lb.ft (30 Nm)
-
Remove the fastener.
Torque: 35 lb.ft (48 Nm)
-
Remove the fastener.
 |
-
Remove the door.
.jpg) |
Installation
-
To install, reverse the removal procedure.
-
NOTE: This step is only necessary when installing a new component.
Check the alignment and correct if necessary.
Refer to: Rear Door Alignment (501-03 Body Closures, General Procedures).
 Removal and Installation - Power Liftgate Motor
Special Tool(s) /
General Equipment
Pick Hook
Removal
NOTE:
Removal steps in this procedure may contain installation details.
Remove the LH C-pillar trim panel...
 Removal and Installation - Rear Door Check Arm
Removal
NOTE:
Removal steps in this procedure may contain installation details.
NOTE:
LH side shown, RH side similar.
Open the rear door...
Other information:
Ford Escape 2020-2026 Service Manual: Description and Operation - Body Repair Health and Safety and General Precautions
WARNING: Always refer to Material Safety Data Sheet (MSDS) when handling chemicals and wear protective equipment as directed. Examples may include but are not limited to respirators and chemically resistant gloves. Failure to follow these instructions may result in serious personal injury...
Ford Escape 2020-2026 Owners Manual: Keyless Entry Settings
Switching Keyless Entry On and Off Switch the ignition on using an original key that has not been created as a MyKey. Press Settings on the touchscreen. Press Vehicle Settings. Press Locks. Reprogramming the Unlocking Function You can enable two-stage unlocking function allowing you to unlock only the driver door when you touch the unlock sensor...
Categories
- Manuals Home
- 4th Generation Ford Escape Owners Manual
- 4th Generation Ford Escape Service Manual
- Locating the Pre-Collision Assist Sensors
- Description and Operation - Identification Codes
- Drive Modes
- New on site
- Most important about car
Symbols Glossary
These are some of the symbols you may see on your vehicle.
 Air conditioning system
Copyright © 2026 www.fordescape4.com