Ford Escape: Body Closures / General Procedures - Rear Door Alignment
Inspection
NOTE:
Removal steps in this procedure may contain installation details.
NOTE:
LH side shown, RH side similar.
-
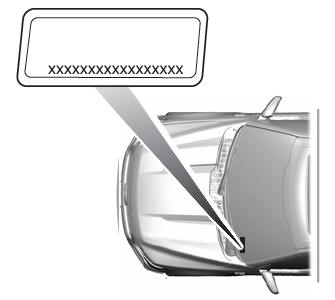
Inspect the body-to-rear door dimensions.
Adjustment
All alignments
-
Open the rear door.
-
Remove the fasteners and striker assembly.
Rear door in and out, up and down alignment
-
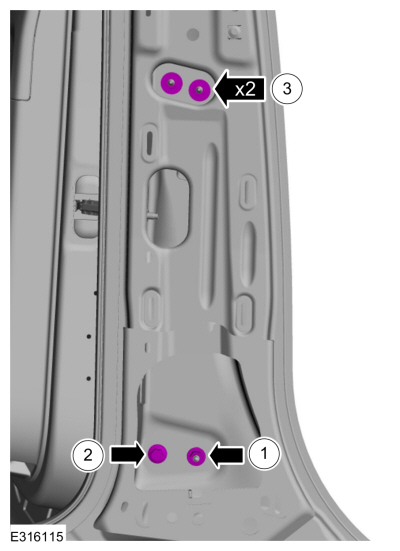
Loosen the fasteners to permit movement of the door.
Loosen:
:
2 turn(s)
-
Adjust the door as required.
-
Tighten the fasteners.
Torque:
35 lb.ft (48 Nm)
Rear door fore, aft and tilt alignment
-
Open the front door.
-
Remove the B-pillar trim panel
Refer to: B-Pillar Trim Panel (501-05 Interior Trim and Ornamentation, Removal and Installation).
-
Loosen the fasteners to permit movement of the door.
Loosen:
:
2 turn(s)
-
Carefully close the rear door.
-
Loosen the fasteners to permit movement of the door.
Loosen:
:
2 turn(s)
-
Carefully close the door.
-
Adjust the door as required.
-
Carefully open the front door.
-
Carefully open the rear door.
-
Tighten the fasteners.
Torque:
22 lb.ft (30 Nm)
-
Tighten the fastener.
Torque:
22 lb.ft (30 Nm)
All alignments
-
Install the striker assembly.
Torque:
18 lb.ft (25 Nm)
-
Inspect the body-to-rear door dimensions.
-
Install the removed components.
Programming
NOTE:
This procedure clears and then sets new open and close end points in the RGTM memory.
Turn the ignition ON.
Using a scan tool perform the RGTM self test to complete power liftgate
initialization...
Special Tool(s) /
General Equipment
Door Lift
Removal
NOTE:
Removal steps in this procedure may contain installation details.
NOTE:
LH shown, RH similar...
Other information:
General Specifications - Front
Item
Specification
Active park assist sensor azimuth system check object position 1 (P1) distance from sensor
50 cm (20 in) ± 10 cm (4 in)
Active park assist sensor azimuth system check
object position 2 (P2) and position 3 (P3) distance from sensor
391 cm (154 in) ± 20 cm (8 in)
..
System Operation
Item
Description
1
BCM
2
Roof Opening Panel Control Switch
3
Sliding Glass Motor / Module
4
Shade Motor
Roof Opening Panel Operating System
The accessory delay relay in the BCM
supplies voltage through fuse F6 (10A) to the sliding glass motor /
module allowing the motors to respond to roof opening panel control
sw..
.jpg)
.jpg)
.jpg)
.jpg)
.jpg)
.jpg)
.jpg)
.jpg)
.jpg)
.jpg)
.jpg)
.jpg)
.jpg)
.jpg)
 General Procedures - Power Liftgate Initialization
 Removal and Installation - Front Door