
Ford Escape 2020-2026 Service Manual / Body and Paint / Body and Paint / Interior Trim and Ornamentation / Removal and Installation - Front Scuff Plate Trim Panel
Ford Escape: Interior Trim and Ornamentation / Removal and Installation - Front Scuff Plate Trim Panel
Special Tool(s) / General Equipment
| Interior Trim Remover |
Removal
NOTE: LH (left hand) shown, RH (right hand) similar.
LH (left hand) Side
-
Remove the hood latch release handle.
Refer to: Hood Latch Release Handle (501-14 Handles, Locks, Latches and Entry Systems, Removal and Installation).
All vehicles
-
Release the clips and remove the lower cowl side trim panel.
Use the General Equipment: Interior Trim Remover
.jpg) |
-
Release the clips and remove the front scuff plate trim panel.
Use the General Equipment: Interior Trim Remover
.jpg) |
Installation
-
To install, reverse the removal procedure.
-
Inspect and position the front door weather strip lip so
that it overlaps the top of the front scuff plate and cowl side trim
panels.
.jpg) |
 Removal and Installation - Front Door Trim Panel
Special Tool(s) /
General Equipment
Pick Hook
Interior Trim Remover
Removal
NOTE:
LH (left hand) shown, RH (right hand) similar.
NOTE:
Removal steps in this procedure may contain installation details...
 Removal and Installation - Headliner
Special Tool(s) /
General Equipment
Pick Hook
Interior Trim Remover
Materials
Name
Specification
3M™ Super-Fast Repair Adhesive04747
-
Removal
Remove the following items:
On both sides...
Other information:
Ford Escape 2020-2026 Service Manual: Removal and Installation - Front Evaporator Shutoff Valve
Removal NOTICE: During the removal of components, cap, tape or otherwise appropriately protect all openings to prevent the ingress of dirt or other contamination. Remove protective materials prior to installation. NOTE: Removal steps in this procedure may contain installation details...
Ford Escape 2020-2026 Service Manual: Description and Operation - Electric Powertrain Control - Overview
Overview The center of the electric motor control system is a microprocessor called the Inverter System Controller (ISC), also known as the SOBDMC . The Inverter System Controller (ISC) receives inputs from sensors and other electronic components...
Categories
- Manuals Home
- 4th Generation Ford Escape Owners Manual
- 4th Generation Ford Escape Service Manual
- Plug-In Hybrid Electric Vehicle Drive Modes
- Rear View Camera
- All-Wheel Drive
- New on site
- Most important about car
Vehicle Identification
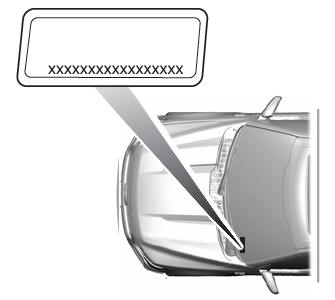
Locating the Vehicle Identification Number
The vehicle identification number is on the left-hand side of the instrument panel.

Copyright © 2026 www.fordescape4.com