Ford Escape: Instrument Panel and Console / Removal and Installation - Instrument Panel
Special Tool(s) /
General Equipment
Removal
NOTE:
Removal steps in this procedure may contain installation details.
-
Evacuate the refrigerant.
Refer to: Air Conditioning (A/C) System Recovery,
Evacuation and Charging - Vehicles With: R134A Refrigerant (412-00
Climate Control System - General Information)
.
Refer to: Air Conditioning (A/C) System Recovery,
Evacuation and Charging - Vehicles With: R1234YF Refrigerant (412-00
Climate Control System - General Information)
.
Refer to: Air Conditioning (A/C) System Recovery,
Evacuation and Charging - Hybrid Electric Vehicle (HEV), Vehicles With:
R134A Refrigerant (412-00 Climate Control System - General Information)
.
Refer to: Air Conditioning (A/C) System Recovery, Evacuation and
Charging - 2.5L Duratec – Hybrid (121kW/164PS) (BG) (412-00 Climate
Control System - General Information, General Procedures).
-
NOTICE:
Only use the specified material to lubricate the seals.
NOTE:
Make sure to cover any open ports to prevent debris from entering the system.
Remove the nut and remove the HVAC flange.
-
On installation, install and lubricate new O-ring
seals. Refer to the appropriate Specifications in Group 412.
Torque:
159 lb.in (18 Nm)
-
Pinch the hoses, remove the clamps and position aside.
-
Remove the wiper linkage assembly.
Refer to: Wiper Linkage Assembly (501-16 Wipers and Washers, Removal and Installation).
-
Remove the bolts.
Torque:
18 lb.ft (25 Nm)
-
Remove the driver side front door.
Refer to: Front Door (501-03 Body Closures, Removal and Installation).
-
Remove the front seats.
Refer to: Front Seat (501-10A Front Seats, Removal and Installation).
-
Remove the floor console.
Refer to: Floor Console (501-12 Instrument Panel and Console, Removal and Installation).
-
Remove the A-pillar trim panels.
Refer to: A-Pillar Trim Panel (501-05 Interior Trim and Ornamentation, Removal and Installation).
-
NOTE:
Right hand A-pillar.
Disconnect the electrical connector.
-
Release the clips and remove the trim panel.
Use the General Equipment: Interior Trim Remover
-
Release the clips and remove the RH instrument panel end cap.
-
Release the clips and remove the RH scuff plate.
-
NOTE:
Left hand A-pillar.
Disconnect the electrical connector.
-
Release the clips and remove the trim panel.
Use the General Equipment: Interior Trim Remover
-
Release the clips and remove the LH instrument panel end cap.
-
Remove the hood latch release handle.
-
Rotate the hood latch release handle.
-
NOTE:
Do not remove the retaining clip from the hood latch release handle.
Release the retaining clip.
-
Remove the hood latch release handle.
-
-
Release the clips at the front of the LH scuff plate.
-
Release the lower clips and remove the LH scuff plate.
-
NOTE:
Right hand side.
Release the clips and remove the lower insulation panel.
-
NOTE:
Right hand side.
Release the clips and remove the trim panel.
Use the General Equipment: Interior Trim Remover
-
Remove the retainers and remove the foam pad.
-
Disconnect the electrical connectors and release the harness retainers.
-
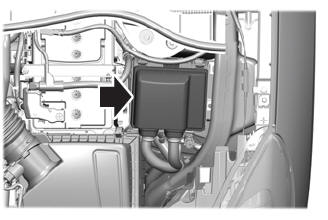
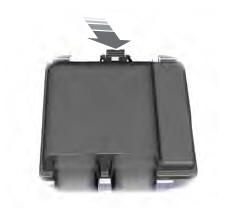
Release the clips and remove the BCM .
-
Remove the nut.
Torque:
62 lb.in (7 Nm)
-
NOTE:
Lower right hand side.
Disconnect the electrical connectors.
-
Remove the cover, the nut and foot rest pad.
Use the General Equipment: Interior Trim Remover
Torque:
48 lb.in (5.4 Nm)
-
Remove the pushpins and position the carpet rearward.
-
-
Remove the cover.
-
Lift the cable and strap upward and reward to disengage from the lower trim panel.
-
NOTICE:
Do not allow the steering wheel to rotate while the
steering column shaft is disconnected or damage to the clockspring may
result. If there is evidence that the shaft has rotated, remove and
recenter the clockspring
Secure the steering wheel.
-
.jpg) WARNING:
Do not reuse steering column shaft bolts. This may
result in fastener failure and steering column shaft detachment or loss
of steering control. Failure to follow this instruction may result in
serious injury to vehicle occupant(s).
WARNING:
Do not reuse steering column shaft bolts. This may
result in fastener failure and steering column shaft detachment or loss
of steering control. Failure to follow this instruction may result in
serious injury to vehicle occupant(s).
-
Remove and discard the steering shaft coupler retainer.
Torque:
Stage 1:
35 lb.ft (48 Nm)
Stage 2:
120°
-
Separate the steering column shaft from the steering column.
-
NOTE:
Lower left hand side.
Disconnect the electrical connectors, and detach the harness retainers.
-
NOTE:
Left hand door opening.
-
Remove the bolt.
Torque:
18 lb.ft (25 Nm)
-
Disconnect the electrical connectors, release the hanress retainers and position the harness aside.
-
Remove the nuts and the bracket.
Torque:
18 lb.ft (25 Nm)
-
Remove the nuts and the bracket.
Torque:
18 lb.ft (25 Nm)
-
Remove the HVAC ducts.
-
NOTE:
Leave the top bolt finger tight until ready to remove the instrument panel.
Remove the bolts.
Torque:
35 lb.ft (47.5 Nm)
-
NOTE:
Leave the top bolt finger tight until ready to remove the instrument panel.
Remove the bolts.
Torque:
35 lb.ft (47.5 Nm)
-
NOTE:
To avoid damaging the instrument panel, an assistant is required when carrying out this step.
NOTE:
Make sure not to damage the instrument panel when removing the instrument panel from the vehicle.
NOTE:
Make sure that all electrical connectors and wiring
are not hindered before removing the instrument panel or damage to the
components may occur.
Remove the instrument panel through the driver door opening.
Installation
-
To install, reverse the removal procedure.
-
On installation, make sure the cowl clips are properly
aligned to the cowl extension before fully seating the instrument panel
in place. The outer fingers must be above, and the lower finger below
the cowl extension for proper retention.
-
Fill and bleed the cooling system.
Refer to: Engine Cooling System Draining, Vacuum Filling and Bleeding
(303-03A Engine Cooling - 1.5L EcoBoost (132kW/180PS) – I3 (Y1), General
Procedures).
Refer to: Engine Cooling System Draining, Vacuum Filling and Bleeding
(303-03B Engine Cooling - 2.0L EcoBoost (177kW/240PS) – MI4, General
Procedures).
Refer to: Engine Cooling System Draining, Vacuum Filling and Bleeding (303-03C Engine Cooling, General Procedures).
Refer to: Cooling System Filling and Bleeding (303-03D Electric
Powertrain Cooling - Hybrid Electric Vehicle (HEV), General Procedures).
Removal
Open the glove compartment and remove the check strap.
Fully lower the glove compartment.
Lift glove compartment off hinge piviot...
Special Tool(s) /
General Equipment
Interior Trim Remover
Removal
NOTE:
Removal steps in this procedure may contain installation details...
Other information:
Argentina
Brazil
Djibouti
European Union EU
Ghana
Jordan
Mauritania
Mexico
Moldova
Morocco
Nigeria
Oman
Pakistan
Paraguay
NR: 2018-06-I-000224
Philippines
Russia
Serbia
Singapore
South Africa
South Korea
R-CRM-SRD-AG2SM4
Taiwan
Ukraine
United Arab Emirates (U...
WARNING: Do not place a
rearward facing child restraint in front of
an active airbag. Failure to follow this
instruction could result in personal injury
or death.
Children must always be properly
restrained. Accident statistics suggest that
children are safer when properly restrained
in the rear seating positions than in the
front seating position...
.jpg)
.jpg)
.jpg)
.jpg)
.jpg)
.jpg)
.jpg)
.jpg)
.jpg)
.jpg)
.jpg)
.jpg)
.jpg)
.jpg)
.jpg)
.jpg)
.jpg)
.jpg)
.jpg)
.jpg)
.jpg)
.jpg)
.jpg)
.jpg)
.jpg)
.jpg)
.jpg)
.jpg)
.jpg)
.jpg)
.jpg)
.jpg)
.jpg)
 Removal and Installation - Glove Compartment
 Removal and Installation - Instrument Panel Upper Section